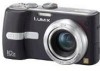
Panasonic DMC TZ1 Digital Still Camera - English/ Spanish - Page 10
DISPLAY/LCD MODE] button P37, Camera ON/OFF switch P11 - digital camera
 |
UPC - 037988985524
View all Panasonic DMC TZ1 manuals
Add to My Manuals
Save this manual to your list of manuals |
Page 10 highlights
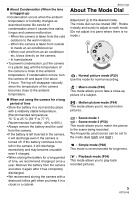
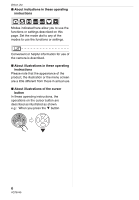
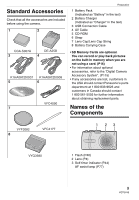
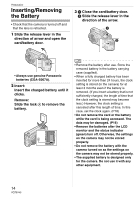
Preparation 4 56 17 18 DIGITAL AV OUT 19 DC IN 20 7 89 4 LCD monitor (P37, 99) 5 Status indicator (P22) 6 Cursor buttons 2/Self-timer button (P44) 4/[REV] button (P33) 1/Flash setting button (P40) 3/Exposure compensation (P45)/Auto bracket (P46)/White balance fine adjustment (P71)/Backlight compensation in simple mode (P29) button 7 [DISPLAY/LCD MODE] button (P37, 39) 8 Single or burst mode (P48)/ Delete (P35) button 9 [MENU/SET] button (P19) 10 11 12 17 Lens barrel 18 Terminal door 19 [DIGITAL/AV OUT] Socket (P92, 95, 98) 20 [DC IN] Socket (P92, 95) • Always use a genuine Panasonic AC adaptor (DMW-AC5; optional). • This camera cannot charge the battery even though the AC adaptor (DMW-AC5; optional) is connected to it. 21 21 Lens cap/Strap eyelet (P17) 22 23 13 14 15 16 10 Speaker (P69) 11 Zoom lever (P30) 12 Optical image stabilizer button (P47) 13 Microphone (P64, 74, 86) 14 Mode dial (P5) 15 Shutter button (P25, 64) 16 Camera ON/OFF switch (P11, 18) 24 22 Release lever (P14, 15) 23 Card/Battery door (P14, 15) 24 Tripod receptacle • When you use a tripod, make sure the tripod is stable when the camera is attached to it. 10 VQT0V40
-
 1
1 -
2
-
3
-
4
-
 5
5 -
 6
6 -
 7
7 -
 8
8 -
 9
9 -
 10
10 -
 11
11 -
 12
12 -
 13
13 -
 14
14 -
 15
15 -
16
-
17
-
18
-
19
-
20
-
21
-
22
-
23
-
24
-
25
-
26
-
27
-
28
-
29
-
30
-
31
-
32
-
33
-
34
-
35
-
36
-
37
-
38
-
39
-
40
-
41
-
42
-
43
-
44
-
45
-
46
-
47
-
48
-
49
-
50
-
51
-
52
-
53
-
54
-
55
-
56
-
57
-
58
-
59
-
60
-
61
-
62
-
63
-
64
-
65
-
66
-
67
-
68
-
69
-
70
-
71
-
72
-
73
-
74
-
75
-
76
-
77
-
78
-
79
-
80
-
81
-
82
-
83
-
84
-
85
-
86
-
87
-
88
-
89
-
90
-
91
-
92
-
93
-
94
-
95
-
96
-
97
-
98
-
99
-
100
-
101
-
102
-
103
-
104
-
105
-
106
-
107
-
108
-
109
-
110
-
111
-
112
-
113
-
114
-
115
-
116
-
117
-
118
-
119
-
120
-
121
-
122
-
123
-
124
 |
 |
