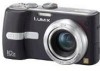
Panasonic DMC TZ1 Digital Still Camera - English/ Spanish - Page 19
About The Setup Menu - reset
 |
UPC - 037988985524
View all Panasonic DMC TZ1 manuals
Add to My Manuals
Save this manual to your list of manuals |
Page 19 highlights
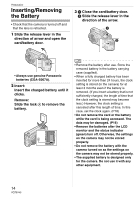
• Refer to [WORLD TIME] (P61) for information about setting the local time at the travel destination area. 3 Press [MENU/SET] several times to close the menu. • Turn the camera off after finishing setting the clock. Then turn it on and check that the clock setting is correct. ∫ Changing the clock setting 1 Press [MENU/SET] to display the menu and then press 2. 2 Press 4 to select the [SETUP] menu icon [ ] and then press 1. 3 Press 3/4 to select [CLOCK SET] and then press 1. Set as shown previously. SETUP 1/4 CLOCK SET WORLD TIME MONITOR n0 TRAVEL DATE OFF AUTO REVIEW 1SEC. SELECT EXIT MENU • When a fully charged battery has been inserted for more than 24 hours, the clock setting is stored (in the camera) for at least 3 months even if the battery is removed. • You can set the year from 2000 to 2099. The 24-hour system is used. • If the date is not set in the camera it will not be printed when you use a photo printing service, even if the store provides a date printing option for your photographs. (P85) Preparation About the Setup Menu • Set items as required. (Refer to P20 to 24 for each menu item.) • Menu items differ depending on the mode selected with the mode dial (P5). The following example shows how to set [BEEP] when normal picture mode [ ] is selected. • Select [RESET] to return the settings to the initial settings at the time of purchase. (P23) 1 Press [MENU/SET] and then press 2. REC 1/3 W.BALANCE AUTO SENSITIVITY AUTO ASPECT RATIO PICT.SIZE QUALITY SELECT EXIT MENU MENU SET 2 Press 4 to select the [SETUP] menu icon [ ] and then press 1. SETUP 1/4 CLOCK SET WORLD TIME MONITOR n0 TRAVEL DATE OFF AUTO REVIEW 1SEC. SELECT EXIT MENU 19 VQT0V40
-
 1
1 -
2
-
3
-
4
-
5
-
6
-
7
-
8
-
9
-
10
-
11
-
12
-
13
-
 14
14 -
 15
15 -
 16
16 -
 17
17 -
 18
18 -
 19
19 -
 20
20 -
 21
21 -
 22
22 -
 23
23 -
 24
24 -
25
-
26
-
27
-
28
-
29
-
30
-
31
-
32
-
33
-
34
-
35
-
36
-
37
-
38
-
39
-
40
-
41
-
42
-
43
-
44
-
45
-
46
-
47
-
48
-
49
-
50
-
51
-
52
-
53
-
54
-
55
-
56
-
57
-
58
-
59
-
60
-
61
-
62
-
63
-
64
-
65
-
66
-
67
-
68
-
69
-
70
-
71
-
72
-
73
-
74
-
75
-
76
-
77
-
78
-
79
-
80
-
81
-
82
-
83
-
84
-
85
-
86
-
87
-
88
-
89
-
90
-
91
-
92
-
93
-
94
-
95
-
96
-
97
-
98
-
99
-
100
-
101
-
102
-
103
-
104
-
105
-
106
-
107
-
108
-
109
-
110
-
111
-
112
-
113
-
114
-
115
-
116
-
117
-
118
-
119
-
120
-
121
-
122
-
123
-
124
 |
 |
