Panasonic DMPB100 DMPB100 User Guide - Page 10
Adjusting the LCD screen, angle, Preparing the Power Supply, Using the unit connected to - battery pack
 |
UPC - 885170000469
View all Panasonic DMPB100 manuals
Add to My Manuals
Save this manual to your list of manuals |
Page 10 highlights
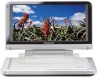
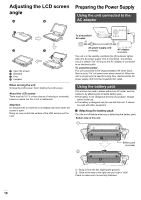
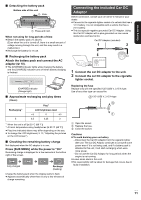
Adjusting the LCD screen angle Preparing the Power Supply Using the unit connected to the AC adaptor A Open the screen. B Standard C Free D Compact When moving the unit: ≥ Close the LCD screen. Don't hold by the LCD screen. About the LCD screen There may be 0.01 % or less chance of missing or constantly turned on pixels, but this is not a malfunction. Attention Do not place the unit with the LCD display-side down when the screen is open. Doing so may scratch the surface of the LCD and around the LCD. To a household AC outlet 3 1 2 AC power supply cord (included) AC adaptor (included) The unit is in the standby condition (the [Í] indicator lights) when the AC power supply cord is connected. The primary circuit is always "live" as long as the AC adaptor is connected to an electrical outlet. To conserve power This unit consumes 0.5 W (Approximately 5 W when Quick Start is set to "On") of power even when turned off. When the unit is not going to be used for a long time, disconnect the AC power supply cord from the household AC outlet. Using the battery pack This unit can be used in places without an AC outlet, such as outdoors, by attaching the included battery pack. ≥ The battery is not charged at the time of purchase. Charge before initial use. ≥ The battery is designed only for use with this unit. It cannot be used with other equipment. ∫ Attaching the battery pack Turn the unit off before attaching or detaching the battery pack. Bottom side of this unit RELEASE DETACH ATTACH RELEASE DETACH ATTACH Battery pack (included) 1 Bring in from the left, aligning the grooves. 2 Slide all the way to the right until you hear a "click". Check to make sure it is securely fastened. VQT2H71 10
-
 1
1 -
2
-
3
-
4
-
 5
5 -
 6
6 -
 7
7 -
 8
8 -
 9
9 -
 10
10 -
 11
11 -
 12
12 -
 13
13 -
 14
14 -
 15
15 -
16
-
17
-
18
-
19
-
20
-
21
-
22
-
23
-
24
-
25
-
26
-
27
-
28
-
29
-
30
-
31
-
32
-
33
-
34
-
35
-
36
 |
 |
