Panasonic DMPB100 DMPB100 User Guide - Page 13
Adjusting the pictures on, the LCD screen, Loading the disc or SD, SD card
 |
UPC - 885170000469
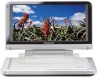
View all Panasonic DMPB100 manuals
Add to My Manuals
Save this manual to your list of manuals |
Page 13 highlights
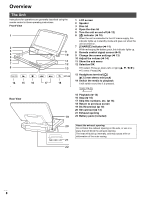
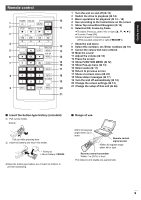
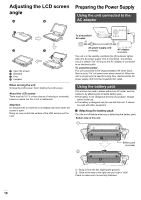
Getting started Adjusting the pictures on the LCD screen 1 Press [LCD MENU]. ≥ It is also possible to display with the following procedures. 1 Press [SUB MENU]. 2 Select "Other Functions" with [3, 4], and select [OK]. 3 Select "LCD Menu" with [3, 4], and select [OK]. LCD Menu Picture Brightness Color Tint Dynamic SUB MENU RETURN 2 Select the item with [3, 4]. 3 Change the setting with [3, 4, 2, 1]. Picture:Adjusting image quality ! Standard: ! Dynamic: ! Night: ! User Standard Picture with high contrast Picture suitable for viewing in dark places jBrightness: s5 to r5 jColor: s5 to r5 jTint: s5 to r5 ≥ Underlined items are the factory presets. To exit the screen Press [EXIT]. Loading the disc or SD card Disc 1 Press [OPEN]. 2 Set the disc and close the lid. ≥ Set the disc securely until you hear a "click", with the label side up. (Double-sided disc: place the label side up that you want to play back) ≥ Some discs may start playing when it is loaded with the unit turned on. ≥ About discs with a cartridge jDVD-RAM, DVD-R: Remove the disc from the cartridge and set the disc in the tray. Cartridge discs cannot be used. jPlace the disc back into the cartridge for storage to prevent dirt and scratches after use. ≥ Do not touch the lens as it may make it dirty. Lens (A) SD card 1 Open the cover at the side of the unit. 2 Insert the SD card into the SD card slot. ≥ With the label side up, insert the card straight in the direction shown in the figure, until you hear a sound. 3 Close the cover. To remove the card In step 2 above, press the center of the card until it "clicks", and pull the card out straight. V QT 2H71 13
-
 1
1 -
2
-
3
-
4
-
5
-
6
-
7
-
 8
8 -
 9
9 -
 10
10 -
 11
11 -
 12
12 -
 13
13 -
 14
14 -
 15
15 -
 16
16 -
 17
17 -
 18
18 -
19
-
20
-
21
-
22
-
23
-
24
-
25
-
26
-
27
-
28
-
29
-
30
-
31
-
32
-
33
-
34
-
35
-
36
 |
 |
