Panasonic DMPB100 DMPB100 User Guide - Page 8
Overview, The Unit - battery
 |
UPC - 885170000469
View all Panasonic DMPB100 manuals
Add to My Manuals
Save this manual to your list of manuals |
Page 8 highlights
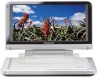
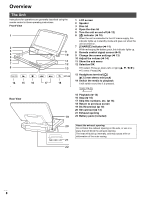
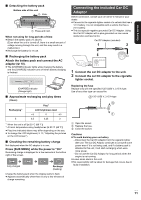
Overview The Unit Instructions for operations are generally described using the remote control in these operating instructions. Front View 1 2 3 9 4 10 5 6 11 7 12 8 13 DISC/SD RETURN 14 15 16 17 18 Rear View 19 1 LCD screen 2 Speaker 3 Disc lid 4 Open the disc lid 5 Turn the unit on and off (> 12) 6 [Í] indicator (> 10) When the unit is connected to the AC mains supply, this indicator lights up in standby mode and goes out when the unit is turned on. 7 [CHARGE] indicator (> 11) While recharging the battery pack, this indicator lights up. 8 Remote control signal sensor (> 9) 9 Change the screen settings (> 13) 10 Adjust the volume (> 14) 11 Show the sub menu 12 Selection/OK ≥ To select: Press up, down, left, or right ([3, 4, 2, 1]) ≥ To enter: Press [OK] 13 Headphone terminal [Ë] (‡ 3.5 mm stereo mini jack) 14 Switch the media to playback It will switch every time it is pressed. DISC SD 15 Playback (> 14) 16 Stop (> 16) 17 Skip title numbers, etc. (> 16) 18 Return to previous screen 19 DC IN terminal (> 10) 20 SD card slot (> 13) 21 Exhaust opening 22 Battery pack (included) 20 About the exhaust opening: Do not block the exhaust opening on the side, or use in a place that will block the exhaust opening. The heat will build up internally, and may cause a fire or deformation of the outer casing. 21 22 VQT2H71 8
-
 1
1 -
2
-
 3
3 -
 4
4 -
 5
5 -
 6
6 -
 7
7 -
 8
8 -
 9
9 -
 10
10 -
 11
11 -
 12
12 -
 13
13 -
14
-
15
-
16
-
17
-
18
-
19
-
20
-
21
-
22
-
23
-
24
-
25
-
26
-
27
-
28
-
29
-
30
-
31
-
32
-
33
-
34
-
35
-
36
 |
 |
