Panasonic DMRE60 DMRE60 User Guide - Page 14
Recording, Recording Television Programs, Ch] To Select
 |
View all Panasonic DMRE60 manuals
Add to My Manuals
Save this manual to your list of manuals |
Page 14 highlights
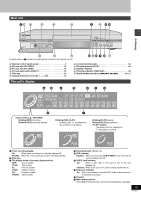
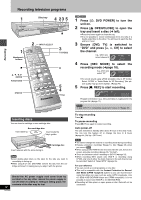
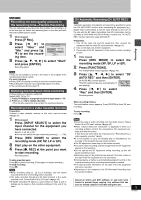
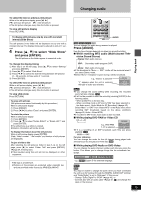
Recording Recording television programs 1 Disc tray 4 23 5 1 Numbered buttons ? 3, 4, 2, 1 ENTER FUNCTIONS STATUS ? 2 INPUT SELECT 3 TV/VIDEO ; 5 4 F Rec Inserting discs You can insert a cartridge or non-cartridge disc. Non-cartridge disc Insert label-up. Insert inside the tray's guides. Insert label-up with the arrow facing in. Cartridge disc [Note] ≥Load double-sided discs so the label for the side you want to record/play is facing up. ≥When using 8 cm (3″) DVD-RAM, remove the disc from the cartridge and insert it, making sure you align it with the groove. Should the AC power supply cord come loose by accident or for any other reason the power supply is cut off while recording or editing is taking place, the contents of the disc may be lost. 14 RQT6981 [RAM] [DVD-R] 1 Press [Í, DVD POWER] to turn the unit on. 2 Press [< OPEN/CLOSE] to open the tray and insert a disc (➜ left). ≥Press the button again to close the tray. ≥It is not possible to record continuously from one side of a double sided disc to the other. You will need to eject the disc and turn it over. 3 Ensure [DVD, TV] is switched to "DVD" and press [W, X, CH] to select the channel. e.g., when you select channel 4 DVD-RAM SP CH 4 Press [REC MODE] to select the recording mode (➜page 10). e.g., when you select "XP" DVD-RAM XP CH ≥To record sound using LPCM (possible only in XP mode): Select "LPCM" in "Audio Mode for XP Recording" (the picture quality may go down slightly). (➜page 45) 5 Press [¥, REC] to start recording. REC DVD-RAM XP PG CH Program information (e.g., time and date) is registered in the program list (➜page 17). [DVD-R] To play DVD-R on compatible equipment, finalize it (➜page 38). To stop recording Press [∫]. To pause recording Press [;]. Press again to restart recording. Auto power-off The unit switches to standby after about 6 hours in the stop mode. You can turn this feature off or change the time to 2 hours (➜page 44, Set Up-Off Timer). [Note] ≥You cannot change the channel or recording mode during recording. ≥Release protection (cartridge ➜page 10, disc ➜page 38) when you record. [RAM] ≥When using a DVD-RAM for the first time with this unit, format it to ensure accurate recording (➜page 38, "Format"). ≥There are limitations when recording to DVD-R (➜page 10). ≥When recording MTS sound onto DVD-R or recording using LPCM, only one of either the main channel or the sub channel can be recorded. Select at "Select MTS" (➜page 45). For your reference ≥You can record up to 99 programs on one disc. ≥This unit is compatible with the Content Protection for Record- able Media (CPRM ➜page 54) system so you can record broadcasts that allow one copy, such as some CATV broadcasts, onto 4.7 GB/9.4 GB DVD-RAM (these are CPRM compatible). It is not possible to record onto DVD-R or 2.8 GB DVD-RAM. ≥Recording will take place on open space on disc. Data will not be overwritten.
-
 1
1 -
2
-
3
-
4
-
5
-
6
-
7
-
8
-
 9
9 -
 10
10 -
 11
11 -
 12
12 -
 13
13 -
 14
14 -
 15
15 -
 16
16 -
 17
17 -
 18
18 -
 19
19 -
20
-
21
-
22
-
23
-
24
-
25
-
26
-
27
-
28
-
29
-
30
-
31
-
32
-
33
-
34
-
35
-
36
-
37
-
38
-
39
-
40
-
41
-
42
-
43
-
44
-
45
-
46
-
47
-
48
-
49
-
50
-
51
-
52
-
53
-
54
-
55
-
56
-
57
-
58
-
59
-
60
-
61
-
62
-
63
-
64
 |
 |
