Panasonic DMRE60 DMRE60 User Guide - Page 18
PLAYING STILL PICTURES, Press [FUNCTIONS]., Press, select JPEG and press, ENTER].
 |
View all Panasonic DMRE60 manuals
Add to My Manuals
Save this manual to your list of manuals |
Page 18 highlights
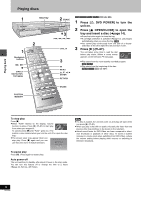
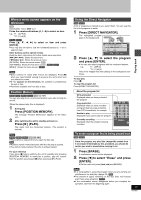
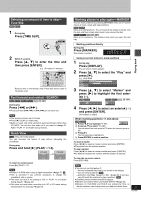
Playing still pictures [SD/CARD] [RAM] Inserting/Removing the SD/PC card Only insert or remove the SD/PC card after turning the unit off. When the card indicator ("SD" or "CARD") on the unit display is flashing, the card is being read from or written to. Do not turn off the power or remove the card. Such action may result in malfunction or loss of the card's contents. ∫ SD card slot ≥Inserting the card Card 3 Lift Click into place flush with card 1 2 Insert label up with cut-off corner facing in. Insert straight-in until it fits into place. Press down ≥Removing the card DVD POWER TV DVD TV Numbered buttons VCR Plus+ OPEN/CLOSE INPUT SELECT TV/VIDEO 12 45 78 CANCEL 0 SKIP 3 CH 6 VOLUME 9 100 SLOW/SEARCH STOP PAUSE PLAY/x1.3 3, 4, 2, 1 ENTER FUNCTIONS DIRECT NAVIGATOR PLAY LIST TOP MENU ENTER MENU FUNCTIONS RETURN FRAME CM SKIP TIME SLIP PROG/CHECK ADD/DLT ERASE REC STATUS MARKER F Rec REC MODE DISPLAY POSITION MEMORY AUDIO SETUP RETURN ERASE Playing back 2 Press on the center of the card. 1 Press down ≥Raise the guard after removing the card. ∫ PC card slot ≥Inserting the card Hold the edge of the card and insert until it fits into place. Do not press directly on the memory card. 2 2 Align to match the mark Terminal connections 1 facing into the unit The labeled side facing upwards ≥Removing the card 1 Push 2 Eject button comes out 3 Push again ≥If using the adapter, remove the adapter and card together. ≥If the eject button does not come out To remove the PC card, press the card in once more and then repeat steps 1-3. ≥It is not possible to open the disc tray while the still pictures screen is displayed. 18 RQT6981 1 While stopped Press [FUNCTIONS]. The FUNCTIONS window appears (➜page 42). 2 Press [3, 4, 2, 1] to select "JPEG" and press JPEG [ENTER]. 3 Select the still picture folder for dis- play. 1 Press [3, 4] to select "INPUT" and press [ENTER]. (A list of the folders in the drive appears.) 2 Press [2] and [3, 4] to select the drive and press [1]. 3 Press [3, 4] to select the folder and press [ENTER]. Displaying still pictures (Album Display) You can display a list of still pictures or display pictures one by one. 4 Press [3, 4] to select "Album" and press [ENTER]. A list of the still pictures in the folder appears. ≥If there are more than 10 still pictures, press [3, 4, 2, 1] to select "Next" and press [ENTER]. Select "Prev." to move back. ≥You can also select a page of still pictures with the numbered buttons. e.g., "5": [0] ➜[0] ➜ [5] JPEG ALBUM INPUT SD card 100_PANA 0001 0002 0003 Select Page 0 -9 SELECT ENTER RETURN 0004 ---Prev. ---- ---1 / 1 ---- ---Next "15": [0] ➜[1] ➜ [5] To display still pictures one by one Press [3, 4, 2, 1] to select a still picture and then [ENTER].
-
 1
1 -
2
-
3
-
4
-
5
-
6
-
7
-
8
-
9
-
10
-
11
-
12
-
 13
13 -
 14
14 -
 15
15 -
 16
16 -
 17
17 -
 18
18 -
 19
19 -
 20
20 -
 21
21 -
 22
22 -
 23
23 -
24
-
25
-
26
-
27
-
28
-
29
-
30
-
31
-
32
-
33
-
34
-
35
-
36
-
37
-
38
-
39
-
40
-
41
-
42
-
43
-
44
-
45
-
46
-
47
-
48
-
49
-
50
-
51
-
52
-
53
-
54
-
55
-
56
-
57
-
58
-
59
-
60
-
61
-
62
-
63
-
64
 |
 |
