Panasonic DMRE60 DMRE60 User Guide - Page 6
Step 2 The Remote Control, Step 3 Plug-in Auto Tuning
 |
View all Panasonic DMRE60 manuals
Add to My Manuals
Save this manual to your list of manuals |
Page 6 highlights
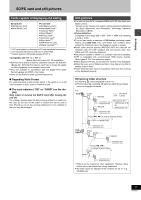
Setting up 2 STEP The remote control Batteries Opening the rear cover. 1 Press with your finger Closing the rear cover. PUSH PUSH 2 +- 3 + R6/LR6, AA, UM-3 Slide into place. When the cover comes off 1 PUSH 2 ≥Insert so the poles (i and j) match those in the remote control. ≥Do not use rechargeable type batteries. Do not: ≥mix old and new batteries. ≥use different types at the same time. ≥heat or expose to flame. ≥take apart or short circuit. ≥attempt to recharge alkaline or manganese batteries. ≥use batteries if the covering has been peeled off. Mishandling of batteries can cause electrolyte leakage which can damage items the fluid contacts and may cause a fire. Remove if the remote control is not going to be used for a long period of time. Store in a cool, dark place. [Note] If you cannot operate the unit or television using the remote control after changing the batteries, please re-enter the codes (television ➜page 9, main unit ➜page 46). Use Remote control signal sensor 20x 30x 20x 30x 7 m (23 feet) directly in front of the unit 3 STEP Plug-in Auto Tuning Í, DVD POWER Numbered buttons DVD POWER TV DVD TV VCR Plus+ OPEN/CLOSE INPUT SELECT TV/VIDEO 12 45 78 CANCEL 0 SKIP 3 CH 6 VOLUME 9 100 SLOW/SEARCH STOP PAUSE PLAY/x1.3 W, X, CH 3, 4, 2, 1 ENTER ADD/DLT DIRECT NAVIGATOR PLAY LIST TOP MENU ENTER MENU FUNCTIONS RETURN FRAME CM SKIP TIME SLIP PROG/CHECK ADD/DLT ERASE REC STATUS MARKER F Rec REC MODE DISPLAY POSITION MEMORY AUDIO SETUP RETURN SETUP POWER, Í/I X,W, CH After plugging the unit into your household AC outlet and pressing [Í, DVD POWER] to turn the unit on for the first time, the unit assists you to set the menu language, and automatically tunes in all the channels it can receive and sets the clock. The unit automatically determines the type of transmission (air or cable) and puts them into channels as follows. TV Mode (Air) CATV Mode (Cable) Band VHF UHF VHF CATV LOW BAND CATV MID/SUPER BAND CATV HYPER BAND ULTRA BAND SPECIAL CATV CHANNEL Channel 2s13 14s69 2s13 95s99 14s36 37s65 66s94 100s125 1 6 RQT6981
-
 1
1 -
 2
2 -
 3
3 -
 4
4 -
 5
5 -
 6
6 -
 7
7 -
 8
8 -
 9
9 -
 10
10 -
 11
11 -
 12
12 -
13
-
14
-
15
-
16
-
17
-
18
-
19
-
20
-
21
-
22
-
23
-
24
-
25
-
26
-
27
-
28
-
29
-
30
-
31
-
32
-
33
-
34
-
35
-
36
-
37
-
38
-
39
-
40
-
41
-
42
-
43
-
44
-
45
-
46
-
47
-
48
-
49
-
50
-
51
-
52
-
53
-
54
-
55
-
56
-
57
-
58
-
59
-
60
-
61
-
62
-
63
-
64
 |
 |
