Panasonic DVD-S35S Dvd Player - Page 17
Advanced operations, Unit information
 |
UPC - 037988406722
View all Panasonic DVD-S35S manuals
Add to My Manuals
Save this manual to your list of manuals |
Page 17 highlights
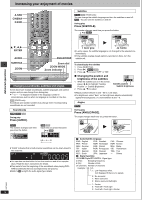
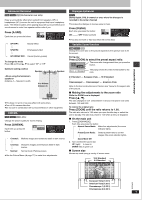
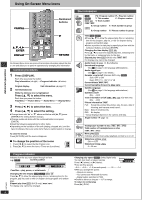
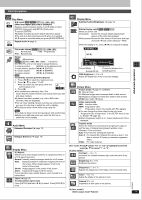
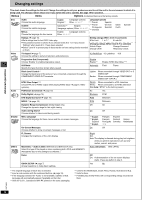
Unit information Play Menu A-B repeat [RAM] [DVD-V] [VCD] [CD] [WMA] [MP3] (When the elapsed play time is displayed) Repeat a section between points A and B within an item. [ENTER] (start point) ➜ [ENTER] (finish point) To cancel: [ENTER] ≥Subtitles recorded around A and B may fail to appear. ≥The end of an item becomes point B when it is reached. ≥A-B repeat is canceled when you press [QUICK REPLAY]. Repeat mode (➜ page 9) Display Menu Subtitle Position/Brightness (➜ page 14) Bitrate Display on/off [RAM] [DVD-V] [VCD] When you select "ON": During play: Shows the average bitrate (approximate values) of the video being played While paused: Shows the data volume of the frame and type of picture (➜ back cover, Glossary-I/P/B) While the display is on, press [2, 1] to change the display: Advanced operations Play mode display [DVD-V] [VCD] [CD] [WMA] [MP3] ---: Normal play PGM: Program play RND: Random play Marker [RAM] : 999 positions [DVD-V] [VCD] [CD] [WMA] [MP3] [JPEG] : 5 positions [ENTER] (The unit is now ready to accept markers.) To mark a position: [ENTER] (at the desired point) To mark another position: [2, 1] ➜ [ENTER] To recall a marker: [2, 1] ➜ [ENTER] To erase a marker: [2, 1] ➜ [CANCEL] [RAM] To mark the eleventh point and beyond 1. Press [2, 1] to select the marker pin icon. 2. Press [3, 4] to select "11-20". ≥You can select the next group when the current group is full. 3. Press [1]. 1-10 ≥The markers are ordered by time. This means that the marker numbers can change when you add and erase markers. ≥If places have been marked (e.g., with a DVD video recorder), they are displayed. ≥You can clear existing markers, but they are restored when you open the disc tray or switch the unit to standby. ≥This feature doesn't work while using a play list. [Note] ≥This feature doesn't work during program and random play. ≥Markers you add clear when you open the disc tray or switch the unit to standby. Audio Menu Advanced Surround (➜ page 15) Dialogue Enhancer (➜ page 15) 9.438 Mbps e l [2, 1] u Bitrate Cur. 7.507 Mbps Ave. 6.730 Mbps 5.0 Mbps Current bitrate Average bitrate A record of bitrates for a sampling period. OSD Brightness (j3 to i3) Adjust the brightness of the on-screen displays. Picture Menu Picture mode (➜ page 15, CINEMA) N: Normal mode C1:Mellows images and enhances detail in dark scenes C2:Sharpens images and enhances detail in dark scenes U1/U2:User mode (➜ below) Video output mode 480I: Interlace video 480P: Progressive video (¢: Progressive output not possible with PAL signals) ≥You can change the video output mode only when "Progressive Out (Component)" in the SETUP menu is set to "Enable" (➜ page 18). ≥When progressive output is on, closed captions will not be displayed. Transfer mode Select the method of conversion for progressive output to suit the type of material being played (➜ Back cover, Glossary-Film and video). Auto 1 (normal): For viewing film material Auto 2: For viewing film material (the same as Auto 1, but able to convert 30-frame-per-second progressive video) Video: For video material Display Menu 4:3 Aspect Select how to show images made for 4:3 aspect screens on a 16:9 aspect television. Normal: Laterally stretches images made for a 4:3 screen. Auto: Expands suitable 4:3 letterbox images to fill more of the screen. Other images appear in full in the center of the screen. Shrink: Images appear in the center of the screen. Zoom: Expands all images to fill the screen. If your television has a similar feature, use it instead for a better effect. Zoom (➜ page 15) To select preset aspect ratio Press [ENTER] and then [2, 1] to select. Press [ENTER] to finish. User mode: Press [1] while "U1" or "U2" is highlighted and then press [3, 4] to select "1" or "2". U1:User mode 1 Contrast (j7 to i7) Increases the contrast between light and dark parts of the picture. Brightness (0 to i15) Brightens the picture. Sharpness (j7 to i7) Adjusts the sharpness of the edges of the horizontal lines. Color (j7 to i7) Adjust the shade of the picture's color. Gamma (0 to i5) Brightness of dark parts of the picture. RQT6933 U2:User mode 2 (Video output mode ➜above) 17
-
 1
1 -
2
-
3
-
4
-
5
-
6
-
7
-
8
-
9
-
10
-
11
-
 12
12 -
 13
13 -
 14
14 -
 15
15 -
 16
16 -
 17
17 -
 18
18 -
 19
19 -
 20
20 -
 21
21 -
 22
22 -
23
-
24
 |
 |