Panasonic HC-X1500 HC-X1500 Basic Operating Manual - Page 27
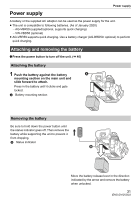
Battery mounting
 |
View all Panasonic HC-X1500 manuals
Add to My Manuals
Save this manual to your list of manuals |
Page 27 highlights
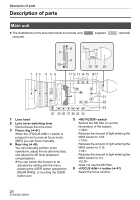
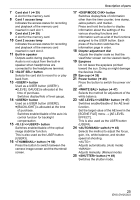
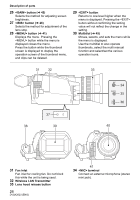
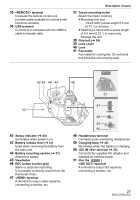
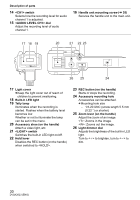
35 terminal Connects the remote control unit (commercially-available) to control some functions remotely. 36 USB terminal Connect to a computer with the USB2.0 cable to transfer data. Description of parts 37 Tripod mounting holes Attach the tripod. (bottom) ≥Mounting hole size j 1/4-20 UNC (screw length 5.5 mm (0.22 q) or shorter) ≥Attaching a tripod with a screw length of 5.5 mm (0.22 q) or more may damage the unit. 38 Grip belt (l 34) 39 Lens cover 40 Lens 41 Fan outlet Fan outlet for cooling fan. Do not block this while the unit is being used. 42 43 44 45 46 X2000 51 52 42 Status indicator (l 40) Illuminates when power is on. 43 Battery release lever (l 31) Used when removing the battery from the main unit. 44 Battery mounting section (l 31) Attaches a battery. 45 Viewfinder 46 REC button (on the grip) Starts or stops the recording. It is possible to directly record from the thumbnail mode. 47 terminal A terminal to output video signal by connecting a monitor, etc. 47 48 49 50 48 Headphones terminal Connects audio monitoring headphones. 49 Charging lamp (l 32) Illuminates when the battery is charging. 50 terminal (l 32) Connects the supplied AC adaptor and supplies an external power. 51 (For the X2000 ) terminal A terminal to output SDI signal by connecting a monitor, etc. 27 (ENG) DVQX2023
-
 1
1 -
2
-
3
-
4
-
5
-
6
-
7
-
8
-
9
-
10
-
11
-
12
-
13
-
14
-
15
-
16
-
17
-
18
-
19
-
20
-
21
-
 22
22 -
 23
23 -
 24
24 -
 25
25 -
 26
26 -
 27
27 -
 28
28 -
 29
29 -
 30
30 -
 31
31 -
 32
32 -
33
-
34
-
35
-
36
-
37
-
38
-
39
-
40
-
41
-
42
-
43
-
44
-
45
-
46
-
47
-
48
-
49
-
50
-
51
-
52
-
53
-
54
-
55
-
56
-
57
-
58
-
59
-
60
-
61
-
62
-
63
-
64
 |
 |
