Panasonic HC-X1500 HC-X1500 Basic Operating Manual - Page 30
Built-in LED light
 |
View all Panasonic HC-X1500 manuals
Add to My Manuals
Save this manual to your list of manuals |
Page 30 highlights
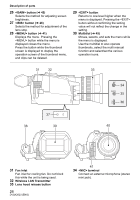
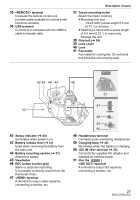
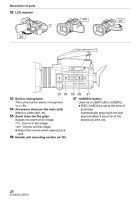
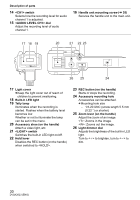
Description of parts 14 switch Selects how the recording level for audio channel 1 is adjusted. 15 dial Adjust the recording level of audio channel 1. 16 Handle unit mounting screw (l 35) Secures the handle unit to the main unit. 17 18 19 20 21 22 23 26 25 24 17 Light cover ≥Keep the light cover out of reach of children to prevent swallowing. 18 Built-in LED light 19 Tally lamp Illuminates when the recording is started. Flashes when the battery level becomes low. Whether or not to illuminate the lamp can be set in the menu. 20 Accessory shoe (on the handle) Attach a video light, etc. 21 switch Switches the built-in LED light on/off. 22 Hold lever Disables the REC button (on the handle) when switched to . 23 REC button (on the handle) Starts or stops the recording. 24 Accessory mounting hole Accessories can be attached. ≥Mounting hole size j 1/4-20 UNC (screw length 5.5 mm (0.22 q) or shorter) 25 Zoom lever (on the handle) Adjust the zoom of an image. : Zooms in the image. : Zooms out the image. 26 Light dimmer dial Adjusts the brightness of the built-in LED light. Turn to to brighten, turn to to dim. 30 DVQX2023 (ENG)
-
 1
1 -
2
-
3
-
4
-
5
-
6
-
7
-
8
-
9
-
10
-
11
-
12
-
13
-
14
-
15
-
16
-
17
-
18
-
19
-
20
-
21
-
22
-
23
-
24
-
 25
25 -
 26
26 -
 27
27 -
 28
28 -
 29
29 -
 30
30 -
 31
31 -
 32
32 -
 33
33 -
 34
34 -
 35
35 -
36
-
37
-
38
-
39
-
40
-
41
-
42
-
43
-
44
-
45
-
46
-
47
-
48
-
49
-
50
-
51
-
52
-
53
-
54
-
55
-
56
-
57
-
58
-
59
-
60
-
61
-
62
-
63
-
64
 |
 |
