Panasonic HDC-SX5 Hd Video Camera - Multi Language - Page 53
Recording motion pictures, button to start recording.
 |
UPC - 037988255771
View all Panasonic HDC-SX5 manuals
Add to My Manuals
Save this manual to your list of manuals |
Page 53 highlights
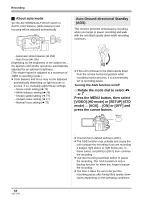
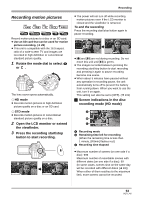
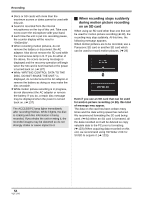
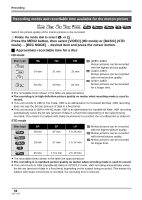
Recording Recording motion pictures ̝̙ ̝̙ ̝̙ ̝̙ VIDEO Record motion pictures to a disc or an SD card. ≥ Use an SD card that can be used for motion picture recording. (l 29) ≥ This unit is compatible with the 16:9 aspect ratio of a wide-screen TV and images are recorded in high definition or conventional standard picture quality. 1 Rotate the mode dial to select or . STD OFF HD The lens cover opens automatically. ¬ HD mode ≥ Records motion pictures in high definition picture quality on a disc or an SD card. ¬ STD mode ≥ Records motion pictures in conventional standard picture quality on a disc. 2 Open the LCD monitor or extend the viewfinder. 3 Press the recording start/stop button to start recording. ≥ The power will not turn off while recording motion pictures even if the LCD monitor is closed and the viewfinder is retracted. To end the recording Press the recording start/stop button again to pause recording. ≥ [¥] and [;] are red during recording. Do not move this unit until [;] is green. ≥ The images recorded between pressing the recording start/stop button to start recording and pressing it again to pause recording become one scene. ≥ When about 5 minutes have passed without any operation in recording pause, the unit automatically turns off to prevent the battery from running down. When you want to use the unit, turn it on again. This setting can also be set to [OFF]. (l 131) ª Screen indications in the disc recording mode (HD mode) A B C A Recording mode B Remaining time left for recording (When the remaining time is less than 1 minute, [R0min] flashes red.) C Recording time elapsed ≥ Maximum number of scenes (on one side if a disc): 999 Maximum number of recordable scenes with different dates (on one side if a disc): 99 (In some cases, scenes shot on the same day will be recorded with different dates (l 83)) When either of them reaches to the maximum limit, more scenes cannot be recorded. 53 VQT1J42
-
 1
1 -
2
-
3
-
4
-
5
-
6
-
7
-
8
-
9
-
10
-
11
-
12
-
13
-
14
-
15
-
16
-
17
-
18
-
19
-
20
-
21
-
22
-
23
-
24
-
25
-
26
-
27
-
28
-
29
-
30
-
31
-
32
-
33
-
34
-
35
-
36
-
37
-
38
-
39
-
40
-
41
-
42
-
43
-
44
-
45
-
46
-
47
-
 48
48 -
 49
49 -
 50
50 -
 51
51 -
 52
52 -
 53
53 -
 54
54 -
 55
55 -
 56
56 -
 57
57 -
 58
58 -
59
-
60
-
61
-
62
-
63
-
64
-
65
-
66
-
67
-
68
-
69
-
70
-
71
-
72
-
73
-
74
-
75
-
76
-
77
-
78
-
79
-
80
-
81
-
82
-
83
-
84
-
85
-
86
-
87
-
88
-
89
-
90
-
91
-
92
-
93
-
94
-
95
-
96
-
97
-
98
-
99
-
100
-
101
-
102
-
103
-
104
-
105
-
106
-
107
-
108
-
109
-
110
-
111
-
112
-
113
-
114
-
115
-
116
-
117
-
118
-
119
-
120
-
121
-
122
-
123
-
124
-
125
-
126
-
127
-
128
-
129
-
130
-
131
-
132
-
133
-
134
-
135
-
136
-
137
-
138
-
139
-
140
-
141
-
142
-
143
-
144
-
145
-
146
-
147
-
148
-
149
-
150
-
151
-
152
-
153
-
154
-
155
-
156
-
157
-
158
-
159
-
160
-
161
-
162
-
163
-
164
-
165
-
166
-
167
-
168
-
169
-
170
-
171
-
172
 |
 |
