Panasonic KX-HNB600 Operating Instructions - Page 18
Appendix, Removing the wall mounting adaptor
 |
View all Panasonic KX-HNB600 manuals
Add to My Manuals
Save this manual to your list of manuals |
Page 18 highlights
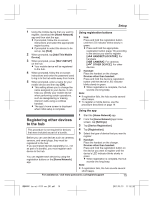
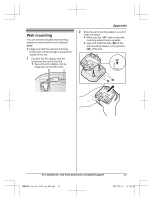
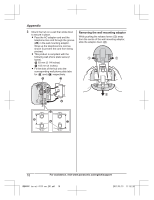
Appendix 3 Mount the hub on a wall then slide down to secure in place. R Pass the AC adaptor cord and the telephone line cord through the groove (1) in the wall mounting adaptor. Wrap up the telephone line cord as shown to prevent the cord from being pinched. R This product is compliant with the following wall phone plate sizes (2 types). 2 83 mm (3 1/4 inches) 3 102 mm (4 inches) R Fit the slots of the hub onto the corresponding wall phone plate tabs for (4) and (5) respectively. 1 4 Removing the wall mounting adaptor While pushing the release levers (A) away from the centre of the wall mounting adaptor, slide the adaptor down (B). A A B 5 4 2 5 3 18 For assistance, visit www.panasonic.ca/english/support HNB600C_(en_en)_0113_ver.201.pdf 18 2017/01/13 11:52:26
-
 1
1 -
2
-
3
-
4
-
5
-
6
-
7
-
8
-
9
-
10
-
11
-
12
-
 13
13 -
 14
14 -
 15
15 -
 16
16 -
 17
17 -
 18
18 -
 19
19 -
 20
20 -
 21
21 -
 22
22 -
 23
23 -
24
-
25
-
26
-
27
-
28
-
29
-
30
-
31
-
32
-
33
-
34
-
35
-
36
-
37
-
38
-
39
-
40
-
41
-
42
-
43
-
44
-
45
-
46
-
47
-
48
 |
 |
