Panasonic KX-HNC600 Installation Guide - US - Page 15
Setup, Part names and functions, LED indicator, Setup overview
 |
View all Panasonic KX-HNC600 manuals
Add to My Manuals
Save this manual to your list of manuals |
Page 15 highlights
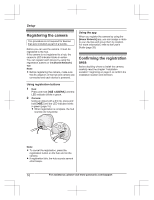
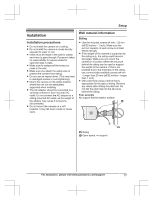
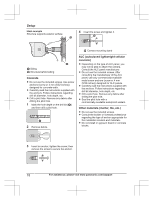
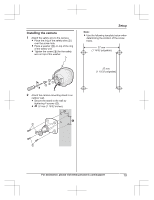
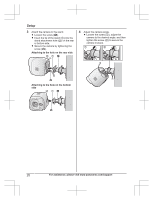
Part names and functions G H I J Setup Indicator Red, blinking Red, blinking quickly Amber, blinking Status Live images are being viewed or recorded Camera is out of range of the hub, or device malfunction Camera is not registered to a hub *1 You can configure the camera so that its LED indicator does not light during normal operation. For more information, refer to the User's Guide (page 26). A B CD E F Microphone Sensor range cap (Standard) Infrared sensor LED indicator Lens unit Speaker MN Used when registering the camera to the hub. Safety wire Camera mounting stand DC cable LED indicator You can use the LED indicator to confirm the camera's status. Indicator Off Green, lit Green, blinking Red Status No power, or LED indicator is turned off*1 Normal operation*1 Registration mode Motion detection features were triggered Setup overview 1 Initial setup Make sure you can access the system using your mobile device. For details, refer to the System Setup Guide included with your hub. 2 Registration Required only if the camera was purchased separately (i.e., not as part of a bundle). 3 Confirm the installation area Read the information in this document to confirm that the desired installation area is suitable to proper operation. 4 Installation Install the camera in the desired location and connect the camera to the power outlet. 5 Adjust the infrared sensor range Confirm the sensor range area and adjust it if necessary using the included sensor range adjustment caps. For assistance, please visit www.panasonic.com/support 15
-
 1
1 -
2
-
3
-
4
-
5
-
6
-
7
-
8
-
9
-
 10
10 -
 11
11 -
 12
12 -
 13
13 -
 14
14 -
 15
15 -
 16
16 -
 17
17 -
 18
18 -
 19
19 -
 20
20 -
21
-
22
-
23
-
24
-
25
-
26
-
27
-
28
-
29
-
30
-
31
-
32
-
33
-
34
-
35
-
36
-
37
-
38
-
39
-
40
-
41
-
42
-
43
-
44
-
45
-
46
-
47
-
48
-
49
-
50
-
51
-
52
-
53
-
54
-
55
-
56
 |
 |
