Panasonic KX-HNC600 Installation Guide - US - Page 17
Installation, Installation precautions, Wall material information
 |
View all Panasonic KX-HNC600 manuals
Add to My Manuals
Save this manual to your list of manuals |
Page 17 highlights
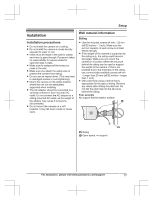
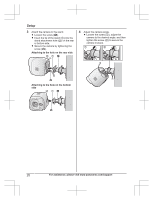
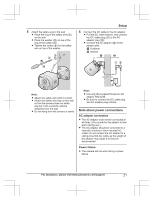
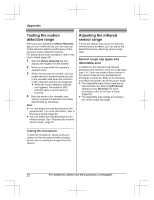
Setup Installation Installation precautions R Do not install the camera on a ceiling. R Do not install the camera in areas directly exposed to water or rain. R Holes must be made in the wall for cables and wires to pass through. Panasonic takes no responsibility for issues related to opening holes in walls. R Make sure to waterproof the holes you make in the wall. R Make sure you attach the safety wire to prevent the camera from falling. R Do not use an impact driver. (This may lead to damaged screws or over-tightening.) R Mount the camera on the stable location where the unit can be adequately supported when installing. R The AC adaptor should be connected to a vertically oriented or floor-mounted AC outlet. Do not connect the AC adaptor to a ceiling-mounted AC outlet, as the weight of the adaptor may cause it to become disconnected. R Do not mount the camera on a soft material. It may fall down, break or cause injury. Wall material information Siding R Use the included screws ø4 mm ´ 25 mm (ø5/32 inches ´ 1 inch). Make sure the pull-out capacity of each screw is at least 294 N (30 kgf). R If the weight of the camera is supported by the siding only, the siding could become damaged. Make sure you mount the camera in a location where the structure behind the siding can be used to support the weight of the camera. If this is not possible due to the thickness of the siding, use commercially-available screws ø4 mm ´ longer than 25 mm (ø5/32 inches ´ longer than 1 inch). R Drill a pilot hole using a drill bit that is appropriate for the type of siding. Remove any debris after drilling the pilot hole. Do not drill the pilot hole into the structure behind the siding. Poor example No support behind exterior surface 2 1 1 Siding 2 Open space, no support For assistance, please visit www.panasonic.com/support 17
-
 1
1 -
2
-
3
-
4
-
5
-
6
-
7
-
8
-
9
-
10
-
11
-
 12
12 -
 13
13 -
 14
14 -
 15
15 -
 16
16 -
 17
17 -
 18
18 -
 19
19 -
 20
20 -
 21
21 -
 22
22 -
23
-
24
-
25
-
26
-
27
-
28
-
29
-
30
-
31
-
32
-
33
-
34
-
35
-
36
-
37
-
38
-
39
-
40
-
41
-
42
-
43
-
44
-
45
-
46
-
47
-
48
-
49
-
50
-
51
-
52
-
53
-
54
-
55
-
56
 |
 |
