Panasonic KX-TGA4500B Telephone Equipment - Page 25
Selecting the line mode, Registering additional cordless handsets, handsets
 |
View all Panasonic KX-TGA4500B manuals
Add to My Manuals
Save this manual to your list of manuals |
Page 25 highlights
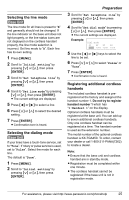
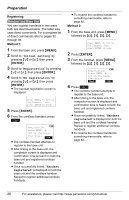
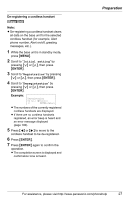
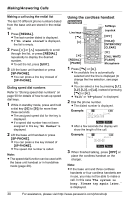
Selecting the line mode Base Unit The line mode for all lines is preset to "B" and generally should not be changed. If the line indicator on the base unit does not light properly, or the line status icons are not displayed on the cordless handset properly, the line mode selection is incorrect. Set line mode to "A". Each line has its own setting. 1 Press {MENU}. 2 Scroll to "Initial setting" by pressing {}, then press {ENTER}. 3 Scroll to "Set telephone line" by pressing {}, then press {ENTER}. 4 Scroll to "Set line mode" by pressing {}, then press {ENTER}. L The current settings are displayed. 5 Press {f} or {g} to select a line. 6 Press {} to select the desired setting. 7 Press {ENTER}. L Confirmation tone is heard. Selecting the dialing mode Base Unit If your lines have a touch-tone service, set to "Tone". If rotary or pulse service is used, set to "Pulse". Select the mode for each line. The default is "Tone". 1 Press {MENU}. 2 Scroll to "Initial setting" by pressing {}, then press {ENTER}. Preparation 3 Scroll to "Set telephone line" by pressing {}, then press {ENTER}. 4 Scroll to "Set dial mode" by pressing {}, then press {ENTER}. L The current settings are displayed. Example: Dial mode L1 L2 L3 L4 Tone Tone Tone Tone 5 Use the {f} or {g} keys to select the line to be set. 6 Press {} to select "Pulse" or "Tone". 7 Press {ENTER}. L Confirmation tone is heard. Registering additional cordless handsets The included cordless handset is preregistered at the factory and assigned the handset number 1. Do not try to register handset number 1 which has "1:Handset 1" on the display. Optional cordless handsets must be registered at the base unit. You can add up to seven additional cordless handsets. Only one cordless handset can be registered at a time. The handset number is used as the extension number. The model number of the optional cordless handset is KX-TGA450. To order, contact your dealer or call 1-800-211-PANA(7262) to locate a dealer. Note: L Ensure that the base unit and cordless handset are in standby mode. L Registration must be completed within one minute. L The cordless handset cannot be registered if the base unit is not in registration mode. For assistance, please visit http://www.panasonic.com/phonehelp 25
-
 1
1 -
2
-
3
-
4
-
5
-
6
-
7
-
8
-
9
-
10
-
11
-
12
-
13
-
14
-
15
-
16
-
17
-
18
-
19
-
 20
20 -
 21
21 -
 22
22 -
 23
23 -
 24
24 -
 25
25 -
 26
26 -
 27
27 -
 28
28 -
 29
29 -
 30
30 -
31
-
32
-
33
-
34
-
35
-
36
-
37
-
38
-
39
-
40
-
41
-
42
-
43
-
44
-
45
-
46
-
47
-
48
-
49
-
50
-
51
-
52
-
53
-
54
-
55
-
56
-
57
-
58
-
59
-
60
-
61
-
62
-
63
-
64
-
65
-
66
-
67
-
68
-
69
-
70
-
71
-
72
-
73
-
74
-
75
-
76
-
77
-
78
-
79
-
80
-
81
-
82
-
83
-
84
-
85
-
86
-
87
-
88
-
89
-
90
-
91
-
92
-
93
-
94
-
95
-
96
-
97
-
98
-
99
-
100
-
101
-
102
-
103
-
104
-
105
-
106
-
107
-
108
-
109
-
110
-
111
-
112
-
113
-
114
-
115
-
116
-
117
-
118
-
119
-
120
-
121
-
122
-
123
-
124
 |
 |