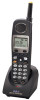
Panasonic KX-TGA4500B Telephone Equipment - Page 83
Telephone settings, Selecting the flash time, Line selection for outgoing calls
 |
View all Panasonic KX-TGA4500B manuals
Add to My Manuals
Save this manual to your list of manuals |
Page 83 highlights
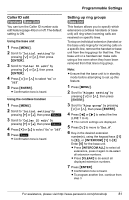
Programmable Settings Telephone settings Selecting the flash time Base Unit The flash time depends on your telephone exchange or host PBX. You can select: "90ms" (milliseconds), "100ms", "110ms", "250ms", "300ms", "400ms", "600ms", or "700ms". Each line has its own setting. The default setting for all lines is "700ms". 1 Press {MENU}. 2 Scroll to "Initial setting" by pressing {}, then press {ENTER}. 3 Scroll to "Set telephone line" by pressing {}, then press {ENTER}. 4 Scroll to "Set flash time" by pressing {}, then press {ENTER}. 5 Press {f} or {g} to select the desired line. 6 Press {} repeatedly to select the desired setting, followed by {ENTER}. L Confirmation tone is heard. Note: L The setting should remain at 700 ms unless pressing {FLASH} fails to pick up the Call Waiting call. L If the unit is connected via a PBX, certain PBX functions (call transferring, etc.) may not work correctly. Consult your PBX supplier for the correct setting. Line selection for outgoing calls Base Unit Handset When line selection is set to auto, the cordless handset and base unit automatically selects a line when you press {C} or {s} on the cordless handset, or press {SP-PHONE} or lift the handset on the base unit. The base unit and each handset can also be set to select a priority line for outgoing calls, if available. The line selection for the cordless handset(s) and base unit are set separately. The default is "Auto". The five available line selection settings are: "Auto" (default): When making a call, LINE 1 will be selected, If that line is unavailable, LINE 2 will be selected, etc. "Line1": LINE 1 is selected, if available. "Line2": LINE 2 is selected, if available. "Line3": LINE 3 is selected, if available. "Line4": LINE 4 is selected, if available. Note: L You can also select a line manually regardless of the line selection mode by pressing a line key. Base unit line selection 1 Press {MENU}. 2 Scroll to "Initial setting" by pressing {}, then press {ENTER}. 3 Scroll to "Line selection" by pressing {}, then press {ENTER}. 4 Press {} to select the desired line. 5 Press {ENTER}. L Confirmation tone is heard. For assistance, please visit http://www.panasonic.com/phonehelp 83
-
 1
1 -
2
-
3
-
4
-
5
-
6
-
7
-
8
-
9
-
10
-
11
-
12
-
13
-
14
-
15
-
16
-
17
-
18
-
19
-
20
-
21
-
22
-
23
-
24
-
25
-
26
-
27
-
28
-
29
-
30
-
31
-
32
-
33
-
34
-
35
-
36
-
37
-
38
-
39
-
40
-
41
-
42
-
43
-
44
-
45
-
46
-
47
-
48
-
49
-
50
-
51
-
52
-
53
-
54
-
55
-
56
-
57
-
58
-
59
-
60
-
61
-
62
-
63
-
64
-
65
-
66
-
67
-
68
-
69
-
70
-
71
-
72
-
73
-
74
-
75
-
76
-
77
-
 78
78 -
 79
79 -
 80
80 -
 81
81 -
 82
82 -
 83
83 -
 84
84 -
 85
85 -
 86
86 -
 87
87 -
 88
88 -
89
-
90
-
91
-
92
-
93
-
94
-
95
-
96
-
97
-
98
-
99
-
100
-
101
-
102
-
103
-
104
-
105
-
106
-
107
-
108
-
109
-
110
-
111
-
112
-
113
-
114
-
115
-
116
-
117
-
118
-
119
-
120
-
121
-
122
-
123
-
124
 |
 |