Panasonic KX-TGA4500B Telephone Equipment - Page 82
Display options, Adjusting the LCD contrast, Changing the name of the cordless handset, Bedroom
 |
View all Panasonic KX-TGA4500B manuals
Add to My Manuals
Save this manual to your list of manuals |
Page 82 highlights
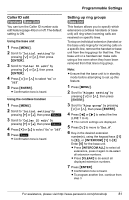
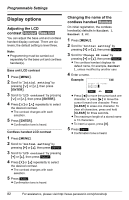
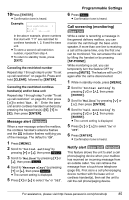
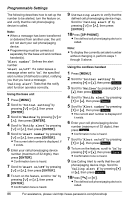
Programmable Settings Display options Adjusting the LCD contrast Handset Base Unit You can adjust the base unit and cordless handset display contrast. There are six levels; the default setting is level three. Note: L Programming must be carried out separately for the base unit and cordless handset(s). Base unit LCD contrast 1 Press {MENU}. 2 Scroll to "Initial setting" by pressing {}, then press {ENTER}. 3 Scroll to "LCD contrast" by pressing {}, then press {ENTER}. 4 Press {} repeatedly to select the desired contrast. L The contrast changes with each selection. 5 Press {ENTER}. L Confirmation tone is heard. Cordless handset LCD contrast 1 Press {MENU}. 2 Scroll to "Initial setting" by pressing {V} or {^}, then press Select . 3 Scroll to "LCD contrast" by pressing {V} or {^}, then press Select . 4 Press {V} or {^} repeatedly to select the desired contrast. L The contrast changes with each selection. 5 Press Save . L Confirmation tone is heard. Changing the name of the cordless handset Handset On initial registration, the cordless handset(s) defaults to Handset 1, Handset 2, etc. 1 Press {MENU}. 2 Scroll to "Initial setting" by pressing {V} or {^}, then press Select . 3 Scroll to "Change HS name" by pressing {V} or {^}, then press Select . L The cordless handset displays its default name, for example, Handset 1, unless modified by another user. 4 Enter a name. Example: 2 Enter HS name: Bedroom Back Save L Press {f} to move the cursor back one character, or press {g} to move the cursor forward one character. Press {CLEAR} to erase one character. To clear all characters, press and hold {CLEAR} for three seconds. L The maximum length of a stored name is 13 characters. L To insert a space, press {0}. 5 Press Save . L Confirmation tone is heard. 82 For assistance, please visit http://www.panasonic.com/phonehelp
-
 1
1 -
2
-
3
-
4
-
5
-
6
-
7
-
8
-
9
-
10
-
11
-
12
-
13
-
14
-
15
-
16
-
17
-
18
-
19
-
20
-
21
-
22
-
23
-
24
-
25
-
26
-
27
-
28
-
29
-
30
-
31
-
32
-
33
-
34
-
35
-
36
-
37
-
38
-
39
-
40
-
41
-
42
-
43
-
44
-
45
-
46
-
47
-
48
-
49
-
50
-
51
-
52
-
53
-
54
-
55
-
56
-
57
-
58
-
59
-
60
-
61
-
62
-
63
-
64
-
65
-
66
-
67
-
68
-
69
-
70
-
71
-
72
-
73
-
74
-
75
-
76
-
 77
77 -
 78
78 -
 79
79 -
 80
80 -
 81
81 -
 82
82 -
 83
83 -
 84
84 -
 85
85 -
 86
86 -
 87
87 -
88
-
89
-
90
-
91
-
92
-
93
-
94
-
95
-
96
-
97
-
98
-
99
-
100
-
101
-
102
-
103
-
104
-
105
-
106
-
107
-
108
-
109
-
110
-
111
-
112
-
113
-
114
-
115
-
116
-
117
-
118
-
119
-
120
-
121
-
122
-
123
-
124
 |
 |
