Panasonic KXTVS225 KXTVS125 User Guide - Page 49
Quick Reference
 |
View all Panasonic KXTVS225 manuals
Add to My Manuals
Save this manual to your list of manuals |
Page 49 highlights
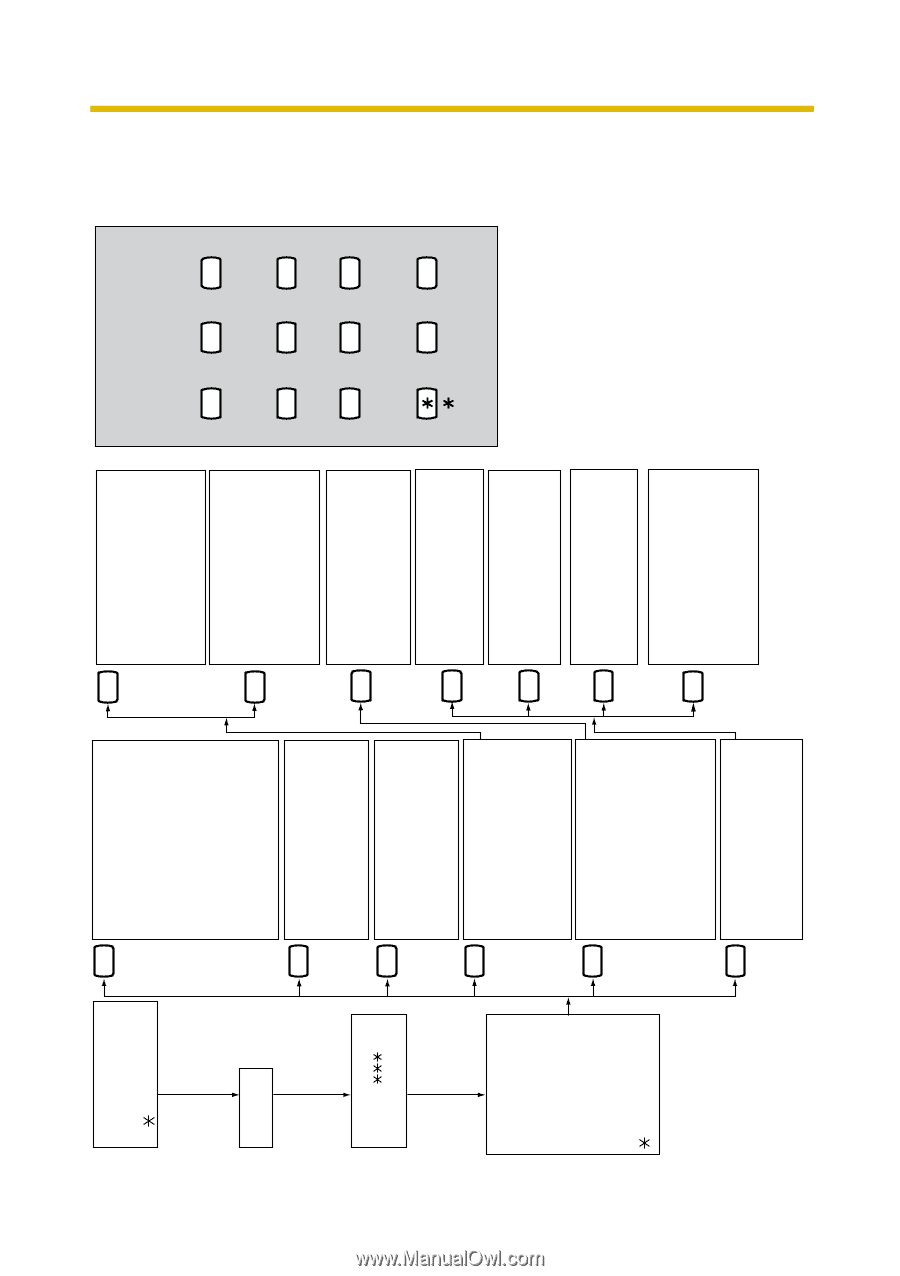
49 To Enter a Mailbox From a Remote Location, Dial: #6 + mailbox number Password # Main Menu: You have new messages. 1 Receive message. 2 Deliver message. 3 Check Mailbox Distribution. 4 Set Automated Attendant (AA) Status. 5 Set Up Mailbox Management. 6 Set Other Features. Hang up. 1 Receive Message: 1 Repeat Message 1.1 Previous Message 2 Next Message 3 Erase Message 4 Send Reply 5 Rewind 6 Fast Forward 7 Transfer Message 8 Scan Messages 9 Save Message as New 0 Help 2 Deliver Message: Enter Mailbox Number 1 Record Message 2 Add Another Mailbox 3 Review Mailing List 3 Check Mailbox Distribution: 1 Play Message 1.1 Check Previous Message 2 Check Next Message 3 Cancel 4 Set AA Status: 1 Set Call Transfer Status 2 Set Covering Extensions 3 Set Message Reception Mode 4 Set Incomplete Call Handling 5 Set Telephone Number for Transfer 5 Set Up Mailbox Management: 1 Record Personal Greetings 2 Set Password 3 Enter Owner's Name 4 Set Group Distribution List 5 Record Caller Name/Number 6 Set Remote Call FWD to CO 7 Set Numbers for Toll Saver 8 Set Personal Custom Service 6 Set Other Features: 1 Set Interview Mailbox 2 Set Message Waiting Notification 3 Set External Delivery Message 4 Remote Call Forwarding Set 1 Set Call Transfer Status: 1 Call Blocking 2 Call Screening 3 Intercom Paging 4 Beeper Access 5 Transfer to Mailbox 6 All Disable Incomplete Handling Status: 1 Leaving a Message 4 2 Covering Extension 3 Intercom Paging 4 Beeper Access 5 Operator 6 Return to AA Service Top Menu Record Personal Greeting: 1 No Answer 1 2 Busy 3 After Hours 4 Caller ID Interview Mailbox Management: 1 Record Question 1 2 Set Answer Length 3 Erase Question Message Notification: 1 Message Waiting Lamp 2 2 Device Status 3 Assign Telephone Numbers External Message Delivery: 3 1 Record message 2 Check Delivery Status 3 Set a Mailing List Remote Call Forwarding Set: 1 FWD All Calls 4 2 FWD Busy Calls 3 FWD No Answer Calls 4 FWD Busy or No Answer Calls 5 FWD to a CO Line 6 FWD Cancel Service Access Commands Dial the following commands any time during system prompts to get a different mailbox, extension, or menu. 1 #1 Dial by Name 2 3 #2 #3 (#D) Custom Department Service Dial 4 5 6 #5 (#L) #6 (#M) Login Voice Mail 7 8 9 #7 (#R) #8 (#T) #9 (#X) Restart Transfer to Exit (Main Menu) an Extn. 0 # Return to Previous Menu 0 Help Note: Commands #5 and #7 are available only when you have accessed Subscriber Service. #5: Login If you press #5 while in Subscriber Service, you will hear: "Please enter your party's mailbox number". #7: Restart If you press #7 while in Subscriber Service, you will return to the Main Menu (top menu) of Subscriber Service. A Appendix A1 Quick Reference Subscriber's Guide
-
 1
1 -
2
-
3
-
4
-
5
-
6
-
7
-
8
-
9
-
10
-
11
-
12
-
13
-
14
-
15
-
16
-
17
-
18
-
19
-
20
-
21
-
22
-
23
-
24
-
25
-
26
-
27
-
28
-
29
-
30
-
31
-
32
-
33
-
34
-
35
-
36
-
37
-
38
-
39
-
40
-
41
-
42
-
43
-
 44
44 -
 45
45 -
 46
46 -
 47
47 -
 48
48 -
 49
49 -
 50
50 -
 51
51 -
 52
52 -
 53
53 -
 54
54 -
55
-
56
-
57
-
58
-
59
-
60
-
61
-
62
-
63
-
64
 |
 |