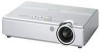
Panasonic LB60NTU Operating Instructions - Page 52
Installation, Highland, Rgb/ypbpr, Volume, Nglish
 |
UPC - 791871111260
View all Panasonic LB60NTU manuals
Add to My Manuals
Save this manual to your list of manuals |
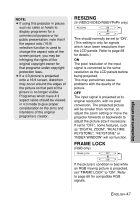
Page 52 highlights
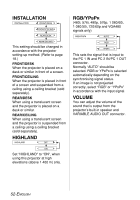
INSTALLATION RGB/YPBPR (480i, 576i, 480p, 576p, 1 080/60i, 1 080/50i, 720/60p and VGA480 signals only) This setting should be changed in accordance with the projector setting-up method. (Refer to page 18.) FRONT/DESK When the projector is placed on a desk or similar in front of a screen. FRONT/CEILING When the projector is placed in front of a screen and suspended from a ceiling using a ceiling bracket (sold separately). REAR/DESK When using a translucent screen and the projector is placed on a desk or similar. REAR/CEILING When using a translucent screen and the projector is suspended from a ceiling using a ceiling bracket (sold separately). HIGHLAND This sets the signal that is input to the PC 1 IN and PC 2 IN/PC 1 OUT connector. Normally "AUTO" should be selected. RGB or YPBPR is selected automatically depending on the synchronising signal status. If an image is not projected correctly, select "RGB" or "YPBPR" in accordance with the input signal. VOLUME You can adjust the volume of the sound that is output from the projector's built-in speaker and VARIABLE AUDIO OUT connector. Set "HIGHLAND" to "ON", when using this projector at high elevations (above 1 400 m) only. 52-ENGLISH
-
 1
1 -
2
-
3
-
4
-
5
-
6
-
7
-
8
-
9
-
10
-
11
-
12
-
13
-
14
-
15
-
16
-
17
-
18
-
19
-
20
-
21
-
22
-
23
-
24
-
25
-
26
-
27
-
28
-
29
-
30
-
31
-
32
-
33
-
34
-
35
-
36
-
37
-
38
-
39
-
40
-
41
-
42
-
43
-
44
-
45
-
46
-
 47
47 -
 48
48 -
 49
49 -
 50
50 -
 51
51 -
 52
52 -
 53
53 -
 54
54 -
 55
55 -
 56
56 -
 57
57 -
58
-
59
-
60
-
61
-
62
-
63
-
64
-
65
-
66
-
67
-
68
-
69
-
70
-
71
-
72
-
73
-
74
-
75
-
76
-
77
-
78
-
79
-
80
-
81
-
82
 |
 |
