Panasonic PT47WXD63 PT47WXD63 User Guide - Page 27
Set Up
 |
View all Panasonic PT47WXD63 manuals
Add to My Manuals
Save this manual to your list of manuals |
Page 27 highlights
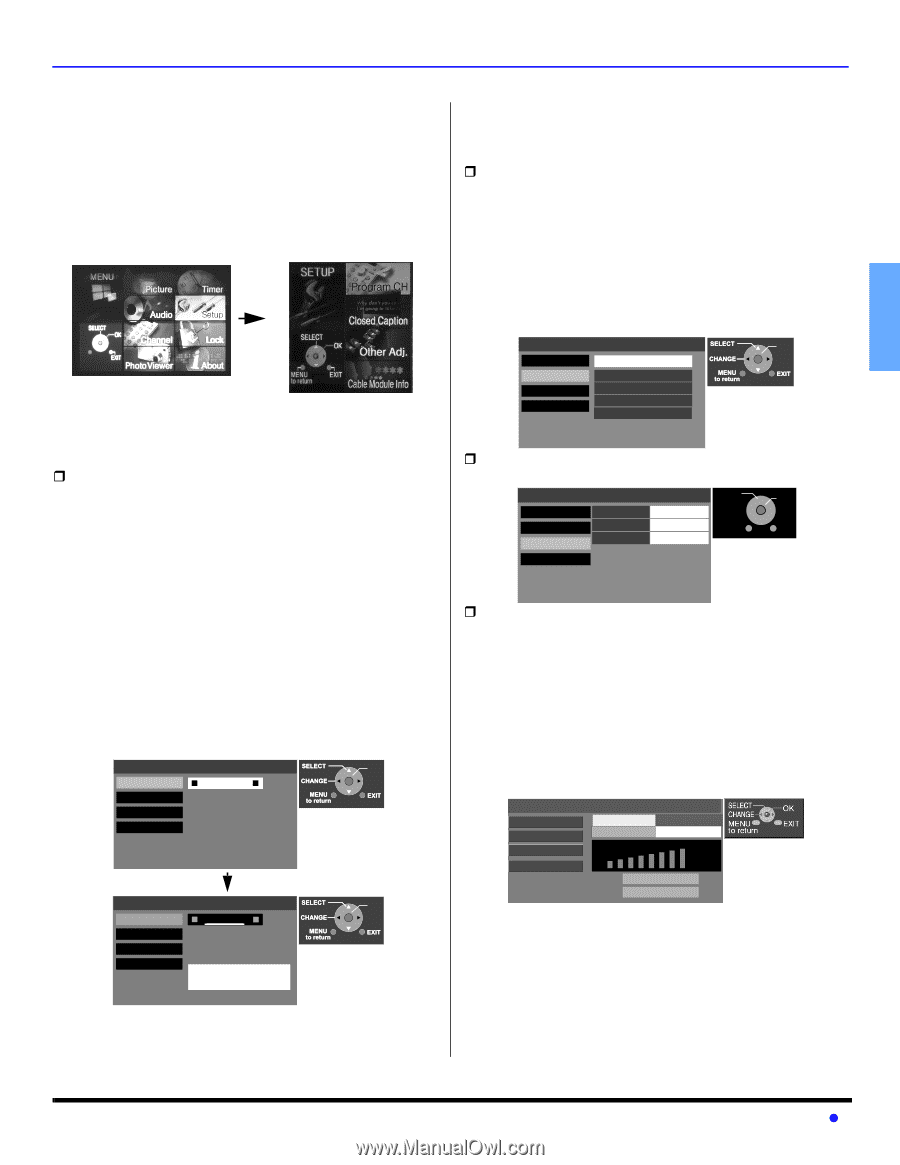
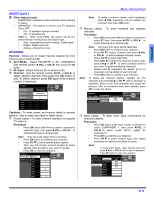
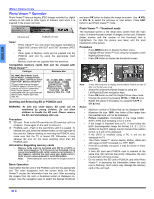
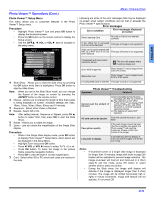
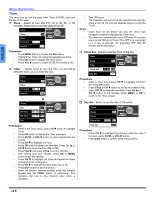
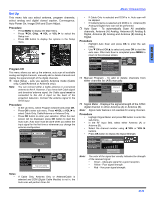
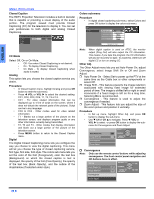
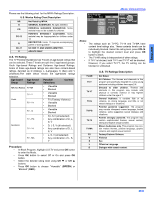
ENGLISH Set Up This menu lets you select antenna, program channels, select analog and digital closed caption, Convergence, Auto Power On, Image Shift and Zoom Adjust. Procedure • Press MENU to display the Main Menu. • Press CH, CH , VOL or VOL to select the Setup icon. • Press OK button to display the options in the Setup menu. Program CH This menu allows you set up the antenna, auto scan all available analog and digital channels, manually add or delete channels and display the signal strength of the digital channels. ˆ Input Setup - Lets you specify Antenna mode (Cable only, Cable/Antenna or Antenna only). Note: You can connect either a Cable antenna or a terrestrial antenna to Ant A. However, if you have both Cable signal and terrestrial antenna signal, the Cable signal must be connected to the Ant A input on the back of the projection television. Connect the antenna signal to the Ant B input. Procedure • In Set Up menu, select Program Channel and press OK. • Press OK to enter sub-menu. Press VOL or VOL to select Cable Only, Cable/Antenna or Antenna Only. • Press OK button to enter your selection. When the next screen will be displayed, press OK button to start the Auto scan. Auto scan must be done when you select the input signal for the first time or whenever you change the antenna configuration. Program Channel OK Input Setup Cable only Auto Scan Manual Program Connect Cable to Antenna (A) Signal Meter Change your Input Setup and press OK Program Channel OK Input Setup Cable only Auto Scan Manual Program Connect Cable to Antenna (A) Signal Meter Auto scan is needed press OK to start Auto Scan MENU OPERATIONS • If Cable Only is selected and DCM is in, Auto scan will be skipped. • If Cable/Antenna is selected and DCM is in, Antenna (B) Analog & Digital Auto scan will be performed. ˆ Auto Scan - To automatically Scan All available channels, Antenna (A) Analog, Antenna (A) Analog & Digital, Antenna (B) Analog and Antenna (B) Analog & Digital. Procedure • Highlight Auto Scan and press OK to enter the sub menu. • Use CH and CH to select and press OK to start the auto scan. After Auto Scan is completed press MENU to return to the previous screen. Program Channel OK Input Setup Scan All Auto Scan Manual Program Signal Meter Antenna (A) Analog Antenna (A) Analog & Digital Antenna (B) Analog Antenna (A) Analog & Digital Press OK to channel scan all available channels ˆ Manual Program - To add or delete channels from either channels list (A/B) manually. Program Channel SELECT OK Input Setup RF Input Antenna (A) Auto Scan Channel Add MENU EXIT Manual Program Channel Delete A: 12 to return Signal Meter ˆ Signal Meter - Displays the signal strength of the ATSC digital channel in either Antenna (A) or Antenna (B). Note: Signal meter feature is not available for analog channels. Procedure • Highlight Signal Meter and press OK button to enter the sub-menu. • In the RF Input field, select either Antenna (A) or Antenna (B). • Select the channel number using VOL or VOL buttons. • Press OK button to display the Signal Strength. Program Channel Input Setup Auto Scan RF Input RF Channel _A_nt_e_nn_a_(_A_) 3-1 Manual Program Signal Meter Signal Strength: 70% Peak: : 75% Note: The color of the signal bar usually indicates the strength of the received signal. • Green - Adequate signal for a good reception. • Yellow - Poor signal strength. • Red - Very poor signal strength. Notes: • If Cable Only, Antenna Only or Antenna/Cable is selected and DCM (Digital Cable Module) is not in, the Auto scan will perform Scan All. 25 z
-
 1
1 -
2
-
3
-
4
-
5
-
6
-
7
-
8
-
9
-
10
-
11
-
12
-
13
-
14
-
15
-
16
-
17
-
18
-
19
-
20
-
21
-
 22
22 -
 23
23 -
 24
24 -
 25
25 -
 26
26 -
 27
27 -
 28
28 -
 29
29 -
 30
30 -
 31
31 -
 32
32 -
33
-
34
-
35
-
36
-
37
-
38
-
39
-
40
-
41
-
42
-
43
-
44
-
45
-
46
-
47
-
48
-
49
-
50
-
51
-
52
-
53
-
54
-
55
-
56
-
57
-
58
-
59
-
60
-
61
-
62
-
63
-
64
-
65
-
66
-
67
-
68
-
69
-
70
-
71
-
72
-
73
-
74
-
75
-
76
-
77
-
78
-
79
-
80
-
81
-
82
-
83
-
84
-
85
-
86
-
87
-
88
 |
 |