Panasonic PT47WXD63 PT47WXD63 User Guide - Page 6
Installation
 |
View all Panasonic PT47WXD63 manuals
Add to My Manuals
Save this manual to your list of manuals |
Page 6 highlights
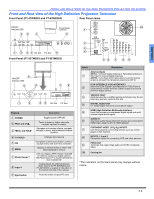
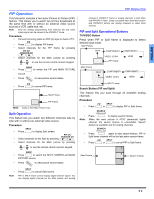
ENGLISH INSTALLATION Installation Television Location This unit can be used as part of an entertainment center. Consult your dealer for available options. • Avoid excessive sunlight or bright lights, including reflections. • Keep away from excessive heat or moisture. Inadequate ventilation may cause internal component failure. • Fluorescent lighting may reduce remote control transmitting range. • Keep away from magnetic equipment, including motors, fans and external speakers. Component Connection Cables Shielded audio and video cables should be used between components. For best results: • Use 75-ohm coaxial shielded cables. • Use appropriate input and output connectors, that match your component connectors. • Avoid long cables to minimize interference. AC Power Supply Cord CAUTION: TO PREVENT ELECTRIC SHOCK, MATCH WIDE BLADE OF PLUG TO WIDE SLOT OF AC OUTLET AND FULLY INSERT. DO NOT Polarized plug USE A PLUG WITH A RECEPTACLE OR OTHER OUTLET UNLESS THE BLADE CAN BE FULLY INSERTED TO PREVENT BLADE EXPOSURE. PROTECT POWER CORDS FROM BEING WALKED ON, ROLLED OVER, CRIMPED, BENT, OR PINCHED, PARTICULARLY AT PLUGS, CONVENIENCE RECEPTACLES, AND THE POINT WHERE THEY EXIT FROM THE APPARATUS. Cable / Antenna Connection For proper reception of analog or digital cable channels, a cable service connection is required. Cable Connection Connect the cable supplied by your local cable company to ANTENNA (A) connection on back of television. Select Cable mode and ANTENNA (A) in SET UP menu under Program CH (Program Channels). Incoming Cable from Cable Company 75 Ohm ANT A Antenna Connection • For proper reception of digital and analog VHF/ UHF channels, an external antenna is required. For best reception an outdoor antenna is recommended. • Connect home antenna to Incoming Cable from either ANT (A) or ANT (B) Home Antenna connection on back of the television. Select Antenna mode for ANTENNA (A) or (B) in Input Setup under Program CH in Setup menu. Note: Cable Mode is preset at the factory. Antenna users must change to ANTENNA Mode for ANTENNA (A) in the Set Up menu. If you have both Cable and Antenna, the Cable must be connected to ANT (A). First Time Setup For your convenience, First Time Set up menu will be displayed on screen when the set is turned on for the first time. If needed, follow the menus and procedures displayed on-screen for setting up the features. Input Setup To select the configuration of RF input depending on the signal source. Note: No video will be displayed in this setup mode. Procedure • Press VOL to select Cable only, Cable/Antenna or Antenna only. • Press the OK button to underline your selection. First time setup OK Input Setup Cable only Auto Scan Manual Program Connect Cable to Antenna (A) Signal Meter Change your Input Setup and press OK • When the next screen is displayed, press OK button to start the Auto Scan. All available channels with a signal will be programmed into memory. Auto Scan This feature allows you to selectively auto scan channels. You can Scan All, Analog only channels or Analog & Digital channels. Procedure • Press OK button to start Auto Scan. First time setup SELECT Input Setup Scan All Auto Scan Antenna (A) Analog MENU to return EXIT Convergence Antenna (A) Analog & Digital Antenna (B) Analog Antenna (B) Analog & Digital • After Auto Scan is completed the PTV tunes to the first channel found during auto scan. Notes: • If the EXIT button is pressed at anytime during auto scan, the First Time Setup menu will be cancelled and the PTV will tune to analog channel 2 on ANTENNA (A). • If a DCM (Digital Cable Module) is present during the First Time Setup and Antenna (A) is set to cable, Antenna (A) will not be scanned due to the DCM providing the channel map. Convergence This menu lets you set the green CRT alignment and the center convergence. Follow the instructions on-screen to perform convergence. After convergence is performed, press EXIT to return to normal viewing. First time setup SELECT OK Input Setup Auto Scan Press OK to go to MENU to return EXIT Convergence Convergence setup 4 z
-
 1
1 -
 2
2 -
 3
3 -
 4
4 -
 5
5 -
 6
6 -
 7
7 -
 8
8 -
 9
9 -
 10
10 -
 11
11 -
 12
12 -
13
-
14
-
15
-
16
-
17
-
18
-
19
-
20
-
21
-
22
-
23
-
24
-
25
-
26
-
27
-
28
-
29
-
30
-
31
-
32
-
33
-
34
-
35
-
36
-
37
-
38
-
39
-
40
-
41
-
42
-
43
-
44
-
45
-
46
-
47
-
48
-
49
-
50
-
51
-
52
-
53
-
54
-
55
-
56
-
57
-
58
-
59
-
60
-
61
-
62
-
63
-
64
-
65
-
66
-
67
-
68
-
69
-
70
-
71
-
72
-
73
-
74
-
75
-
76
-
77
-
78
-
79
-
80
-
81
-
82
-
83
-
84
-
85
-
86
-
87
-
88
 |
 |