Panasonic PV GS19 Digital Video Camera - Page 21
USING THE MENU SCREEN, To Adjust, Adjusting Brightness and Color Level
 |
UPC - 037988977994
View all Panasonic PV GS19 manuals
Add to My Manuals
Save this manual to your list of manuals |
Page 21 highlights
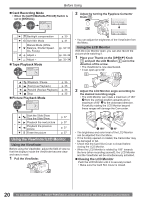
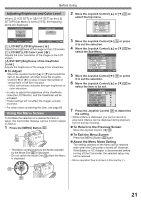
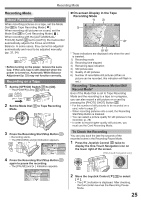
Before Using Adjusting Brightness and Color Level When [ LCD SET] or [ EVF SET] on the [ SETUP] Sub-Menu is set to [YES], the following items are displayed. LCD SET EVF SET SET SETUP ENTER EXIT SET ENTER EXIT [ LCD SET] LCD Brightness [ ] Adjusts the brightness of the image on the LCD screen. [ LCD SET] LCD Color Level [ ] Adjusts the color saturation of the image on the LCD screen. [ EVF SET] Brightness of the Viewfinder [ ] Adjusts the brightness of the image in the Viewfinder. „ To Adjust Move the Joystick Control [▲] or [▼] and select the item to be adjusted, and then move the Joystick Control [◄] or [►] to raise or lower the number of vertical bars in the Bar Indication. • More vertical bars indicates stronger brightness or color saturation. • In order to adjust the brightness of the Viewfinder, close the LCD Monitor, and the Viewfinder will be activated. • These settings will not affect the images actually recorded. • For other notes concerning this item, see page 66. Using the Menu Screen To facilitate the selection of a desired function or setup, this Camcorder displays various function setups on Menus. 1 Press the [MENU] Button 30 . 30 • The Menu corresponding to the Mode selected by the Mode Dial 34 is displayed. • Do not switch the Mode Dial 34 when the Menu is displayed. 2 Move the Joystick Control [▲] or [▼] 35 to select the top menu. BASIC ADVANCE SETUP LANGUAGE SETUP ENTER EXIT 3 Move the Joystick Control [►] 35 or press it to set the selection. 4 Move the Joystick Control [▲] or [▼] 35 to select the Sub-Menu. BASIC SCENE MODE REC SPEED BLANK SEARCH WIND CUT CLOCK SET SETUP ENTER OFF SP NO ON NO EXIT 5 Move the Joystick Control [►] 35 or press it to set the selection. 6 Move the Joystick Control [▲] or [▼] 35 to select the item to be set. BASIC SCENE MODE REC SPEED BLANK SEARCH WIND CUT CLOCK SET SETUP ENTER OFF EXIT 7 Press the Joystick Control 35 to determine the setting. • While a Menu is displayed, you cannot record or play back. Menus can be displayed during playback but not during recording. „ To Return to the Previous Screen Move the Joystick Control [◄] 35 . „ To Exit the Menu Screen Press the [MENU] Button 30 again. „ About the Menu Mode Setting The setting selected on the Menu will be retained even when the Camcorder is turned off. However, if the Battery or AC Adaptor is disconnected before turning off the Camcorder, the selected setup may not be retained. • Menu operation flow is shown in this text by >>. 34 35 21
-
 1
1 -
2
-
3
-
4
-
5
-
6
-
7
-
8
-
9
-
10
-
11
-
12
-
13
-
14
-
15
-
 16
16 -
 17
17 -
 18
18 -
 19
19 -
 20
20 -
 21
21 -
 22
22 -
 23
23 -
 24
24 -
 25
25 -
 26
26 -
27
-
28
-
29
-
30
-
31
-
32
-
33
-
34
-
35
-
36
-
37
-
38
-
39
-
40
-
41
-
42
-
43
-
44
-
45
-
46
-
47
-
48
-
49
-
50
-
51
-
52
-
53
-
54
-
55
-
56
-
57
-
58
-
59
-
60
-
61
-
62
-
63
-
64
-
65
-
66
-
67
-
68
-
69
-
70
-
71
-
72
-
73
-
74
-
75
-
76
-
77
-
78
-
79
-
80
 |
 |
