Panasonic PVGS36 PVGS36 User Guide - Page 17
USING THE VIEWFINDER/LCD MONITOR, Adjusting Brightness and Color Level
 |
View all Panasonic PVGS36 manuals
Add to My Manuals
Save this manual to your list of manuals |
Page 17 highlights
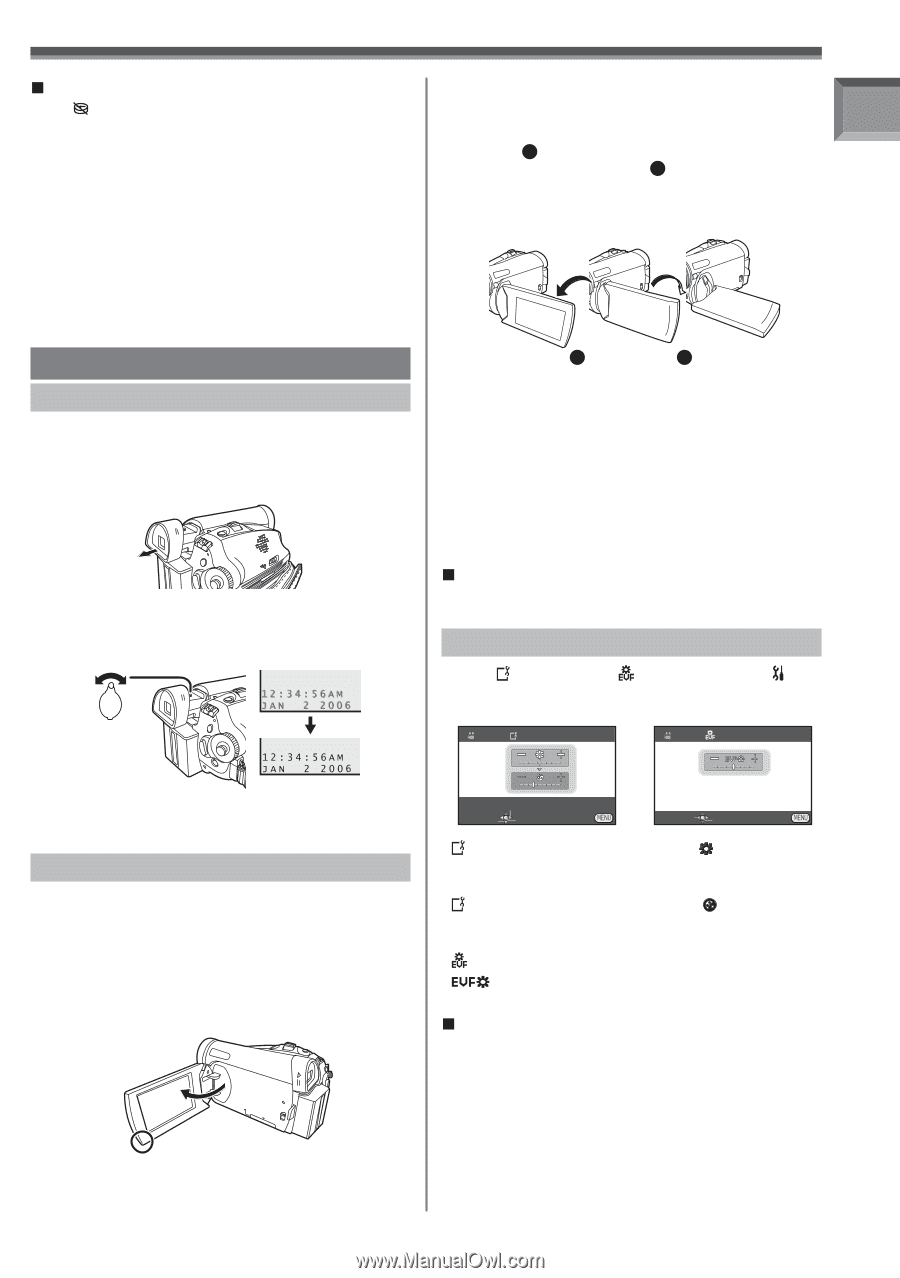
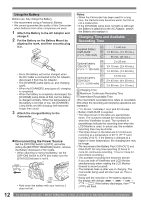
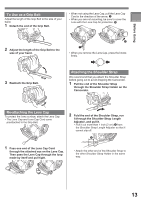
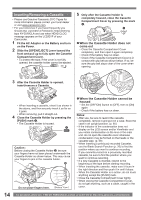
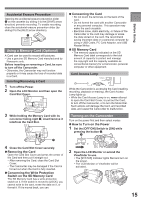
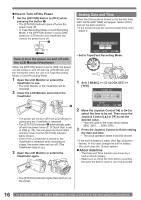
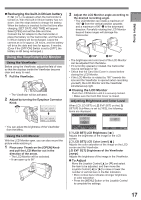
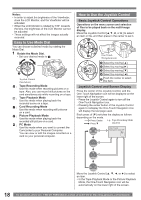
Before Using „ Recharging the built-in lithium battery If [ ] or [--] is appears when the Camcorder is turned on, then the built-in lithium battery has run down. Use the steps below to charge the battery. When the battery is inserted for the first time after charging, [SET DATE AND TIME] will appear. Select [YES] and set the date and time. Connect the AC adaptor to the Camcorder or place the battery on the Camcorder, and the builtin lithium battery will be recharged. Leave the camera as is for approx. 24 hours, and the battery will drive the date and time for approx. 6 months. (Even if the [OFF/ON] Switch is set to [OFF], the battery is still being recharged.) Using the Viewfinder/LCD Monitor Using the Viewfinder Before using the Viewfinder, adjust the field of view so that the displays inside the Viewfinder become clear and easy to read. 1 Pull the Viewfinder. • The Viewfinder will be activated. 2 Adjust by turning the Eyepiece Corrector Knob. 2 Adjust the LCD Monitor angle according to the desired recording angle. • The LCD Monitor can rotate a maximum of 180° 1 from the vertical position upwards and a maximum of 90° 2 to the downward direction. Forcefully rotating the LCD Monitor beyond these ranges will damage the Camcorder. 1 180° 2 90° • The brightness and color level of the LCD Monitor can be adjusted from the Menu. • If it is forcibly opened or rotated, the Camcorder may be damaged or fail. • Check that the Card Slot Cover is closed before closing the LCD Monitor. • If the LCD Monitor is rotated by 180° towards the lens and the Viewfinder is opened (when recording yourself), the LCD Monitor and the Viewfinder simultaneously light. „ Closing the LCD Monitor Push the LCD Monitor until it is securely locked. • Make sure the Card Slot Cover is closed. Adjusting Brightness and Color Level When [ LCD SET] or [ EVF SET] on the [ SETUP] Sub-Menu is set to [YES], the following items are displayed. LCD SET EVF SET • You can adjust the brightness of the Viewfinder from the Menu. Using the LCD Monitor With the LCD Monitor open, you can also record the picture while watching it. 1 Place your Thumb on the [OPEN] Knob and pull the LCD Monitor out in the direction of the arrow. • The LCD Monitor will be activated. • It can open up to 90°. SET SETUP ENTER EXIT SET ENTER EXIT [ LCD SET] LCD Brightness [ ] Adjusts the brightness of the image on the LCD screen. [ LCD SET] LCD Color Level [ ] Adjusts the color saturation of the image on the LCD screen and the Viewfinder. [ EVF SET] Brightness of the Viewfinder [ ] Adjusts the brightness of the image in the Viewfinder. „ To Adjust Move the Joystick Control [▲] or [▼] and select the item to be adjusted, and then move the Joystick Control [◄] or [►] to raise or lower the number of vertical bars in the Bar Indication. • More vertical bars indicates stronger brightness or color saturation. • Press the [MENU] Button or the Joystick Control to complete the settings. 17
-
 1
1 -
2
-
3
-
4
-
5
-
6
-
7
-
8
-
9
-
10
-
11
-
 12
12 -
 13
13 -
 14
14 -
 15
15 -
 16
16 -
 17
17 -
 18
18 -
 19
19 -
 20
20 -
 21
21 -
 22
22 -
23
-
24
-
25
-
26
-
27
-
28
-
29
-
30
-
31
-
32
-
33
-
34
-
35
-
36
-
37
-
38
-
39
-
40
-
41
-
42
-
43
-
44
-
45
-
46
-
47
-
48
-
49
-
50
-
51
-
52
-
53
-
54
-
55
-
56
-
57
-
58
-
59
-
60
-
61
-
62
-
63
-
64
-
65
-
66
-
67
-
68
-
69
-
70
-
71
-
72
-
73
-
74
-
75
-
76
 |
 |