Panasonic SCXH50 SAXH50 User Guide - Page 20
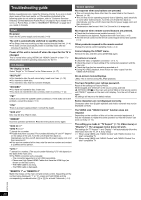
Troubleshooting guide
 |
View all Panasonic SCXH50 manuals
Add to My Manuals
Save this manual to your list of manuals |
Page 20 highlights
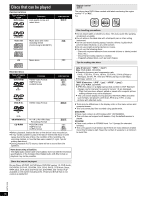
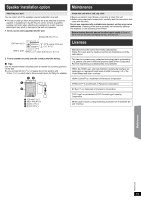
Getting Started Playing Discs Other Operations Troubleshooting guide Before requesting service, make the following checks. If you are in doubt about some of the check points, or if the solutions indicated in the following guide do not solve the problem, refer to "Customer Services Directory (United States and Puerto Rico)" on page 23 if you reside in the U.S.A. or Puerto Rico, or refer to "WARRANTY SERVICE" on page 24 if you reside in Canada. Power No power. Insert the AC power supply cord securely. (B 8) The unit is automatically switched to standby mode. ≥ The Sleep timer was working and had reached the set time limit. (B 4) ≥ The main unit will automatically switch to standby mode after 30 minutes of inactivity. (B 4) Power of this unit is turned off when the input for the TV is changed. This is normal when using VIERA Link "HDAVI Control 4 or later". For details please read the operating instructions for the TV. Unit displays The display is dark. Select "Bright" in "FL Dimmer" in the Others menu. (B 17) "NO PLAY" ≥ You inserted a disc the unit cannot play; insert one it can. (B 18) ≥ You inserted a blank disc. ≥ You inserted a disc that has not been finalized. "NO DISC" ≥ You have not inserted a disc; insert one. ≥ You have not inserted the disc correctly; insert it correctly. (B 12) "F61" Check and correct the speaker cable connections. If this does not fix the problem, consult the dealer. (B 6) "F76" There is a power supply problem. Consult the dealer. "DVD U11" Disc may be dirty. Wipe it clean. "ERROR" Incorrect operation performed. Read the instructions and try again. "DVD H∑∑" "DVD F∑∑∑" ∑ stands for a number. ≥ Trouble may have occurred. The numbers following "H" and "F" depend on the status of the unit. Turn the unit off and then back on. Alternatively, turn the unit off, disconnect the AC power supply cord, and then reconnect it. ≥ If the service numbers fail to clear, note the service number and contact a qualified service person. "U70∑" ∑ stands for a number. (The actual number following "U70" will depend on the state of the main unit.) ≥ The HDMI connection acts unusually. - The connected equipment is not HDMI-compatible. - Please use High Speed HDMI Cables that have the HDMI logo (as shown on the back cover). - The HDMI cable is too long. - The HDMI cable is damaged. "REMOTE 1" or "REMOTE 2" Match the modes on the main unit and remote control. Depending on the number being displayed ("1" or "2"), press and hold [OK]8 and the corresponding numbered button ([1] or [2]) for at least 2 seconds. (B 4) General operation No response when any buttons are pressed. ≥ This unit cannot play discs other than the ones listed in this Owner's Manual. (B 18) ≥ The unit may not be operating properly due to lightning, static electricity or some other external factor. Turn the unit off and then back on. Alternatively, turn the unit off, disconnect the AC power supply cord, and then reconnect it. ≥ Condensation has formed. Wait 1 to 2 hours for it to evaporate. No response when remote control buttons are pressed. ≥ Check that the batteries are installed correctly. (B 8) ≥ The batteries are depleted. Replace them with new ones. (B 8) ≥ Aim the remote control at the remote control signal sensor and operate. (B 4) Other products respond to the remote control. Change the remote control operating mode. (B 4) Cannot display the START menu. Remove the disc and then press [START]B again. No picture or sound. ≥ Check the video or speaker connection. (B 6, 7) ≥ Check the power or input setting of the connected equipment and the main unit. ≥ Check that the disc has something recorded on it. ≥ During HD JPEG playback, there will be no video output from the VIDEO OUT terminal. No on-screen menus/displays. [JPEG] This is normal during HD JPEG playback. You have forgotten your ratings password. Reset all the settings to Factory Preset. While stopped and "DVD/CD" is the source, press and hold [< OPEN/CLOSE]2 on the main unit and [S10]2 on the remote control until "RESET" appears on the main unit's display. Turn the unit off and on again. All settings will return to the default values. Some characters are not displayed correctly. Characters other than English alphabet and Arabic numerals may not be displayed correctly. The VIERA Link "HDAVI Control" function does not respond. Depending on the condition of this unit or the connected equipment, it may be necessary to repeat the same operation so that the function can work correctly. (B 14) The setting you made in "TV Aspect" (B 16, Video menu) or "Display" (B 16, Language menu) does not work. The settings for "TV Aspect"§1 and "Display"§2 will automatically follow the information from the TV. (B 8, Easy setup) §1 When using VIERA Link "HDAVI Control" with "HDAVI Control 3 or later" compatible TV §2 When using VIERA Link "HDAVI Control" with "HDAVI Control 2 or later" compatible TV Reference RQTX1326 20
-
 1
1 -
2
-
3
-
4
-
5
-
6
-
7
-
8
-
9
-
10
-
11
-
12
-
13
-
14
-
 15
15 -
 16
16 -
 17
17 -
 18
18 -
 19
19 -
 20
20 -
 21
21 -
 22
22 -
 23
23 -
 24
24 -
 25
25 -
26
 |
 |