Panasonic SCXH50 SAXH50 User Guide - Page 8
step 3, step 4, step 5
 |
View all Panasonic SCXH50 manuals
Add to My Manuals
Save this manual to your list of manuals |
Page 8 highlights
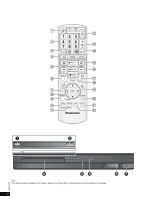
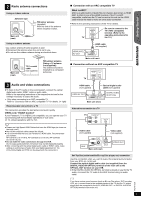
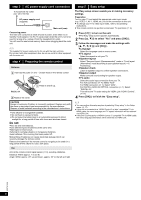
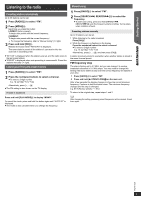
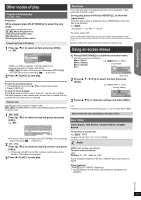
step 3 AC power supply cord connection To household AC outlet (AC 120 V, 60 Hz) AC power supply cord (supplied) AC IN Main unit (rear) Conserving power The main unit consumes a small amount of power, even when it is in standby mode (approx. 0.4 W). To save power when the unit is not to be used for a long time, unplug it from the household AC outlet. You will need to reset some memory items when plugging back the main unit. The supplied AC power supply cord is for use with the main unit only. Do not use it with other equipment. Also, do not use cords for other equipment with the main unit. step 4 Preparing the remote control Batteries Insert so the poles (r and j) match those in the remote control. Press in and lift up. R6/LR6, AA Replace the cover. CAUTION Danger of explosion if battery is incorrectly replaced. Replace only with the same or equivalent type recommended by the manufacturer. Dispose of used batteries according to the manufacturer's instructions. ≥ Use alkaline or manganese batteries. ≥ Do not heat or expose to flame. ≥ Do not leave the battery(ies) in an automobile exposed to direct sunlight for a long period of time with doors and windows closed. Do not: ≥ mix old and new batteries. ≥ use different types of batteries at the same time. ≥ take apart or short circuit. ≥ attempt to recharge alkaline or manganese batteries. ≥ use batteries if the covering has been peeled off. Mishandling of batteries can cause electrolyte leakage which can severely damage the remote control. Remove the batteries if the remote control is not going to be used for a long period of time. Store in a cool, dark place. Use Aim at the remote control signal sensor (B 4), avoiding obstacles. Distance: Within approx. 7 m (23 ft) Angle: Within approx. 20° up and down, approx. 30° to the left and right step 5 Easy setup The Easy setup screen assists you in making necessary settings. Preparation Turn on your TV and select the appropriate video input mode (e.g. VIDEO 1, AV 1, HDMI, etc.) to suit the connection to this unit. ≥ To change your TV's video input mode, refer to its operating instructions. ≥ This remote control can perform some basic TV operations (B 4). 1 Press [Í]1 to turn on the unit. ≥ The Easy setup screen appears automatically. 2 Press [3, 4]8 to select "Yes" and press [OK]8. 3 Follow the messages and make the settings with [3, 4, 2, 1]8 and [OK]8. ≥Language Select the language used on menu screen. ≥TV aspect Select the aspect to suit your TV. ≥Speaker layout Select "Surround layout (Recommended)" mode or "Front layout (Alternative)" mode according to your speaker layout (B 6, Positioning). ≥Speaker check Listen to speaker output to confirm speaker connections. ≥Speaker output Make surround sound setting for speaker output. ≥TV audio Select the audio input connection from your TV. For AUX connection (B 7): Select "AUX". For HDMI connection (B 7): Select "ARC". For DIGITAL AUDIO IN OPTICAL connection (B 7): Select "DIGITAL IN". This will be the TV audio setting for VIERA Link "HDAVI Control". (B 14) 4 Press [OK]8 to finish the "Easy setup". ≥ You can perform this setup anytime by selecting "Easy setup" in the Setup menu. (B 17) ≥ If this unit is connected to a "HDAVI Control 3 or later" compatible TV via HDMI cable, the menu language and TV aspect information will be retrieved via VIERA Link. ≥ If this unit is connected to a "HDAVI Control 2" compatible TV via HDMI cable, the menu language information will be retrieved via VIERA Link. RQTX1326 8
-
 1
1 -
2
-
 3
3 -
 4
4 -
 5
5 -
 6
6 -
 7
7 -
 8
8 -
 9
9 -
 10
10 -
 11
11 -
 12
12 -
 13
13 -
14
-
15
-
16
-
17
-
18
-
19
-
20
-
21
-
22
-
23
-
24
-
25
-
26
 |
 |
