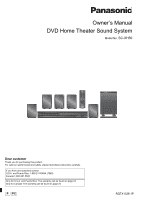
Panasonic SCXH50 SAXH50 User Guide - Page 6
Positioning, Connections
 |
View all Panasonic SCXH50 manuals
Add to My Manuals
Save this manual to your list of manuals |
Page 6 highlights
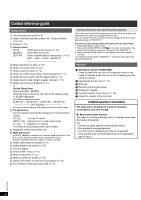
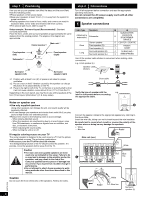
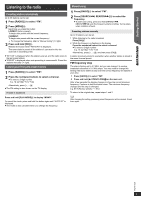
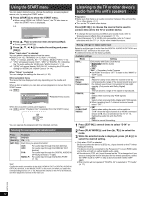
step 1 Positioning How you set up your speakers can affect the bass and the sound field. Note the following points: ≥ Place speakers on flat secure bases. ≥ Keep your speakers at least 10 mm (13/32q) away from the system for proper ventilation. ≥ Placing speakers too close to floors, walls, and corners can result in excessive bass. Cover walls and windows with thick curtains. ≥ For optional wall mount, refer to page 19. Setup example ("Surround layout (Recommended)": Standard surround placement) Place the front, center, and surround speakers at approximately the same distance from the seating position. The angles in the diagram are approximate. Main unit§1 Center speaker§2 Front speaker Front speaker (left) (right) 60° Subwoofer§3 120° Surround speaker (left) Surround speaker (right) §1 Position with at least 5 cm (2q) of space on all sides for proper ventilation. §2 Put on a rack or shelf. Vibration caused by the speaker can disrupt the picture if it is placed directly on the TV. §3 Place to the right or left of the TV, on the floor or a sturdy shelf so that it will not cause vibration. Leave about 30 cm (1113/16q) from the TV. Depending on the room layout, you may like to use all the speakers at the front ("Front layout (Alternative)") (B 8, Easy setup). step 2 Connections Turn off all equipment before connection and read the appropriate operating instructions. Do not connect the AC power supply cord until all other connections are completed. 1 Speaker connections Cable type Speakers (Attached to subwoofer) Subwoofer Short Long Center speaker Front speaker (R) Front speaker (L) Surround speaker (R) Surround speaker (L) SUBWOOFER / 6 ENCEINTE D'EXTRÊMES- GRAVES 5 CENTER / CENTRE 2 FRONT / 1 AVANT 4 SURROUND / 3 AMBIOPHONIE Use of the speaker cable stickers is convenient when making cable connections. e.g., Front speaker (L) Speaker cable stickers Short cable FRONT Lch 1 Verify the type of speaker with the label on the speaker before connecting the appropriate cable. FRONT Lch 1 e.g. RQTX1326 Notes on speaker use ≥Use only supplied speakers Using other speakers can damage the unit, and sound quality will be negatively affected. ≥ You can damage your speakers and shorten their useful life if you play sound at high levels over extended periods. ≥ Reduce the volume in the following cases to avoid damage: - When playing distorted sound. - When the speakers are reverberating due to a record player, noise from FM broadcasts, or continuous signals from an oscillator, test disc, or electronic instrument. - When adjusting the sound quality. - When turning the unit on or off. If irregular coloring occurs on your TV The center speaker is designed to be used close to a TV, but the picture may be affected on some TVs and setup combinations. If this occurs, turn the TV off for about 30 minutes. The demagnetizing function of the TV should correct the problem. If it persists, move the speakers further away from the TV. Caution ≥ The main unit and supplied speakers are to be used only as indicated in this setup. Failure to do so may lead to damage to the amplifier and/or the speakers, and may result in the risk of fire. Consult a qualified service person if damage has occurred or if you experience a sudden change in performance. ≥ Do not attempt to attach these speakers to walls using methods other than those described in this manual. Caution Do not touch the front netted area of the speakers. Hold by the sides. 6 Connect the speaker cables to the appropriate speakers by referring to the above table. Insert the wire fully, taking care not to insert beyond the wire insulation. Be careful not to cross (short circuit) or reverse the polarity of the speaker wires as doing so may damage the speakers. i: White j: Blue line Push! Main unit (rear) White 6 5 2 1 5 5 R5 L SUBWOOFER CENTER FRONT 4 3 R5 L SURROUND Blue line Push! White Blue line Surround speaker (L)
-
 1
1 -
 2
2 -
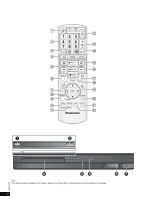 3
3 -
 4
4 -
 5
5 -
 6
6 -
 7
7 -
 8
8 -
 9
9 -
 10
10 -
 11
11 -
 12
12 -
13
-
14
-
15
-
16
-
17
-
18
-
19
-
20
-
21
-
22
-
23
-
24
-
25
-
26
 |
 |
