Panasonic TX-P42X50B Operating Instructions - Page 14
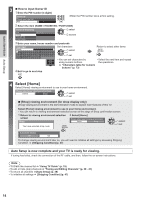
Select [Home]
 |
View all Panasonic TX-P42X50B manuals
Add to My Manuals
Save this manual to your list of manuals |
Page 14 highlights
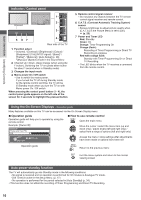
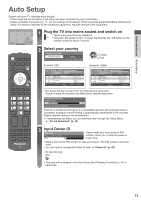
Quick Start Guide Auto Setup 3 ■ How to input Owner ID 1 Enter the PIN number (4 digits) Owner ID Please enter new PIN PIN * * * * ● Enter the PIN number twice at first setting. 2 Select the item (NAME / HOUSE NO / POSTCODE) Owner ID-Data Entry PIN NAME HOUSE NO POSTCODE * * * * select access 3 Enter your name, house number and postcode User input NAME A BCDE FGH I J K LMNOPQRS T U VWX Y Z 0123456789 ! : # a b c d e f g h i j k l mn o p q r s t uvwx y z 123 .!:# abc def 456 ghi jkl mno 789 pqrs tuv wxyz 0 Set characters select Return to select other items set ● You can set characters by ● Select the next item and repeat using numeric buttons. the operations. "Characters table for numeric buttons" (p. 73) 4 Exit to go to next step 4 Select [Home] Select [Home] viewing environment to use in your home environment. Please select your viewing environment. Home Shop select set ■ [Shop] viewing environment (for shop display only) [Shop] viewing environment is the demonstration mode to explain main features of this TV. Select [Home] viewing environment to use in your home environment. ● You can return to viewing environment selection screen at the stage of Shop confirmation screen. 1 Return to viewing environment selection 2 Select [Home] screen Shop You have selected shop mode Please select your viewing environment. Home Shop select set Automatic Demo Off On To change viewing environment later on, you will need to initialise all settings by accessing Shipping Condition. [Shipping Condition] (p. 47) Auto Setup is now complete and your TV is ready for viewing. If tuning has failed, check the connection of the RF cable, and then, follow the on-screen instructions. Note ● To check the channel list "Using TV Guide" (p. 19) ● To edit or hide (skip) channels "Tuning and Editing Channels" (p. 39 - 41) ● To retune all channels [Auto Setup] (p. 38) ● To initialise all settings [Shipping Condition] (p. 47) 14
-
 1
1 -
2
-
3
-
4
-
5
-
6
-
7
-
8
-
 9
9 -
 10
10 -
 11
11 -
 12
12 -
 13
13 -
 14
14 -
 15
15 -
 16
16 -
 17
17 -
 18
18 -
 19
19 -
20
-
21
-
22
-
23
-
24
-
25
-
26
-
27
-
28
-
29
-
30
-
31
-
32
-
33
-
34
-
35
-
36
-
37
-
38
-
39
-
40
-
41
-
42
-
43
-
44
-
45
-
46
-
47
-
48
-
49
-
50
-
51
-
52
-
53
-
54
-
55
-
56
-
57
-
58
-
59
-
60
-
61
-
62
-
63
-
64
-
65
-
66
-
67
-
68
-
69
-
70
-
71
-
72
-
73
-
74
-
75
-
76
-
77
-
78
-
79
-
80
-
81
-
82
-
83
-
84
 |
 |
