Panasonic U1 Panaboard - Page 16
Storing images on an SD memory card, Press the Start/Stop Key.
 |
UPC - 092281895208
View all Panasonic U1 manuals
Add to My Manuals
Save this manual to your list of manuals |
Page 16 highlights
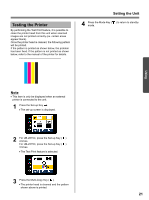
Scanning Storing images on an SD memory card 1 Set the power switch to on ( I ). • The scanner will move to the home position and stop. 2 Open the SD memory card cover and insert the SD memory card into the SD memory card slot until it is locked. Then close the SD memory card cover. 4 Press the Start/Stop Key. • The unit starts scanning. • The scanning status is shown on the display. • When scanning has finished, a preview of the scanned image is shown on the display. • The SD memory card icon is shown on the display. The display below is an example of the unit in standby mode. Note • Do not remove the SD memory card until the preview is shown on the display. 5 Press the Multi-Copy Key ( ) to zoom in on the image. Note • If an SD memory card has been formatted (ex. by the general formatting software of a computer), it oftentimes cannot be recognized by this unit. To use the SD memory card with this unit, it must be reformatted to comply with SD memory card specifications using the appropriate formatting software. You can also download the formatting software for the SD memory card from the following site: http://panasonic.co.jp/pavc/global/cs/sd/ download/sd_formatter.html 3 Press the Mode Key to select the scanning mode. 16 • It is possible to view specific areas of the image. • The current view area is shown on the top left side of the display. Press the Set-up Key ( ) to move down. Press the Multi-Copy Key ( ) to move left. • Press the Mode Key ( ) to return to the preview. 6 Press the Mode Key ( ) again to return to standby mode. • Only remove the SD memory card once you have returned to standby mode. • To remove the SD memory card, open the SD memory card cover and unlock the SD memory card by pressing it once. Once it is unlocked you may remove it. • For information on saving files on an SD memory card, refer to page 14.
-
 1
1 -
2
-
3
-
4
-
5
-
6
-
7
-
8
-
9
-
10
-
 11
11 -
 12
12 -
 13
13 -
 14
14 -
 15
15 -
 16
16 -
 17
17 -
 18
18 -
 19
19 -
 20
20 -
 21
21 -
22
-
23
-
24
-
25
-
26
-
27
-
28
-
29
-
30
-
31
-
32
-
33
-
34
-
35
-
36
-
37
-
38
-
39
-
40
-
41
-
42
-
43
-
44
-
45
-
46
-
47
-
48
 |
 |
