Panasonic WVCW384 WVCW384 User Guide - Page 26
Gain Control Setting AGC, Electronic Sensitivity Enhancement SENS UP, Synchronization Setting SYNC
 |
UPC - 791871505830
View all Panasonic WVCW384 manuals
Add to My Manuals
Save this manual to your list of manuals |
Page 26 highlights
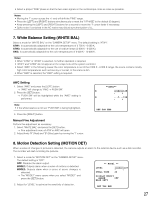
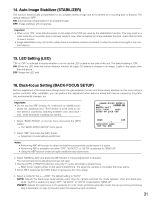
4. Gain Control Setting (AGC) Select an automatic gain control mode. This setting raises the gain and brightens the image under low light conditions. The default setting is "ON (HIGH)". Available modes: ON (HIGH), ON (MID), ON (LOW), OFF 5. Electronic Sensitivity Enhancement (SENS UP) Select a proper enhancement rate when the camera is set to ALC mode. The higher rate you select, the brighter the picture will be. The default setting is "OFF". AUTO: Sets "AGC" to "ON" and adaptively raises the sensitivity up to the selected amplification rate, for example 10 times when set to "X10 AUTO". FIX: Raises the sensitivity fixedly to the selected rate. OFF: Does not raise the sensitivity. * Default SUPER-D3 OFF: SUPER-D3 ON: OFF X2 AUTO X4 AUTO X6 AUTO X10 AUTO OFF X32 FIX X16 FIX X10 FIX X6 FIX X4 FIX X2 FIX OFF* X2 AUTO X4 AUTO X6 AUTO X10 AUTO Notes: • Some types of system controllers may not operate some of the SENS UP functions. If this happens, use the operation but- tons on the camera. • When you select "AUTO" for "SENS UP" and "ON" for "SUPER-D3", the SENS UP function has priority so that the SUPER-D3 function is not activated automatically. • While the SENS UP function is selected, noise, spots or a whitish phenomenon may appear in the picture when the sensi- tivity of the camera is increased. This is a normal phenomenon. • Only when "OFF", "X2 FIX", or "X2 AUTO" is selected for sensitivity enhancement (SENS UP), it is possible to perform ABF adjustment or to select "AUTO" for "C/L ←→ B/W" on the "BACK-FOCUS SETUP" menu. When a sensitivity rate other than "X2 FIX" or "X2 AUTO" is selected, use "PRESET" and "FIX" for "C/L ←→ B/W" on the "BACK-FOCUS SETUP" menu. 6. Synchronization Setting (SYNC) 1. Select a sync mode. VD2: Multiplexed vertical drive, highest priority LL: Line-Lock, follows the phase of supplied AC power, 2nd priority INT: Internal sync, lowest priority Notes: • Selection is not available when VD2 is added to the camera. Selection from "LL" is available when the respective sync is added. • When "LL" is selected, phase adjustment is required. **SYNC** V PHASE COARSE 1(1--16) FINE ...I...128 - + RET TOP END 2. Line-Lock Vertical Phase Adjustment (V PHASE) • Select "LL" and press the [SET] button. • Prepare a dual-trace oscilloscope and supply it with the video output of the camera to be adjusted and that of the refer- ence camera. • Set the oscilloscope to the vertical rate and expand the V-sync portion. • Select a proper "COARSE" phase from 16 steps (22.5 degrees/step) that makes the two video signals on the oscilloscope the closest. 26
-
 1
1 -
2
-
3
-
4
-
5
-
6
-
7
-
8
-
9
-
10
-
11
-
12
-
13
-
14
-
15
-
16
-
17
-
18
-
19
-
20
-
 21
21 -
 22
22 -
 23
23 -
 24
24 -
 25
25 -
 26
26 -
 27
27 -
 28
28 -
 29
29 -
 30
30 -
 31
31 -
32
-
33
-
34
-
35
-
36
-
37
-
38
-
39
-
40
-
41
-
42
-
43
-
44
-
45
-
46
-
47
-
48
-
49
-
50
-
51
-
52
-
53
-
54
-
55
-
56
-
57
-
58
-
59
-
60
-
61
-
62
-
63
-
64
-
65
-
66
-
67
-
68
-
69
-
70
-
71
-
72
-
73
-
74
 |
 |