Pentair MagicFlame Fire and Water Bowl MagicFlame Install and Users Guide - Page 12
Bowl Installation
 |
View all Pentair MagicFlame Fire and Water Bowl manuals
Add to My Manuals
Save this manual to your list of manuals |
Page 12 highlights
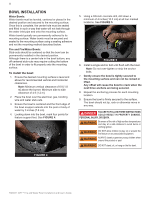
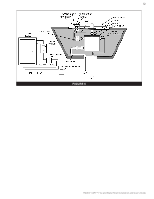
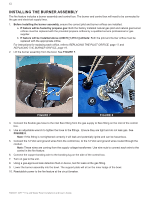
11 BOWL INSTALLATION Water Bowls: Water bowls must be leveled, centered or placed in the desired position and secured to the mounting surface. Once this is complete, the center hole must be sealed and filled in such a way that water will not leak through the water inlet pipe and onto the mounting surface. Water bowls typically are permanently adhered to its mounting surface. Water bowls must be secured and sealed to the mounting surface using a sealing adhesive and not the mounting method described below. Fire and Fire/Water Bowls: Stub-outs should be centered so that the bowl can be permanently installed in the desired position. Although there is a center hole in the bowl bottom, any off centered stub-outs may require cutting the bottom of the bowl in order to fit properly onto the mounting surface. To install the bowl: 1. Ensure the desired mounting surface is level and allows for recommended vertical and horizontal clearances. Note: Minimum vertical clearance of 6 ft [1.8 m] above the burner. Minimum side to side clearance of 4 ft [1.2 m]. 2. Place the bowl over the electrical, gas, bonding wire and water stub-outs. 3. Ensure the bowl is centered and the front edge of the bowl scupper extends into the pool or body of water by 3 inches [7.6 cm]. 4. Looking down into the bowl, mark four points for feature support feet. See FIGURE 4. 5. Using a 3/8-inch concrete drill, drill down a minimum of 4 inches [10.2 cm] at all four marked locations. See FIGURE 5. FIGURE 5 6. Install a single anchor bolt until flush with the bowl. Note: Do not over-tighten or strip the anchor bolts. 7. Gently ensure the bowl is tightly secured to the mounting surface and can not be rocked or lifted. Any offset will cause the bowl to crack when the next three anchors are being secured. 8. Repeat the anchoring process for each mounting location. 9. Ensure the bowl is firmly secured to the surface. The bowl should not tip, rock or otherwise move in any way. FAILURE TO FOLLOW THESE INSTRUCTIONS COULD RESULT IN PROPERTY DAMAGE, PERSONAL INJURY, OR DEATH. Be aware of the risk of high surface temperatures and stay at a safe distance to avoid burns or clothing ignition. DO NOT allow children to play on or around the fire feature or any associated equipment. ALWAYS closely supervise young children when around this product or pool. DO NOT stand, sit, or hang on the fire bowl. FIGURE 4 MAGICFLAME™ Fire and Water Bowl Installation and User's Guide
-
 1
1 -
2
-
3
-
4
-
5
-
6
-
 7
7 -
 8
8 -
 9
9 -
 10
10 -
 11
11 -
 12
12 -
 13
13 -
 14
14 -
 15
15 -
 16
16 -
 17
17 -
18
-
19
-
20
-
21
-
22
-
23
-
24
-
25
-
26
 |
 |
