Pentair MagicFlame Fire and Water Bowl MagicFlame Install and Users Guide - Page 22
Replacing The Pilot Sensor
 |
View all Pentair MagicFlame Fire and Water Bowl manuals
Add to My Manuals
Save this manual to your list of manuals |
Page 22 highlights
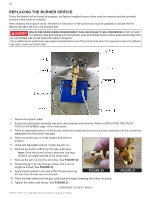
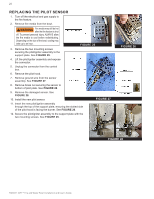
21 REPLACING THE PILOT SENSOR 1. Turn off the electrical and gas supply to the fire feature. 2. Remove fire media from the bowl. Fire media may still be hot after the fire feature is shut off. To prevent personal injury, ALWAYS allow the fire media to cool before redistributing. Depending on the size of the bowl, cooling may take up to an hour. FIGURE 25 3. Remove the two mounting screws securing the pilot/igniter assembly to the support plate. See FIGURE 25. 4. Lift the pilot/igniter assembly and expose the connector. 5. Unplug the connector from the control box. 6. Remove the pilot hood. 7. Remove ground wire from the sensor assembly. See FIGURE 27. 8. Remove brass nut securing the sensor to bottom of pilot plate. See FIGURE 28. 9. Remove the damaged sensor. See FIGURE 28. 10. Install the new pilot sensor. FIGURE 27 11. Insert the new pilot/igniter assembly through the top of the support plate, ensuring the slotted side of the pilot hood is facing the burner. See FIGURE 26. 12. Secure the pilot/igniter assembly to the support plate with the two mounting screws. See FIGURE 25. FIGURE 26 FIGURE 28 MAGICFLAME™ Fire and Water Bowl Installation and User's Guide
-
 1
1 -
2
-
3
-
4
-
5
-
6
-
7
-
8
-
9
-
10
-
11
-
12
-
13
-
14
-
15
-
16
-
 17
17 -
 18
18 -
 19
19 -
 20
20 -
 21
21 -
 22
22 -
 23
23 -
 24
24 -
 25
25 -
 26
26
 |
 |
