Pfaff 130-6 Owner's Manual - Page 5

needle, Feeding

Page 5 highlights

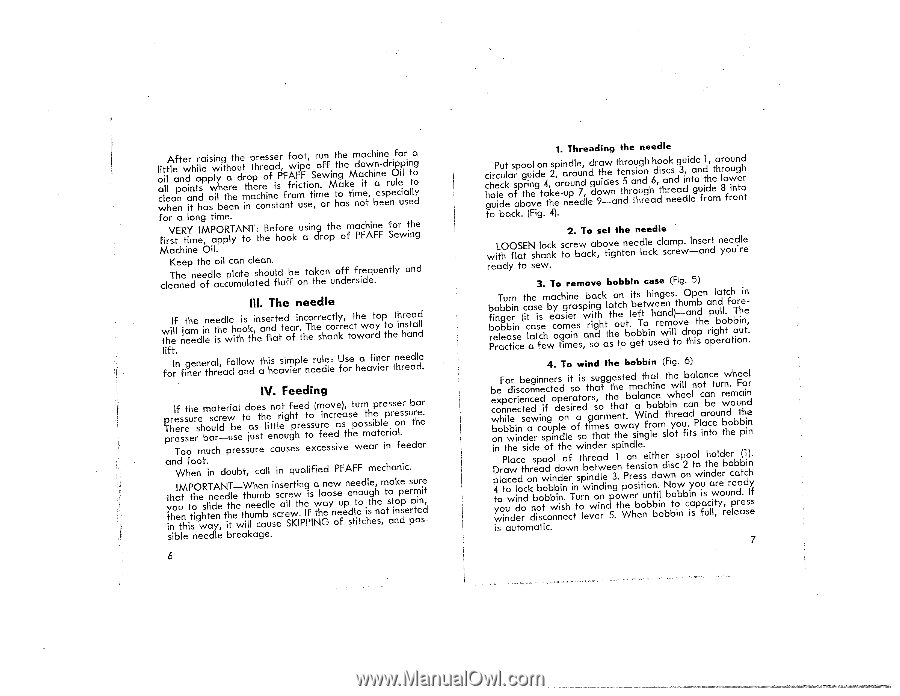
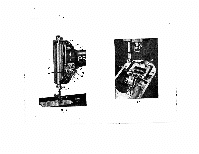
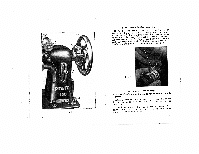
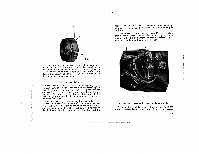
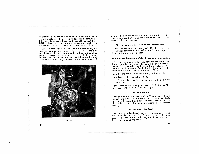
loacwiilltllhetAlaeeafpnnntoewdiarinthntiardhslapeaipssowwliinylhbigteethaheroteenhudetmritnohpatpehccrrehroeoesinnfasseeditsPra,FfnrffAwtoroiFmiocupFttsei,eotS,inrmoeu.owfnerfMintththgohaaekestMeimmdnaooaiecttwc,hhinbaienn-esedeeprrneuiOpfcleoipiularislnetltoagoyd for ci long time. firVstERtYimeIM, PaOppRlTyAtNoT:thBe ehfooroek using the machine a drop of PFAFF for the Sewing Machine Oil. Keep the oil can clean. cleTahneedneoefdlaeccpulmatuelastehdoufldlufbf eontotkheen off frequently underside. and Ill. The needle If will the njtaehmeedliennetieshdewlehitohioskth,ienasnfeldrattetdeoafri.nthcTeohrersehccaotnlrykr,etcotthwewaartydoptthoethinhrseatanadldl lift. In general, follow for finer thread and this simple rule: a heavier needle Use a finer for heavier needle thread. IV. Feeding pTprhreIeTefssrosestouherersemhbmuoascuarchlt-dreerpwuibarseelestsodjauousrsetethsleeicntntaoloreutiugsgfehpehstreedttseoosxu(cmfrieeenosecsvdriaeve)sae,thstpeeuwornmestshaaieprbtreleeirpnsiraseolef.snerseubdtrhaeeer.r atytihnhnoeWaIduMtnthhfiPtttsoeohiOngoewRhts.ltaTiniendyAnee,eNddtoihtTtlhuee-ewbttitWh,lnhluuehmcecmeadanblbullesisnesicncasrlereSlerqwKtwuti.InhaPgeIlPifisfIawtiNhelGoadenoyenswoPeeufFepAndeseFntltieeFootdcuihlsgtmeheh,nsee,ocmthtsoaaatinoknnpdpeiscee.rpsrpmutioenrieds,t sible needle breakage. 6 1. Threading the needle cchghiourePlciecduuketloasrfsappbogtrhooiunevligdeotena4t,kh2see,ap-riuannorpdueolenue7dd,n,leddgdruo9taihw-wdeenasttnhetd5hrnorsaotuihnougdrngheha6hd,doitshoacnrnkseedgea3dudi,nildetagoenufdirt1dho, eemtahr8rlooofruwuionngenthdort to back. (Fig. 4). 2. To set the needle LOOSEN lock with flat shank stocrebwacka,botivgehtneneedloleckclsacmrepw. -Insaenrdt needle youre ready to sew. 3. To remove bobbin case (Fig. 5) bfbrPieoornTlabbgeucbbeartiirnisnncee(tcihctlaaaaestsiecfseehmwbeaycaacogtshimgaimiernienareesssp,wabirnsniaiotgdgchhkattlshathoteoctenuohtb.lgoibetbeseTftbttowihunhiesnraeeegwndmnedisl)olt.t- ovhdueOtarmhonpitspbdehneoarppniuglebdalhrlot.atcbfthobioToiurhnnietne,.. 4. To wind the bobbin (Fig. 6) becwboiDp4tywnoxeonolhoFrnpaiPtbiautnoolcwnhewdblwedraereeiiiidlciesndcnnoebecorsttsddcnhoeeeioakecdgddwrnnnsbreeeiinpbocionsadnewoostoicbndofgpcoubobeifwtiolnpbnreniddnspldiintoddoesenh.oeenelhwseeirfcriTtsoiarntnotuwafestsoitorpsodlhwbnietitrngrinehwvsismetdantdos,ehuaaiweordnlerntagdmerisdtetgnhp5tetesg3eh.ehatonn1pt.hsehwawittWpePn.etebotoaedmerdanhsseyrnlaWbleiieasanstonts.ciueinigfhobobhnnrilcnabdtnootidbeheint.iombloneewdsbbNttrblwihhibonsyotwnoerocihtosbwneipeloubfal2cbecon.iidaityalnaosstnnPolowploaulcfaaiinatisunatbcrnhchcltnoaeildwooteeet,ruueyleordnrrtwb,brnwuheedeoo.ronmrceplhebbeadurFaeabtbtpae.n(hedcoii1iissndnelnnhr)yIes.f is automatic. 7

  • 1
  • 2
  • 3
  • 4
  • 5
  • 6
  • 7
  • 8
  • 9
  • 10
  • 11
  • 12
  • 13
  • 14
  • 15
  • 16
  • 17
  • 18
  • 19
  • 20
  • 21
  • 22

After
raising
the
presser
foot,
run
the
machine
for
a
little
while
without
thread,
wipe
off
the
down-dripping
oil
and
apply
a
drop
of
PFAFF
Sewing
Machine
Oil
to
all
points
where
there
is
friction.
Make
it
a
rule
to
clean
and
oil
the
machine
from
time
to
time,
especially
when
it
has
been
in
constant
use,
or
has
not
been
used
for
ci
long
time.
VERY
IMPORTANT:
Before
using
the
machine
for
the
first
time,
apply
to
the
hook
a
drop
of
PFAFF
Sewing
Machine
Oil.
Keep
the
oil
can
clean.
The
needle
plate
should
be
token
off
frequently
and
cleaned
of
accumulated
fluff
on
the
underside.
Ill.
The
needle
If
the
needle
is
inserted
incorrectly,
the
top
thread
will
jam
in
the
hook,
and
tear.
The
correct
way
to
install
the
needle
is
with
the
flat
of
the
shank
toward
the
hand
lift.
In
general,
follow
this
simple
rule:
Use
a
finer
needle
for
finer
thread
and
a
heavier
needle
for
heavier
thread.
IV.
Feeding
If
the
material
does
not
feed
(move),
turn
presser
bar
pressure
screw
to
the
right
to
increase
the
pressure.
There
should
be
as
little
pressure
as
possible
on
the
presser
bar—use
just
enough
to
feed
the
material.
Too
much
pressure
causes
excessive
wear
in
feeder
and
foot.
When
in
doubt,
call
in
qualified
PFAFF
mechanic.
IMPORTANT—When
inserting
a
new
needle,
make
sure
that
the
needle
thumb
screw
is
loose
enough
to
permit
you
to
slide
the
needle
all
the
way
up
to
the
stop
pin,
then
tighten
the
thumb
screw.
If
the
needle
is
not
inserted
in
this
way,
it
will
cause
SKIPPING
of
stitches,
and
pos
sible
needle
breakage.
1.
Threading
the
needle
Put
spool
on
spindle,
draw
through
hook
guide
1,
around
circular
guide
2,
around
the
tension
discs
3,
and
through
check
spring
4,
around
guides
5
and
6,
and
into
the
lower
hole
of
the
take-up
7,
down
through
thread
guide
8
into
guide
above
the
needle
9—and
thread
needle
from
front
to
back.
(Fig.
4).
2.
To
set
the
needle
LOOSEN
lock
screw
above
needle
clamp.
Insert
needle
with
flat
shank
to
back,
tighten
lock
screw—and
youre
ready
to
sew.
3.
To
remove
bobbin
case
(Fig.
5)
Turn
the
machine
back
on
its
hinges.
Open
latch
in
bobbin
case
by
grasping
latch
between
thumb
and
fore
finger
(it
is
easier
with
the
left
hand)—and
pull.
The
bobbin
case
comes
right
out.
To
remove
the
bobbin,
release
latch
again
and
the
bobbin
will
drop
right
out.
Practice
a
few
times,
so
as
to
get
used
to
this
operation.
4.
To
wind
the
bobbin
(Fig.
6)
For
beginners
it
is
suggested
that
the
balance
wheel
be
disconnected
so
that
the
machine
will
not
turn.
For
experienced
operators,
the
balance
wheel
can
remain
connected
if
desired
so
that
a
bobbin
can
be
wound
while
sewing
on
a
garment.
Wind
thread
around
the
bobbin
a
couple
of
times
away
from
you.
Place
bobbin
on
winder
spindle
so
that
the
single
slot
fits
into
the
pin
in
the
side
of
the
winder
spindle.
Place
spool
of
thread
1
on
either
spool
holder
(1).
Draw
thread
down
between
tension
disc
2
to
the
bobbin
placed
on
winder
spindle
3.
Press
down
on
winder
catch
4
to
lock
bobbin
in
winding
position.
Now
you
are
ready
to
wind
bobbin.
Turn
on
power
until
bobbin
is
wound.
If
you
do
not
wish
to
wind
the
bobbin
to
capacity,
press
winder
disconnect
lever
5.
When
bobbin
is
full,
release
is
automatic.
6
7