Pfaff 130-6 Owner's Manual - Page 7
forefinger
 |
View all Pfaff 130-6 manuals
Add to My Manuals
Save this manual to your list of manuals |
Page 7 highlights
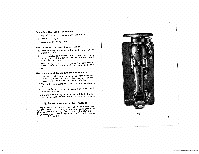
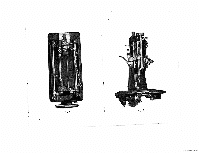
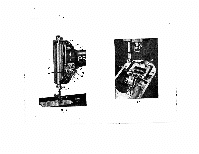
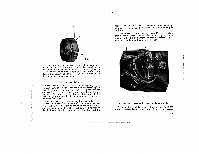
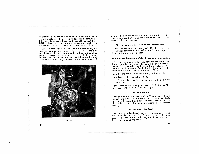
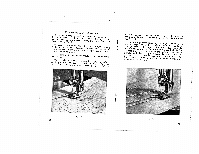
Fig. 6 10 5. To replace bobbin case (Fig. 7) tthibthnehoegnruSotosmwlbkuiipoabgenasheenbtnosodtfphbotrmebdhirniuranbgobmkopoebb2bin.bblstaiaTuointnnrcuedhrcbncaotasbfhbmesoaabe.cratiekcWnfs.hcilainiotncPsghteaueessbr1hebi,,os,obdacslboaoklwiinwcpnakdonyenbcdoadbifsbrtoriseabnobwimbhnlpaiionntctysighnhioectetiusoaoo,snpteech.uexernnwpnedetaoieedtdhsrr, Fig. 7 6. To commence sewing IMPORTANT-Turn wheel towards you to pick-up bobbin thread. Allow needle to descend thread then appears in the and form rise once. of a loop The under out of the needle hole. tlheveTehrpe.rneDslsroeawrwefrobooptt,rheasnsudeprpteofrotohatendbreyalorw.meerantshroeaf dpreensdsser foot under 11
-
 1
1 -
 2
2 -
 3
3 -
 4
4 -
 5
5 -
 6
6 -
 7
7 -
 8
8 -
 9
9 -
 10
10 -
 11
11 -
 12
12 -
13
-
14
-
15
-
16
-
17
-
18
-
19
-
20
-
21
-
22
 |
 |

5.
To
replace
bobbin
case
(Fig.
7)
Slip
bobbin
into
bobbin
case,
and
draw
the
thread
through
the
bobbin
case
slot
1,
away
from
you,
under
tension
spring
2.
Turn
machine
bock
on
its
hinges
expos
ing
base
for
bobbin
case.
With
bobbin
case
latch
opened,
between
thumb
and
forefinger,
slip
bobbin
into
center
hook
and
drop
latch
back.
Push
down
bobbin
case
with
thumb
to
make
sure
that
case
is
locked
in
position.
Fig.
7
6.
To
commence
sewing
IMPORTANT—Turn
wheel
towards
you
to
pick-up
bobbin
thread.
Allow
needle
to
descend
and
rise
once.
The
under
thread
then
appears
in
the
form
of
a
loop
out
of
the
needle
hole.
Then
lower
presser
foot
by
means
of
presser
foot
lever.
Draw
both
upper
and
lower
thread
ends
under
the
presser
foot,
and
to
the
rear.
Fig.
6
10
11