Pfaff GrandQuilter 18.8 Owner's Manual - Page 25
New Spring, This is
 |
View all Pfaff GrandQuilter 18.8 manuals
Add to My Manuals
Save this manual to your list of manuals |
Page 25 highlights
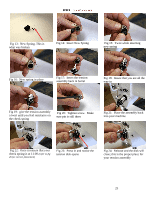
Fig 13: New Spring, This is what was broken Fig 14: Insert New Spring Fig 15: Twist while inserting new spring Fig 16: New spring in place Fig 17: Insert the tension assembly back in barrel Fig 18: Insure that you are all the way in Fig 19: give the tension assembly a twist until you feel resistance on the check spring Fig 20: Tighten screw. Make sure pin is still there Fig 21: Place the assembly back into your machine Fig 22: Once in ensure that your check spring is at 11:00 (refer to fig 26 for correct placement) Fig 23: Press in and notice the tension disk opens Fig 24: Release and the disk will close; this is the proper place for your tension assembly 25
-
 1
1 -
2
-
3
-
4
-
5
-
6
-
7
-
8
-
9
-
10
-
11
-
12
-
13
-
14
-
15
-
16
-
17
-
18
-
19
-
 20
20 -
 21
21 -
 22
22 -
 23
23 -
 24
24 -
 25
25 -
 26
26 -
 27
27 -
 28
28
 |
 |

25
Fig 13:
New Spring, This is
what was broken
Fig 16:
New spring in place
Fig 19:
give the tension assembly
a twist until you feel resistance on
the check spring
Fig 22:
Once in ensure that your
check spring is at 11:00
(refer to fig
26 for correct placement)
Fig 14:
Insert New Spring
Fig 17:
Insert the tension
assembly back in barrel
Fig 20:
Tighten screw.
Make
sure pin is still there
Fig 23:
Press in and notice the
tension disk opens
Fig 15:
Twist while inserting
new spring
Fig 18:
Insure that you are all the
way in
Fig 21:
Place the assembly back
into your machine
Fig 24:
Release and the disk will
close; this is the proper place for
your tension assembly