Pfaff GrandQuilter 18.8 Owner's Manual - Page 7
Attaching your handle bars with controllers
 |
View all Pfaff GrandQuilter 18.8 manuals
Add to My Manuals
Save this manual to your list of manuals |
Page 7 highlights
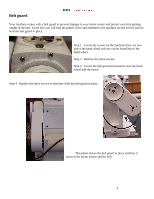
Attaching your handle bars with controllers There are two locations where you can connect your handle bars with controllers to your Mega Quilter 18x8. These photos show the block that will hold the handle bars in place on your Mega Quilter 18x8. This block is on the front of the machine or the needle side of the machine and is used for free motion quilting. This block is on the back of the Machine or the motor side of the machine and is used when following a pantograph with the laser light. Step 1. Remove the two hex screws from the block using the allen wrench provided in your accessory bag. As you remove the screws the front of the block will come off. Step 2. Locate your handles which have the controllers attached and also have a 9 pin cable attached to the left controller. Step 3. Center the handles on the block and place the front part of the block back in place and put the screws in. As you get to the point of the screws being tight ensure that they are angled good for you. If you need to adjust the angle of the handles you can loosen the screws and move the handles up and down to help with your comfort. 7
-
 1
1 -
 2
2 -
 3
3 -
 4
4 -
 5
5 -
 6
6 -
 7
7 -
 8
8 -
 9
9 -
 10
10 -
 11
11 -
 12
12 -
13
-
14
-
15
-
16
-
17
-
18
-
19
-
20
-
21
-
22
-
23
-
24
-
25
-
26
-
27
-
28
 |
 |
