Pfaff creative 2140 Owner's Manual - Page 33
Assistant.
 |
View all Pfaff creative 2140 manuals
Add to My Manuals
Save this manual to your list of manuals |
Page 33 highlights
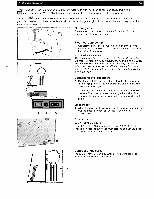
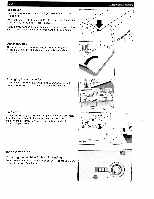
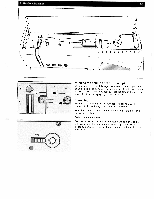
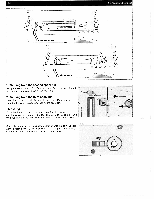
2. Machine Assistant 2-1 riThere is a Creative Assistant function in your sewing machine to help you; it can be called up at any time with the icon on the tool bar. The tool bar then changes color and the functions assigned to the icons change. Touch the icon to open the Machine Assistant. The Machine Assistant contains precise instructions on how to use your Pfaff creative 2140, thread a needle and wind a bobbin, change the light bulb, and attach the embroidery unit to the machine, plus lots more. i Carrying case Place the enclosed power cord and the foot control into the compartment of the carrying case. \/] Electrical connection 1. Connect the power cord between the socket of the sewing machine and the wall outlet. The socket is located on the righthand side of the machine. For the USA and Canada This sewing machine has a polarized plug (one blade wider than the other). To reduce the risk of electric shock, this plug is intended to fit in a polarized outlet only one way If the plug does not fit fully in the outlel reverse the plug. If it still does not fit, contact a qualified electrician to install the proper outlet. Do not modify the plug in any way. Connecting the foot control 2. Pull the retractable cord out of the foot control to a length that is comfortable for you. The foot control has an automatic cordrewind reel for storage. Connect the plug of the foot control to the socket of the sewing machine. The socket is located on the right-hand side of the machine. The sewing speed is controlled by pressing the foot control. 3. 2. 1. Main switch 3. When the main switch is switched on, the sewing lamp and the multi-color touch screen light up. Your Pfaff creative 2140 is now ready to use. Dual voltage 220 V - 240 V I 120 V Your Pfaff creative 2140 is pre-set to voltage 220 V - 240 V. To change the voltage to 120 V, you must slide the dual voltage switch (28) on the underside of your machine. Contrast of the screen The contrast of the screen is adjustable. The setting can be re adjusted with the screen control dial (A).
-
 1
1 -
2
-
3
-
4
-
5
-
6
-
7
-
8
-
9
-
10
-
11
-
12
-
13
-
14
-
15
-
16
-
17
-
18
-
19
-
20
-
21
-
22
-
23
-
24
-
25
-
26
-
27
-
 28
28 -
 29
29 -
 30
30 -
 31
31 -
 32
32 -
 33
33 -
 34
34 -
 35
35 -
 36
36 -
 37
37 -
 38
38 -
39
-
40
-
41
-
42
-
43
-
44
-
45
-
46
-
47
-
48
-
49
-
50
-
51
-
52
-
53
-
54
-
55
-
56
-
57
-
58
-
59
-
60
-
61
-
62
-
63
-
64
-
65
-
66
-
67
-
68
-
69
-
70
-
71
-
72
-
73
-
74
-
75
-
76
-
77
-
78
-
79
-
80
-
81
-
82
-
83
-
84
-
85
-
86
-
87
-
88
-
89
-
90
-
91
-
92
-
93
-
94
-
95
-
96
-
97
-
98
-
99
-
100
-
101
-
102
-
103
-
104
-
105
-
106
-
107
-
108
-
109
-
110
-
111
-
112
-
113
-
114
-
115
-
116
-
117
-
118
-
119
-
120
-
121
-
122
-
123
-
124
-
125
-
126
-
127
-
128
-
129
-
130
-
131
-
132
-
133
-
134
-
135
-
136
-
137
-
138
-
139
-
140
-
141
-
142
-
143
-
144
-
145
-
146
-
147
-
148
-
149
-
150
-
151
-
152
-
153
-
154
-
155
-
156
-
157
-
158
-
159
-
160
-
161
-
162
-
163
-
164
-
165
-
166
-
167
-
168
-
169
-
170
-
171
-
172
-
173
-
174
-
175
-
176
-
177
-
178
-
179
-
180
-
181
-
182
-
183
-
184
-
185
-
186
-
187
-
188
-
189
-
190
-
191
 |
 |
