Pfaff creative 2140 Owner's Manual - Page 84
Operate, multi-color, touch, screen, Automatic, positioning, color, changing
 |
View all Pfaff creative 2140 manuals
Add to My Manuals
Save this manual to your list of manuals |
Page 84 highlights
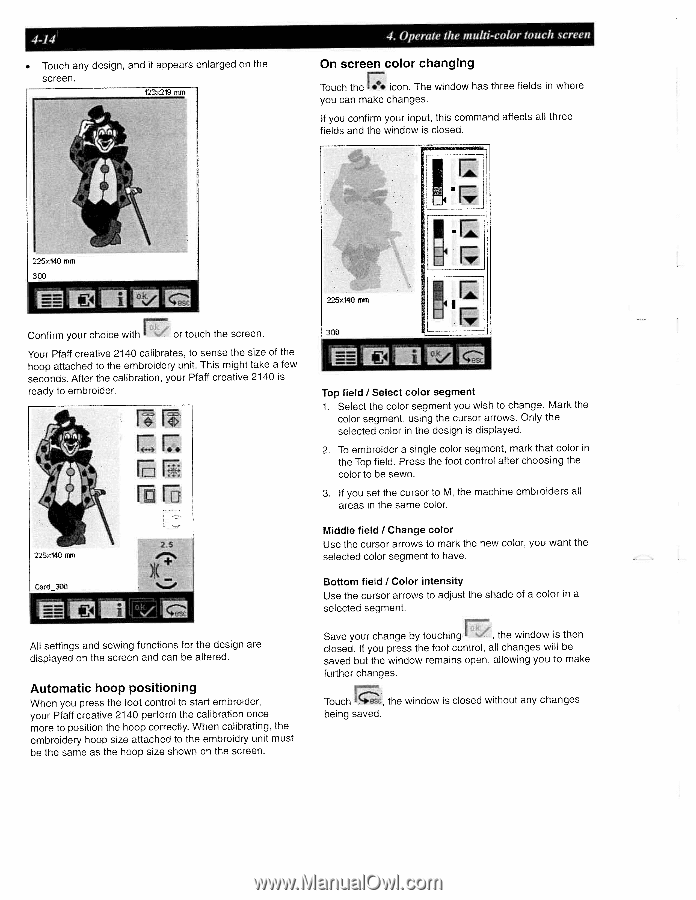
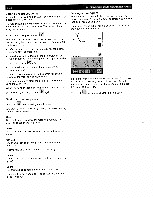
4-14 • Touch any design, and it appears enlarged on the screen. 123x219 mm 4. Operate the multi-color touch screen On screen color changing Touch the icon. The window has three fields in where you can make changes. If you confirm your input, this command affects all three fields and the window is closed. 225x140 mm 300 225x140 fliT! Confirm your choice with or touch the screen. Your Pfaff creative 2140 calibrates, to sense the size of the hoop attached to the embroidery unit. This might take a few seconds. After the calibration, your Pfaft creative 2140 is ready to embroider. Ii Cird,300 rrn 2.5 All settings and sewing functions for the design are displayed on the screen and can be altered. Automatic hoop positioning When you press the foot control to start embroider, your Pfaff creative 2140 perform the calibration once more to position the hoop correctly. When calibrating, the embroidery hoop size attached to the embroidry unit must be the same as the hoop size shown on the screen. 300 irz iii Top field I Select color segment 1. Select the color segment you wish to change. Mark the color segment, using the cursor arrows. Only the selected color in the design is displayed. 2. To embroider a single color segment, mark that color in the Top field. Press the foot control after choosing the color to be sewn. 3. If you set the cursor to M. the machine embroiders all areas in the same color. Middle field I Change color Use the cursor arrows to mark the new color, you want the selected color segment to have. Bottom field I Color intensity Use the cursor arrows to adjust the shade of a color in a selected segment. Save your change by touching - the window is then , closed. If you press the foot control, all changes will be saved but the window remains open, allowing you to make further changes. Touch the window is closed without any changes being saved.
-
 1
1 -
2
-
3
-
4
-
5
-
6
-
7
-
8
-
9
-
10
-
11
-
12
-
13
-
14
-
15
-
16
-
17
-
18
-
19
-
20
-
21
-
22
-
23
-
24
-
25
-
26
-
27
-
28
-
29
-
30
-
31
-
32
-
33
-
34
-
35
-
36
-
37
-
38
-
39
-
40
-
41
-
42
-
43
-
44
-
45
-
46
-
47
-
48
-
49
-
50
-
51
-
52
-
53
-
54
-
55
-
56
-
57
-
58
-
59
-
60
-
61
-
62
-
63
-
64
-
65
-
66
-
67
-
68
-
69
-
70
-
71
-
72
-
73
-
74
-
75
-
76
-
77
-
78
-
 79
79 -
 80
80 -
 81
81 -
 82
82 -
 83
83 -
 84
84 -
 85
85 -
 86
86 -
 87
87 -
 88
88 -
 89
89 -
90
-
91
-
92
-
93
-
94
-
95
-
96
-
97
-
98
-
99
-
100
-
101
-
102
-
103
-
104
-
105
-
106
-
107
-
108
-
109
-
110
-
111
-
112
-
113
-
114
-
115
-
116
-
117
-
118
-
119
-
120
-
121
-
122
-
123
-
124
-
125
-
126
-
127
-
128
-
129
-
130
-
131
-
132
-
133
-
134
-
135
-
136
-
137
-
138
-
139
-
140
-
141
-
142
-
143
-
144
-
145
-
146
-
147
-
148
-
149
-
150
-
151
-
152
-
153
-
154
-
155
-
156
-
157
-
158
-
159
-
160
-
161
-
162
-
163
-
164
-
165
-
166
-
167
-
168
-
169
-
170
-
171
-
172
-
173
-
174
-
175
-
176
-
177
-
178
-
179
-
180
-
181
-
182
-
183
-
184
-
185
-
186
-
187
-
188
-
189
-
190
-
191
 |
 |