Philips 26PF5321 User Manual - Page 4
Preparation / Getting started - 10 remote control
 |
View all Philips 26PF5321 manuals
Add to My Manuals
Save this manual to your list of manuals |
Page 4 highlights
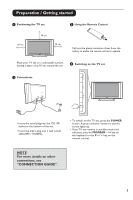
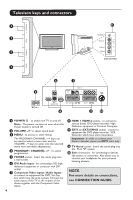
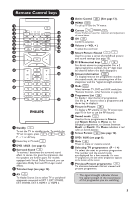
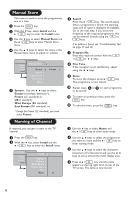
Preparation / Getting started 1 Positioning the TV set 10 cm 10 cm 10 cm 3 Using the Remote Control Pull out the plastic insulation sheet from the battery to enable the remote control to operate. Place your TV set on a solid stable surface, leaving a space of at 10 cm around the set. 4 Switching on the TV set 2 Connections - - . • Insert the aerial plug into the 75Ω : socket at the bottom of the set. • Insert the mains plug into a wall socket (220-240V / 50/60Hz). • To switch on the TV set, press the POWER button. A green indicator comes on and the screen lights up. • If the TV set remains in standby mode (red indicator), press the PROGRAM - / + key on the keyboard or the P - / + key on the remote control. NOTE For more details on other connections, see "CONNECTION GUIDE". 3
-
 1
1 -
 2
2 -
 3
3 -
 4
4 -
 5
5 -
 6
6 -
 7
7 -
 8
8 -
 9
9 -
 10
10 -
11
-
12
-
13
-
14
-
15
-
16
-
17
-
18
-
19
-
20
-
21
-
22
 |
 |
