Philips DVDR985A User manual - Page 20
Remote Control Buttons
 |
UPC - 037849922774
View all Philips DVDR985A manuals
Add to My Manuals
Save this manual to your list of manuals |
Page 20 highlights
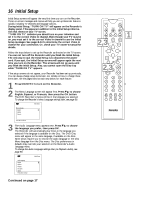
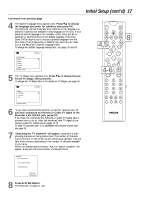
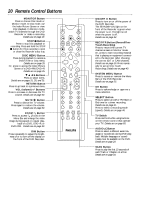
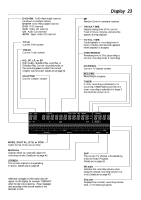
20 Remote Control Buttons MONITOR Button Press to choose Disc mode or Monitor mode. In Disc mode, use the Index Picture Screen or view Disc playback. In Monitor mode, watch TV channels through the DVD Recorder or make a recording. Details are on page 19. STOP C Button Press to stop Disc playback or recording. Press and hold the STOP C button for three seconds to open or close the Recorder's disc tray. DISC MENU Button Press during playback to access a DVD's Title or Disc menu. Details are on page 28. Or, press to access the Index Picture Screen of a DVD+RW/DVD+R. Details are on page 35. 9 8 ; :Buttons Press to select items. Details are on pages 25, 28, and 35. RETURN Button Press to go back to a previous menu. VOL (volume) +/- Buttons Press to increase or decrease the TV volume. Details are on page 60. MUTE H Button Press to silence the TV volume. Press again to restore the volume. Details are on page 60. ZOOM a Button Press to access a (Zoom) in the Menu Bar and enlarge the video image during paused or regular play- back of a DVD, DVD+R, or DVD+RW. Details are on page 30. DIM Button Press repeatedly to adjust the bright- ness of or to turn off the display on the front of the DVD Recorder. MONITOR ON/OFF PREVIOUS REC/OTR NEXT REVERSE PAUSE SLOW FORWARD STOP FSS PLAY CLEAR VOL TIMER SELECT CH MUTE T/C A/CH ZOOM ANGLE SUBTITLE AUDIO DIM REPEAT REPEAT SCAN ON/OFF y Button Press to turn on or off the power of the DVD Recorder. The STANDBY-ON light on the front of the Recorder is green when the power is on. The light is red when the power is off. Details are on page 22. REC/OTR Button (Record/OneTouch Recording) Press to record the current TV channel as seen in Monitor mode. Or, press to start recording material that is playing on equipment connected to the Recorder (after choosing the correct EXT or CAM channel). Details are on page 19. Press repeatedly to set up One-Touch Recordings. Details are on page 40. SYSTEM MENU Button Press to access or remove the Menu Bars of the DVD Recorder. Details are on page 25. OK Button Press to acknowledge or approve a menu selection. SELECT Button Press to select an AM or PM Start or End time for a timer recording. Details are on page 41. Press to select a recording mode (speed). Details are on page 46. TV Switch Press and hold while using buttons on the remote control that operate your TV. Details are on page 60. AUDIO Y Button Press to select a different audio language or soundtrack during DVD playback. Multiple languages or soundtracks must be available on the DVD. Details are on page 29. SCAN Button Press to play the first 10 seconds of each Track or Chapter on a Disc. Details are on page 33.
-
 1
1 -
2
-
3
-
4
-
5
-
6
-
7
-
8
-
9
-
10
-
11
-
12
-
13
-
14
-
 15
15 -
 16
16 -
 17
17 -
 18
18 -
 19
19 -
 20
20 -
 21
21 -
 22
22 -
 23
23 -
 24
24 -
 25
25 -
26
-
27
-
28
-
29
-
30
-
31
-
32
-
33
-
34
-
35
-
36
-
37
-
38
-
39
-
40
-
41
-
42
-
43
-
44
-
45
-
46
-
47
-
48
-
49
-
50
-
51
-
52
-
53
-
54
-
55
-
56
-
57
-
58
-
59
-
60
-
61
-
62
-
63
-
64
-
65
-
66
-
67
-
68
 |
 |
