Philips DVDR985A User manual - Page 9
Hookups
 |
UPC - 037849922774
View all Philips DVDR985A manuals
Add to My Manuals
Save this manual to your list of manuals |
Page 9 highlights
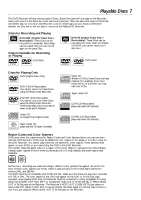
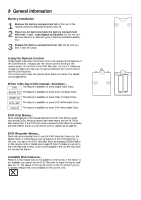
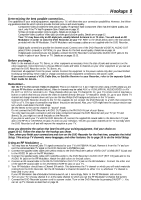
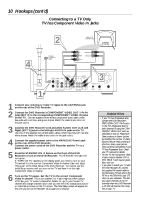
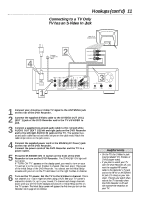
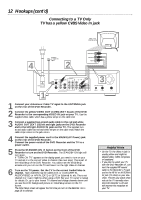
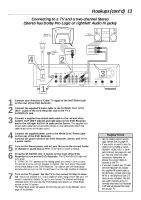
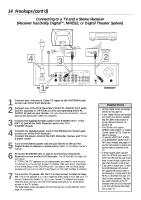
Hookups 9 Determining the best possible connection... The capabilities of your existing equipment, especially your TV, will determine your connection possibilities. However, the follow- ing guidelines describe which options provide the best picture and sound quality. 5555 Component Video provides the best picture quality. Progressive Scan Component Video has the highest quality, but use it only if the TV has Progressive Scan. Details are on page 10. 555 S-Video provides excellent picture quality. Details are on page 11. 55 Composite Video (a yellow Video jack) provides good picture quality. Details are on page 12. 55 Your TV may have only an RF-style jack, usually labeled Antenna In or 75 ohm. You will need an RF Modulator in order to view the DVD Recorder at your TV. Refer to the details below and to the instructions provided with the RF Modulator. The RF Modulator and necessary cables are not supplied with the DVD Recorder. 5555 555 Digital audio connections provide the clearest sound. Connect one of the DVD Recorder's DIGITAL AUDIO OUT jacks (COAX (coaxial) or OPTICAL) to your Stereo for the best sound quality. Details are on page 14. If digital audio connections are not possible, connect the DVD Recorder's red and white AUDIO OUT jacks to the Audio In jacks of your Stereo or TV. Details are on pages 10-13. Before you begin... q Refer to the manuals of your TV, Stereo, or other equipment as necessary. Note the style of jacks and connectors on the other equipment. Determine how to choose different Audio and Video In channels on your other equipment so you can see and hear the DVD Recorder on the TV, Stereo, etc. q Disconnect all equipment from the power outlets. Connect the equipment to the power outlets only after you have finished hooking up everything. Never make or change connections with equipment connected to the power outlet. q If you need to connect a VCR, Cable Box, or Satellite Receiver to your Recorder, refer to the separate Quick Start Guide for details. Remember... q Set the TV to the correct Video In channel. This is not channel 3 or 4 as it might be when using a VCR (unless you are using an RF Modulator as detailed below). Video In channels may be called AUX or AUXILIARY IN, AUDIO/VIDEO or A/V IN, EXT1 or EXT2 or External In, etc. These channels often are near TV channel 00. Or, your TV remote control may have a button or switch that lets you choose the Video In channel directly. See your TV manual for details. Or, go to your lowest TV channel and change channels down until you see the blue Philips DVD background picture on the TV screen. q Connect the DVD Recorder directly to the TV. For example, do not connect the DVD Recorder to a VCR, then connect the VCR to a TV. This type of connection may distort the picture and sound. Also, your VCR might have the copy protection system, which could distort the DVD image. q Set the Stereo to the correct channel or "source" mode. q Do not connect the DVD Recorder's AUDIO OUT jacks to the PHONO IN jack of your Stereo. q You only need one audio connection and one video connection between the DVD Recorder and your TV (or TV and Stereo). So, you might not use all the jacks on the Recorder. q If you plan to watch your TV with the DVD Recorder off, connect the supplied RF coaxial cable to the Recorder's TV jack and to the RF IN or ANTENNA IN jack (75 ohm) on your television. This lets you watch channels at the TV normally when the DVD Recorder is off and will improve the reception at your TV. Once you determine the option that best fits with your existing equipment, find your choice on pages 10-15. Follow the steps for the hookup you chose. Then, when you finish your connections and turn on the DVD Recorder for the first time, complete the Initial Setup. This sets up TV channels, menu languages, and other features. Go to page 16 to do the Initial Setup. Using an RF Modulator ... 1 You may have an Antenna/Cable TV signal connected to your TV's ANTENNA IN jack. Remove it from the TV and connect the Antenna/Cable TV signal to the DVD Recorder's ANTENNA jack. 2 Connect the supplied video cable (with yellow ends) to the DVD Recorder's yellow VIDEO OUT (CVBS) (EXT 2) jack and to the VIDEO IN jack on the RF Modulator. 3 Connect the supplied audio cable (with red/white ends) to the DVD Recorder's AUDIO OUT (EXT 1/2) jacks and to the AUDIO IN jacks on the RF Modulator. Match the cable colors to the jack colors. 4 Connect an RF coaxial cable to the RF OUT/ANTENNA OUT/TO TV jack on the RF Modulator. Connect the other end of the same RF coaxial cable to the ANTENNA IN/RF IN jack on your TV. 5 Your RF Modulator should have a Channel 3/4 switch. This determines the TV channel on which you will watch materials coming from the DVD Recorder. Set the RF Modulator's Channel 3/4 switch to either 3 or 4, whichever TV channel is least used in your area. If your RF Modulator has a Modulator/Antenna switch, set it accordingly. Refer to the RF Modulator instructions. 6 Turn on your TV. Choose channel 3 or 4 (the same channel to which you set the RF Modulator's Channel 3/4 switch). 7 Connect the DVD Recorder's power cord to a power outlet. Turn on the DVD Recorder by pressing ON/OFF y. You can set up TV channels as described on page 36.
-
 1
1 -
2
-
3
-
 4
4 -
 5
5 -
 6
6 -
 7
7 -
 8
8 -
 9
9 -
 10
10 -
 11
11 -
 12
12 -
 13
13 -
 14
14 -
15
-
16
-
17
-
18
-
19
-
20
-
21
-
22
-
23
-
24
-
25
-
26
-
27
-
28
-
29
-
30
-
31
-
32
-
33
-
34
-
35
-
36
-
37
-
38
-
39
-
40
-
41
-
42
-
43
-
44
-
45
-
46
-
47
-
48
-
49
-
50
-
51
-
52
-
53
-
54
-
55
-
56
-
57
-
58
-
59
-
60
-
61
-
62
-
63
-
64
-
65
-
66
-
67
-
68
 |
 |