Philips DVP3345VB User manual - Page 11
English - dvd player
 |
UPC - 605342038294
View all Philips DVP3345VB manuals
Add to My Manuals
Save this manual to your list of manuals |
Page 11 highlights
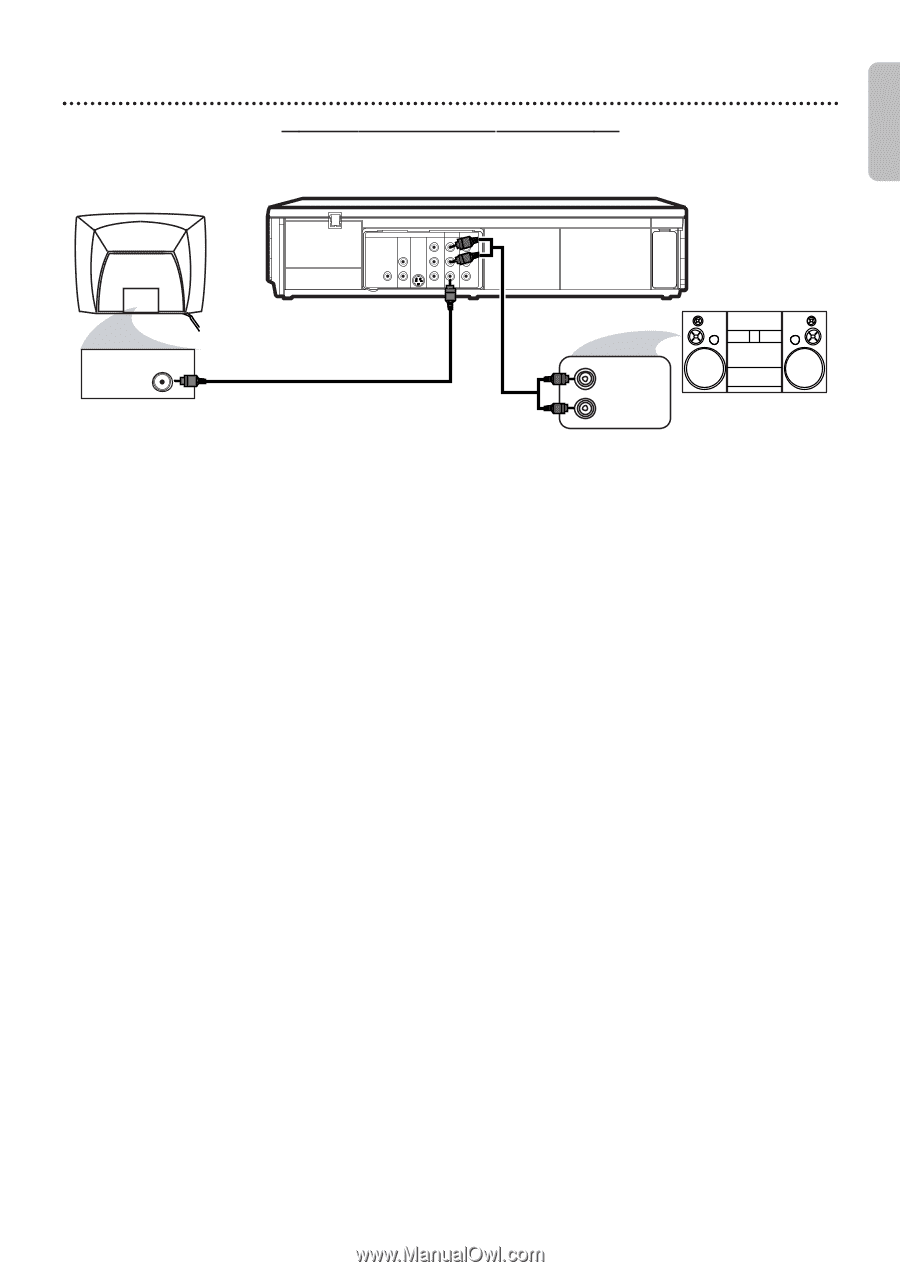
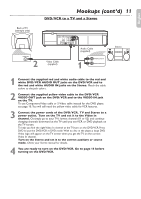
English Hookups (cont'd) 11 DVD/VCR to a TV and a Stereo Back of TV (example only) VIDEO IN 2 DIGITAL AUDIO OUT DVD AUDIO OUT S VIDEO OUT COM ONENT V DEO OUT Y DVD VCR AUD O O VCR L L COAX AL R CB PB R V DEO OUT V DEO N CR PR Audio Cable (supplied) Video Cable (supplied) 1 AUDIO (LEFT) IN AUDIO (RIGHT) IN Stereo 1 Connect the supplied red and white audio cable to the red and white DVD/VCR AUDIO OUT jacks on the DVD/VCR and to the red and white AUDIO IN jacks on the Stereo. Match the cable colors to the jack colors. 2 Connect the supplied yellow video cable to the DVD/VCR VIDEO OUT jack on the DVD/VCR and to the VIDEO IN jack on the TV. To use Component Video cable or S-Video cable instead for the DVD player, see page 10. You will still need the yellow video cable for VCR features. 3 Connect the power cords of the DVD/VCR, TV and Stereo to a power outlet. Turn on the TV and set it to the Video In channel. Or, simply go to your TV's lowest channel (01 or 02) and continue changing channels downward at the TV until you see VCR or DVD playback on the TV screen. To help you find the right Video In channel at the TV, turn on the DVD/VCR. Press DVD to put the DVD/VCR in DVD mode. With no disc in the player, a large DVD Video logo will appear on the TV screen when you get the TV on the correct Video In channel. Turn on the Stereo and set it to the correct auxiliary or source mode. Check your Stereo manual for details. 4 You are ready to turn on the DVD/VCR. Go to page 14 before turning on the DVD/VCR.
-
 1
1 -
2
-
3
-
4
-
5
-
 6
6 -
 7
7 -
 8
8 -
 9
9 -
 10
10 -
 11
11 -
 12
12 -
 13
13 -
 14
14 -
 15
15 -
 16
16 -
17
-
18
-
19
-
20
-
21
-
22
-
23
-
24
-
25
-
26
-
27
-
28
-
29
-
30
-
31
-
32
-
33
-
34
-
35
-
36
-
37
-
38
-
39
-
40
-
41
-
42
-
43
-
44
-
45
-
46
-
47
-
48
-
49
-
50
-
51
-
52
-
53
-
54
-
55
-
56
-
57
-
58
-
59
-
60
-
61
-
62
-
63
-
64
-
65
-
66
-
67
-
68
-
69
-
70
-
71
-
72
-
73
-
74
-
75
-
76
-
77
-
78
-
79
-
80
-
81
-
82
-
83
-
84
-
85
-
86
-
87
-
88
-
89
-
90
-
91
-
92
-
93
-
94
-
95
-
96
-
97
-
98
-
99
-
100
-
101
-
102
-
103
-
104
-
105
-
106
-
107
-
108
-
109
-
110
-
111
-
112
-
113
-
114
-
115
-
116
-
117
-
118
-
119
-
120
-
121
-
122
-
123
-
124
-
125
-
126
 |
 |