Philips HTS5506 User manual - Page 12
FUNCTIONAL OVERVIEW, 3.1. Front Panel, 3.2. Rear Panel, Front Panel, Rear Panel - f7
 |
UPC - 609585210561
View all Philips HTS5506 manuals
Add to My Manuals
Save this manual to your list of manuals |
Page 12 highlights
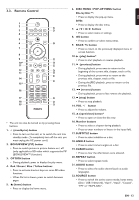
3. FUNCTIONAL OVERVIEW 3.2. Rear Panel 3.1. Front Panel 1 2 3 45 1 2* 3* 4 5 6 7 89 10 11 * The unit can also be turned on by touching these buttons. 1. Disc tray • Place a disc after opening the disc tray. 2. (open/close) button* • Touch to open or close the disc tray. 3. (play) button* • Touch to start or resume playback. 4. (stop) button • Touch to stop playback. 5. (standby/on) button • Touch to turn on the unit, or to switch the unit into standby mode. (To completely turn off the unit, you must unplug the AC power cord.) • Touch and hold for 10 seconds to shut down the unit. • This button lights up when the power is on and turns off when the unit is in standby mode. 6. SOURCE button • Touch to switch the active source mode. 7. / (previous/next) buttons • Touch to skip to the previous or next title / chapter / track / file. 8. VOL jog • Rotate to adjust the volume. 9. USB input • Connect a USB storage device or USB card reader. 10. Infrared sensor window • Receives signals from your remote control so that you can control the unit from a distance. 11. Display • Refer to "Display Panel" on page 15. C Caution • Do not connect any device other than USB storage device or USB card reader into USB input. (e.g. PC, external HDD, MP3 player, digital camera, keyboard, mouse, etc.) • Do not use an extension cord or USB hub to connect devices to this unit. Always connect one single USB storage device or USB card reader into USB input directly. 6 789 1. AC power cord • Connect to a standard AC outlet to supply power to this unit. • Unplug this cord from the AC outlet to completely turn off the unit. 2. 5.1ch Audio Out jacks (SPEAKERS (4:)) • Use to connect supplied 5.1ch speakers. 3. LAN terminal • Use to connect to network provisioning equipment such as a router or a modem with a LAN cable. 4. HDMI OUT jack • Use to connect to a display with an HDMI compatible port with an HDMI cable. 5. DIGITAL AUDIO IN (COAXIAL) jack • Use to connect to another device with a digital audio coaxial output jack with a digital audio coaxial cable. 6. VIDEO OUT jack • Use to connect a TV monitor, an AV receiver / amplifier or other device with a video cable. 7. AUDIO¬IN (AUX1 / AUX2) jacks • Use to connect to another device with audio out jacks with an audio cable. 8. FM ANT 75: jack • Use to connect the supplied FM wire antenna. 9. Wireless rear audio input • Connect to a Philips wireless module. (Model: Philips RWSS5510/F7, sold separately. Contact 1-866-309-0866 for details to purchase this wireless module.) C Caution • Do not touch the inner pins of the jacks on the rear panel. Electrostatic discharge may cause permanent damage to the unit. • This unit does not have an RF modulator. D Note Wireless Speaker and Wireless Module for Philips model: HTS5506/F7 • This unit is compatible only with Philips brand wireless speakers and wireless module (RWSS5510/F7). • Do not connect other commercially available wireless module with this unit. EN - 12
-
 1
1 -
2
-
3
-
4
-
5
-
6
-
 7
7 -
 8
8 -
 9
9 -
 10
10 -
 11
11 -
 12
12 -
 13
13 -
 14
14 -
 15
15 -
 16
16 -
 17
17 -
18
-
19
-
20
-
21
-
22
-
23
-
24
-
25
-
26
-
27
-
28
-
29
-
30
-
31
-
32
-
33
-
34
-
35
-
36
-
37
-
38
-
39
-
40
-
41
-
42
-
43
-
44
-
45
-
46
-
47
-
48
-
49
-
50
-
51
-
52
-
53
-
54
-
55
-
56
-
57
-
58
-
59
-
60
-
61
-
62
-
63
-
64
-
65
-
66
-
67
-
68
 |
 |
