Philips MCM530 User manual - Page 13
Step 2, Connecting the, speakers, Step 3, Connecting to PC, Step 4, Connecting the AC, power cord, - usb
 |
View all Philips MCM530 manuals
Add to My Manuals
Save this manual to your list of manuals |
Page 13 highlights
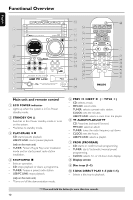
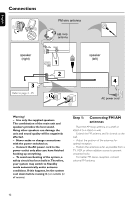
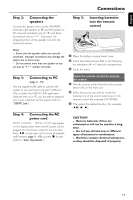
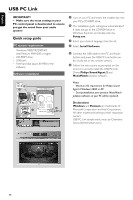
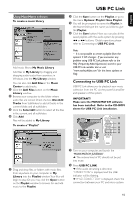
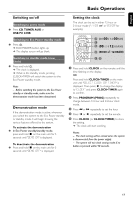
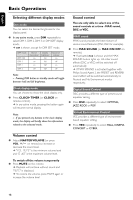
English Connections Step 2: Connecting the speakers Connect the speaker wires to the SPEAKERS terminals, right speaker to "R" and left speaker to "L", coloured (marked) wire to "+" and black (unmarked) wire to "-". Fully insert the stripped portion of the speaker wire into the terminal as shown. Step 5: Inserting batteries into the remote control 3 1 2 Notes: - Ensure that the speaker cables are correctly connected. Improper connections may damage the system due to short-circuit. - Do not connect more than one speaker to any one pair of +/- speaker terminals. 1 Open the battery compartment cover. 2 Insert two batteries type R06 or AA, following the indications (+-) inside the compartment. 3 Close the cover. Step 3: Connecting to PC (page 3 - P5) Use the supplied USB cable to connect the system to your personal computer's USB port. After installed the USB PC LINK application software onto your PC, you are able to playback your music collection via the system (refer to "USB PC Link"). Using the remote control to operate the system 1 Aim the remote control directly at the remote sensor (iR) on the main unit. 2 Select the source you wish to control by pressing one of the source select keys on the remote control (for example CD,TUNER). 3 Then select the desired function (for example Step 4: Connecting the AC power cord "AUTO INSTALL - PRESS PLAY" may appear on the display panel when the AC power cord is plugged into the power outlet for the first time. Press ÉÅ on the main unit to store all available radio stations (page 3 - P3) or press Ç to exit (refer to "Tuner Operations"). CAUTION! - Remove batteries if they are exhausted or will not be used for a long time. - Do not use old and new or different types of batteries in combination. - Batteries contain chemical substances, so they should be disposed of properly. 13
-
 1
1 -
2
-
3
-
4
-
5
-
6
-
7
-
 8
8 -
 9
9 -
 10
10 -
 11
11 -
 12
12 -
 13
13 -
 14
14 -
 15
15 -
 16
16 -
 17
17 -
 18
18 -
19
-
20
-
21
-
22
-
23
-
24
-
25
-
26
-
27
-
28
 |
 |
