Philips MX6000I User manual - Page 49
Addendum, MX6000i/37
 |
View all Philips MX6000I manuals
Add to My Manuals
Save this manual to your list of manuals |
Page 49 highlights
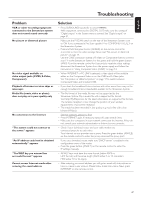
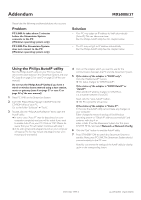
Addendum MX6000i/37 Please take the following problems/solutions into account: Problem PC LINK: It takes about 2 minutes before the Streamium System connects to the PC (Windows operating system only) PC LINK:The Streamium System does not connect to the PC (Windows operating system only) Solution - Your PC may assign an IP address to itself automatically (Auto-IP).This can take some time. Run the Philips AutoIP utility. See the chapter below. - The PC may not get an IP address automatically. Run the Philips AutoIP utility. See the chapter below. Using the Philips AutoIP utility Run the Philips AutoIP utility on your PC if you have a direct connection between the Streamium System and your PC (case B on page 23 or case D on page 25 of the user manual). Do not run the Philips AutoIP Utility if you have a wired or wireless home network using a base station, router or gateway (case A on page 21 or case C on page 24 of the user manual) 1 Press PC LINK on the Streamium System. 2 Insert the Philips Media Manager CD-ROM into the CD-ROM drive of your PC. Go to the folder "Software" ➜ "Tools". 3 Double-click the "PhilipsAutoIPutility.exe" file to start the AutoIP utility. ➜ In some cases "Auto IP" may be deactivated on your computer completely and you will be asked if you want to enable Auto IP on your PC. Click on "OK". Please be aware that your PC will restart. Continue with step 2. ➜ A list with all network adapters found on your computer will appear.The list may include old adapters that were not properly uninstalled. 4 Click on the adapter which you want to use for the communication between the PC and the Streamium System. 5 If the status of the adapter is "DHCP only": Click the "Enable AutoIP" button. ➜ The status changes to "DHCP/AutoIP". If the status of the adapter is "DHCP/AutoIP" or "AutoIP": Wait until the IP address changes to 169.254.x.x. x is a number between 0 and 255. Next, click the "Lock AutoIP" button. ➜ The PC is properly set up now. If the status of the adapter is "Static IP": In this case the AutoIP utility cannot make any changes on your computer. Either change the network settings of the Windows operating system to "Obtain IP address automatically" and continue with step 4 or enter a static IP on the Streamium System. For this, press SYSTEM MENU and select Network ➜ Network Config. 6 Click the "Exit" button to exit the AutoIP utility. 7 Press STANDBY·ON to switch the Streamium System to standby. Next, press PC LINK.The Streamium System should connect instantly to the PC now. Note:You can reverse the settings of the AutoIP utility by clicking again on the corresponding button. 3103 306 1999.3 EL6593E003 VieChr0418
-
 1
1 -
2
-
3
-
4
-
5
-
6
-
7
-
8
-
9
-
10
-
11
-
12
-
13
-
14
-
15
-
16
-
17
-
18
-
19
-
20
-
21
-
22
-
23
-
24
-
25
-
26
-
27
-
28
-
29
-
30
-
31
-
32
-
33
-
34
-
35
-
36
-
37
-
38
-
39
-
40
-
41
-
42
-
43
-
 44
44 -
 45
45 -
 46
46 -
 47
47 -
 48
48 -
 49
49 -
 50
50 -
 51
51 -
 52
52 -
 53
53 -
 54
54 -
55
 |
 |
