Philips MX6000I User manual - Page 5

Contents - review

Page 5 highlights

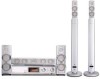
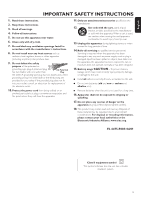
English Important safety instructions 3 General information Supplied accessories 7 Setup 7 Maintenance 7 Disc handling 7 Environmental information 7 Remote control Inserting the batteries 8 Using the remote control 8 Using the remote control to control a Philips TV ------- 8 Controls 10 Connections 11 Connecting ... Assembling of the speakers 12 Attaching the front speakers to the subwoofers --- 12 Attaching the mini speaker stands to the rear speakers 12 Attaching the rear speakers to the wall ---------- 12 Positioning of the speakers and the subwoofers ------ 12 Connecting the speakers and the subwoofers -------- 13 How to use the click fit connectors 13 Connecting the tuner antennas 13 Connecting the FM antenna 13 Connecting the AM antenna 13 Connecting the TV 14 Using Component Video (PR PB Y 14 Using Composite Video (CVBS 14 Using S-Video 14 Connecting audio equipment 15 Connections for playback 15 Connection for digital or analog recordings ------- 15 Connecting to power supply 16 Switching on the system 16 Selecting a source 16 Switching to Eco Power standby 16 Settings for the TV Check if you see a picture 17 No picture or distorted picture 17 TV Shape 17 Using the System Menu 18 Contents Volume and sound Adjusting the Volume 19 Adjusting Bass,Treble, Loudness and ClearVoice ------ 19 Listening through Headphones 19 Adjusting the Surround Sound 19 Internet and PC Link General information on INTERNET and PC LINK ----- 20 Requirements to use Internet media services ----- 20 Requirements to use PC LINK 20 How to ensure a good wireless connection ------- 20 Network name (SSID 20 WEP encryption 20 Before connecting 21 A) Wireless home network with wireless router 21 B) PC with a wireless network card or with a wireless USB adapter 23 C) Wired home network with a router 24 D) PC only with a network interface (Ethernet) card -- 25 Registration 26 About "My.Philips.com 26 Reviewing and changing network settings 26 Internet services 27 PC LINK 27 Using the colored multifunction buttons - SUBTITLE, ANGLE, ZOOM and AUDIO 28 INFO 28 FAVORITES 28 Adding a service to your favorites 28 Accessing your favorites 28 Recently used media services - RECENT 29 Multiple users - USER 29 Adding a new user 29 Selecting a user 29 Removing a user 29 Disc General Information 30 Playable Discs 30 Region Codes 30 Available disc Features 30 Disc Playback 31 Selecting next disc 31 Resume 31 Chapter Preview 31 Chapter/track selection 32 Forward and Reverse Searching 32 Searching in the System Menu 32 Time Search 32 Fast, Slow 33 Still Picture/Frame-by-Frame Playback 33 5

  • 1
  • 2
  • 3
  • 4
  • 5
  • 6
  • 7
  • 8
  • 9
  • 10
  • 11
  • 12
  • 13
  • 14
  • 15
  • 16
  • 17
  • 18
  • 19
  • 20
  • 21
  • 22
  • 23
  • 24
  • 25
  • 26
  • 27
  • 28
  • 29
  • 30
  • 31
  • 32
  • 33
  • 34
  • 35
  • 36
  • 37
  • 38
  • 39
  • 40
  • 41
  • 42
  • 43
  • 44
  • 45
  • 46
  • 47
  • 48
  • 49
  • 50
  • 51
  • 52
  • 53
  • 54
  • 55

Important safety instructions
––––––––––––––––– 3
General information
Supplied accessories –––––––––––––––––––––––––––– 7
Setup –––––––––––––––––––––––––––––––––––––––– 7
Maintenance ––––––––––––––––––––––––––––––––––– 7
Disc handling –––––––––––––––––––––––––––––––––– 7
Environmental information –––––––––––––––––––––––– 7
Remote control
Inserting the batteries ––––––––––––––––––––––––––– 8
Using the remote control –––––––––––––––––––––––– 8
Using the remote control to control a Philips TV ––––––– 8
Controls
––––––––––––––––––––––––––––––––––– 10
Connections
–––––––––––––––––––––––––––––––– 11
Connecting …
Assembling of the speakers –––––––––––––––––––––– 12
Attaching the front speakers to the subwoofers ––– 12
Attaching the mini speaker stands to
the rear speakers ––––––––––––––––––––––––––– 12
Attaching the rear speakers to the wall –––––––––– 12
Positioning of the speakers and the subwoofers –––––– 12
Connecting the speakers and the subwoofers –––––––– 13
How to use the click fit connectors ––––––––––––– 13
Connecting the tuner antennas ––––––––––––––––––– 13
Connecting the FM antenna ––––––––––––––––––– 13
Connecting the AM antenna –––––––––––––––––– 13
Connecting the TV ––––––––––––––––––––––––––––– 14
Using Component Video (P
R
P
B
Y) –––––––––––––– 14
Using Composite Video (CVBS) –––––––––––––––– 14
Using S-Video –––––––––––––––––––––––––––––– 14
Connecting audio equipment ––––––––––––––––––––– 15
Connections for playback ––––––––––––––––––––– 15
Connection for digital or analog recordings ––––––– 15
Connecting to power supply ––––––––––––––––––––– 16
Switching on the system –––––––––––––––––––––––– 16
Selecting a source ––––––––––––––––––––––––––––– 16
Switching to Eco Power standby –––––––––––––––––– 16
Settings for the TV
Check if you see a picture ––––––––––––––––––––––– 17
No picture or distorted picture ––––––––––––––––––– 17
TV Shape –––––––––––––––––––––––––––––––––––– 17
Using the System Menu
–––––––––––––––––––––– 18
Volume and sound
Adjusting the Volume ––––––––––––––––––––––––––– 19
Adjusting Bass,Treble, Loudness and ClearVoice –––––– 19
Listening through Headphones ––––––––––––––––––– 19
Adjusting the Surround Sound –––––––––––––––––––– 19
Internet and PC Link
General information on INTERNET and PC LINK ––––– 20
Requirements to use Internet media services ––––– 20
Requirements to use PC LINK ––––––––––––––––– 20
How to ensure a good wireless connection ––––––– 20
Network name (SSID) ––––––––––––––––––––––– 20
WEP encryption –––––––––––––––––––––––––––– 20
Before connecting ––––––––––––––––––––––––––––– 21
A) Wireless home network with
wireless router ––––––––––––––––––––––––––––– 21
B) PC with a wireless network card
or with a wireless USB adapter ––––––––––––––––– 23
C) Wired home network with a router ––––––––––––– 24
D) PC only with a network interface (Ethernet) card –– 25
Registration –––––––––––––––––––––––––––––––––– 26
About “My.Philips.com”
––––––––––––––––––––––––– 26
Reviewing and changing network settings ––––––––––– 26
Internet services –––––––––––––––––––––––––––––– 27
PC LINK ––––––––––––––––––––––––––––––––––––– 27
Using the colored multifunction buttons – SUBTITLE,
ANGLE, ZOOM and AUDIO –––––––––––––––––––– 28
INFO! ––––––––––––––––––––––––––––––––––––––– 28
FAVORITES –––––––––––––––––––––––––––––––––– 28
Adding a service to your favorites –––––––––––––– 28
Accessing your favorites –––––––––––––––––––––– 28
Recently used media services – RECENT ––––––––––– 29
Multiple users – USER –––––––––––––––––––––––––– 29
Adding a new user –––––––––––––––––––––––––– 29
Selecting a user –––––––––––––––––––––––––––– 29
Removing a user –––––––––––––––––––––––––––– 29
Disc
General Information –––––––––––––––––––––––––––– 30
Playable Discs ––––––––––––––––––––––––––––––––– 30
Region Codes –––––––––––––––––––––––––––––––– 30
Available disc Features –––––––––––––––––––––––––– 30
Disc Playback ––––––––––––––––––––––––––––––––– 31
Selecting next disc –––––––––––––––––––––––––– 31
Resume ––––––––––––––––––––––––––––––––––––– 31
Chapter Preview –––––––––––––––––––––––––––––– 31
Chapter/track selection ––––––––––––––––––––––––– 32
Forward and Reverse Searching ––––––––––––––––––– 32
Searching in the System Menu –––––––––––––––––––– 32
Time Search ––––––––––––––––––––––––––––––– 32
Fast, Slow ––––––––––––––––––––––––––––––––– 33
Still Picture/Frame-by-Frame Playback –––––––––––––– 33
Contents
5
English