Pioneer AVH-P5200BT Installation Manual - Page 10
Fastening the front panel
 |
UPC - 012562975900
View all Pioneer AVH-P5200BT manuals
Add to My Manuals
Save this manual to your list of manuals |
Page 10 highlights
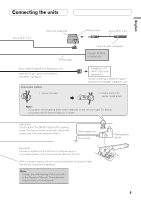
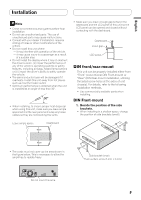
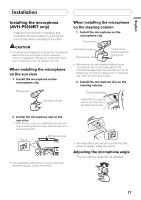
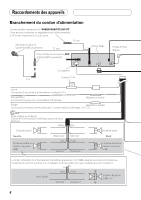
Installation 2. Install the unit into the dashboard. Insert the mounting sleeve into the dashboard. And then secure the mounting sleeve by using a screwdriver to bend the metal tabs (90°) into place. Dashboard 182 53 Mounting sleeve Side bracket Screw (2 mm × 3 mm) DIN Rear-mount 1. Determine the appropriate position where the holes on the bracket and the side of the unit match. • When installing in a shallow space, use the following screw holes. *1 Use binding screws (4 mm × 3 mm) only. *1 *1 2. Tighten two screws on each side. Use any of binding screws (4 mm × 3 mm), binding screws (5 mm × 6 mm) or flush surface screws (5 mm × 6 mm), depending on the shape of screw holes in the bracket. Screw Factory radio mounting bracket Dashboard or Console Removing the unit Extend top and bottom of the trim ring outwards to remove the trim ring. And then loosen the screws (2 mm × 3 mm) to remove the mounting sleeve. • When reattaching the trim ring, push the trim ring onto the unit until it clicks after reattaching the mounting sleeve. (If the trim ring is attached upside down, the trim ring will not fit properly.) Mounting sleeve Screw (2 mm × 3 mm) Trim ring Fastening the front panel If you do not plan to detach the front panel, the front panel can be fastened with supplied screw. Screw 10
-
 1
1 -
2
-
3
-
4
-
 5
5 -
 6
6 -
 7
7 -
 8
8 -
 9
9 -
 10
10 -
 11
11 -
 12
12 -
 13
13 -
 14
14 -
 15
15 -
16
-
17
-
18
-
19
-
20
-
21
-
22
-
23
-
24
-
25
-
26
-
27
-
28
-
29
-
30
-
31
-
32
 |
 |
