Pioneer AVIC-5200NEX Owner s Manual - Page 12
How to use the map - navigation not working
 |
View all Pioneer AVIC-5200NEX manuals
Add to My Manuals
Save this manual to your list of manuals |
Page 12 highlights
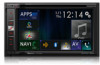
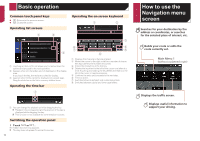
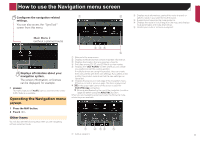
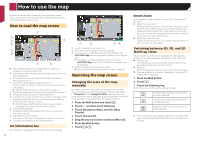
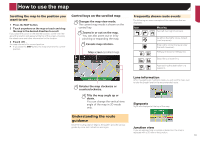
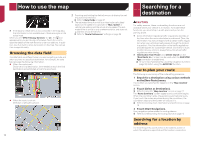
How to use the map Most of the information provided by your navigation system can be seen on the map. You need to become familiar with how information appears on the map. How to read the map screen 1 2 3 9 4 5 6 7 8 p The following information marked with an asterisk (*) appears only when a route is set. p Depending on the conditions and settings, some items may not be displayed. 1 Shows the number and name of the street to be used (or next guidance point).* 2 Shows the next guidance point (maneuver).* The type of the event (turn, traffic circle, exiting freeway, etc.) is displayed. Refer to Frequently shown route events on page 13 3 Shows the distance to the next guidance point (maneuver).* 4 Shows the maneuver after the next maneuver.* 5 Indicates the current location of your vehicle. The apex of the triangular mark indicates your orientation and the display moves automatically as you drive. p When there is no GPS position, the triangular mark is transparent. It shows your last known position. 6 Displays the data field. 7 Shows the name of the street (or city) that your vehicle is traveling on (or in). 8 Indicates the current route.* The route currently set is highlighted in color on the map. 9 Indicates the progress to the final destination.* AV information bar AV information is displayed at the bottom of the map screen. 12 1 2 34 1 Touch to display the AV source list. 2 Shows the current status of AV source briefly. 3 You can turn on or off the communication between the AVICSYNC App and the navigation system by touching the key. p This setting is always turned on when you use the AVICSYNC App on an iPod / iPhone (the setting cannot be changed). 4 Touch to display the phone menu screen. Refer to Displaying the phone menu screen on page 32 Operating the map screen Changing the scale of the map manually By default, even if the map scale is changed on the scrolled map, it will return to the preset scale (according to the setting in "Viewpoint"of the "Navigation Map" settings) when the current position map is displayed. If you change the scale of the current position map, perform the following procedure. 1 Press the MAP button and touch . 2 Touch , and then touch [Settings]. 3 Touch [Navigation Map], and then [Map Display]. 4 Touch [Viewpoint]. 5 Drag the pop-up window and touch [Manual]. 6 Press the MAP button. 7 Touch or . Smart Zoom Your navigation system features "Smart Zoom" that works in two ways: When the route is set: When approaching a turn, "Smart Zoom" will zoom in and raise the view angle to enable you to easily recognize your maneuver at the next junction. If the next turn is at a distance, it will zoom out and lower the view angle to be flat so you can see the road in front of you. When the route is not set: "Smart Zoom" will zoom in if you drive slowly and zoom out when you drive at high speed. Switching between 2D, 3D, and 2D North up views You can switch how the map is displayed. For 2D map view mode, you can select between "Heading up" and "North up". Heading up: The map display always shows the vehicle's direction as proceeding toward the top of the screen. North up: The map display always has north at the top of the screen. p The map orientation is fixed at "Heading up" when the 3D map screen is displayed. 1 Press the MAP button. 2 Touch . 3 Touch the following key. Each time you touch the key the setting changes. Indicates 2D Heading up view mode is currently selected. Indicates 3D Heading up view mode is currently selected. Indicates 2D North up view mode is currently selected. p There is a limit to map scaling in 3D map view mode. If the map scale is zoomed out further, the map is zoomed out in 2D map.
-
 1
1 -
2
-
3
-
4
-
5
-
6
-
 7
7 -
 8
8 -
 9
9 -
 10
10 -
 11
11 -
 12
12 -
 13
13 -
 14
14 -
 15
15 -
 16
16 -
 17
17 -
18
-
19
-
20
-
21
-
22
-
23
-
24
-
25
-
26
-
27
-
28
-
29
-
30
-
31
-
32
-
33
-
34
-
35
-
36
-
37
-
38
-
39
-
40
-
41
-
42
-
43
-
44
-
45
-
46
-
47
-
48
-
49
-
50
-
51
-
52
-
53
-
54
-
55
-
56
-
57
-
58
-
59
-
60
-
61
-
62
-
63
-
64
-
65
-
66
-
67
-
68
-
69
-
70
-
71
-
72
-
73
-
74
-
75
-
76
-
77
-
78
-
79
-
80
-
81
-
82
-
83
-
84
-
85
-
86
-
87
-
88
-
89
-
90
-
91
-
92
 |
 |
