Pioneer AVIC-5200NEX Owner s Manual - Page 21
Registering and editing locations and, routes, Receiving real - navigation receiver
 |
View all Pioneer AVIC-5200NEX manuals
Add to My Manuals
Save this manual to your list of manuals |
Page 21 highlights
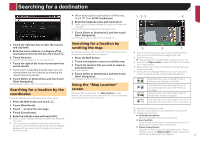
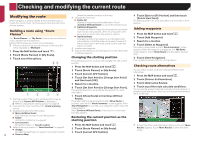
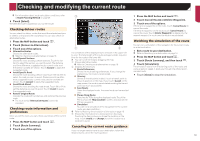
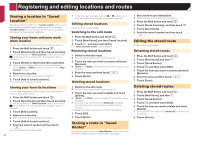
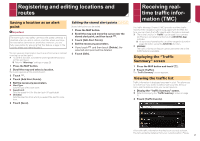
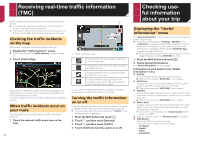
Registering and editing locations and routes Saving a location as an alert point Important The warning for road safety cameras (like speed cameras) is disabled when you are in certain countries where warnings for road safety cameras are prohibited. However, you are fully responsible for ensuring that this feature is legal in the country where you intend to use it. You can save any map location (such as a school zone or railroad crossing) as an alert point. p To use this function, activate the warnings beforehand and set the alert types. Refer to "Warnings" settings on page 26 1 Press the MAP button. 2 Scroll the map and select a location. The cursor appears at the selected point. 3 Touch . 4 Touch [Add Alert Points]. 5 Set the necessary parameters. Alert Type: Sets the type of the alert point. Speed Limit: Sets the speed limit for this alert point (if applicable). Direction: Sets the direction from which you expect the alert to come from. 6 Touch [Save]. Editing the stored alert points Stored alert points can be edited. 1 Press the MAP button. 2 Scroll the map and move the cursor over the stored alert point, and then touch . 3 Touch [Edit Alert Points]. 4 Set the necessary parameters. If you touch and then touch [Delete], the selected alert point will be deleted. 5 Touch [Edit]. Receiving realtime traffic information (TMC) The Traffic Message Channel (TMC) provides real-time traffic reports. If the navigation system is equipped with the TMC feature, you can check the traffic reports and information received. p The online function in "Traffic" can be used if you connect an iPhone or a smartphone that has the AVICSYNC App installed. Be sure read Expanding the use of the navigation functions (page 29) before using the AVICSYNC function. p 5200NEX The traffic information feature can be used when the online traffic feature is available. Displaying the "Traffic Summary" screen 1 Press the MAP button and touch . 2 Touch [Traffic]. The "Traffic Summary" screen appears. Viewing the traffic list Traffic information is displayed onscreen in a list. This allows you to check how many traffic incidents have occurred, the locations, and the distance from your current position. 1 Display the "Traffic Summary" screen. Refer to Displaying the "Traffic Summary" screen on page 21 2 Touch [Traffic Events]. A list with traffic information that has been received is shown. The list is sorted by distance from your current position. Places 21
-
 1
1 -
2
-
3
-
4
-
5
-
6
-
7
-
8
-
9
-
10
-
11
-
12
-
13
-
14
-
15
-
 16
16 -
 17
17 -
 18
18 -
 19
19 -
 20
20 -
 21
21 -
 22
22 -
 23
23 -
 24
24 -
 25
25 -
 26
26 -
27
-
28
-
29
-
30
-
31
-
32
-
33
-
34
-
35
-
36
-
37
-
38
-
39
-
40
-
41
-
42
-
43
-
44
-
45
-
46
-
47
-
48
-
49
-
50
-
51
-
52
-
53
-
54
-
55
-
56
-
57
-
58
-
59
-
60
-
61
-
62
-
63
-
64
-
65
-
66
-
67
-
68
-
69
-
70
-
71
-
72
-
73
-
74
-
75
-
76
-
77
-
78
-
79
-
80
-
81
-
82
-
83
-
84
-
85
-
86
-
87
-
88
-
89
-
90
-
91
-
92
 |
 |