Pioneer AVIC-W6500NEX Owners Manual - Page 145
A-EQ&TA Measurement]
 |
View all Pioneer AVIC-W6500NEX manuals
Add to My Manuals
Save this manual to your list of manuals |
Page 145 highlights
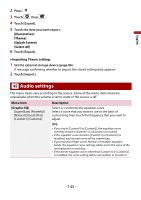
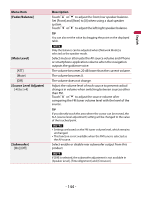
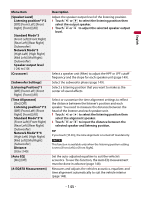
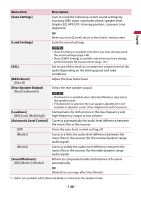
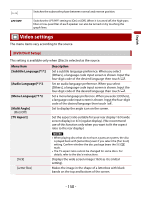
English Menu Item [Speaker Level] Listening position*1*2 [Off] [Front Left] [Front Right] [Front] [All] Standard Mode*3 [Front Left] [Front Right] [Rear Left] [Rear Right] [Subwoofer] Network Mode*3 [High Left] [High Right] [Mid Left] [Mid Right] [Subwoofer] Speaker output level [-24] to [10] [Crossover] [Subwoofer Settings] [Listening Position]*1 [Off] [Front Left] [Front Right] [Front] [All] [Time Alignment] [On] [Off] Listening position*1*2 [Off] [Front Left] [Front Right] [Front] [All] Standard Mode*3*4 [Front Left] [Front Right] [Rear Left] [Rear Right] [Subwoofer] Network Mode*3*4 [High Left] [High Right] [Mid Left] [Mid Right] [Subwoofer] Distance [0] to [140] [Auto EQ] [On] [Off] [A-EQ&TA Measurement] Description Adjust the speaker output level of the listening position. 1 Touch or to select the listening position then select the output speaker. 2 Touch or to adjust the selected speaker output level. Select a speaker unit (filter) to adjust the HPF or LPF cutoff frequency and the slope for each speaker unit (page 149). Select the subwoofer phase (page 149). Select a listening position that you want to make as the center of sound effects. Select or customize the time alignment settings to reflect the distance between the listener's position and each speaker. You need to measure the distance between the head of the listener and each speaker unit. 1 Touch or to select the listening position then select the alignment speaker. 2 Touch or to input the distance between the selected speaker and listening position. TIP If you touch [TA On], the time alignment is turned off mandatorily. NOTE This function is available only when the listening position setting is set to [Front Left] or [Front Right]. Set the auto-adjusted equalizer to suit the vehicle's acoustics. To use this function, the Auto EQ measurement must be done in advance (page 148). Measures and adjusts the vehicles acoustics, equalizer, and time alignment automatically to suit the vehicle interior (page 148). - 145 -
-
 1
1 -
2
-
3
-
4
-
5
-
6
-
7
-
8
-
9
-
10
-
11
-
12
-
13
-
14
-
15
-
16
-
17
-
18
-
19
-
20
-
21
-
22
-
23
-
24
-
25
-
26
-
27
-
28
-
29
-
30
-
31
-
32
-
33
-
34
-
35
-
36
-
37
-
38
-
39
-
40
-
41
-
42
-
43
-
44
-
45
-
46
-
47
-
48
-
49
-
50
-
51
-
52
-
53
-
54
-
55
-
56
-
57
-
58
-
59
-
60
-
61
-
62
-
63
-
64
-
65
-
66
-
67
-
68
-
69
-
70
-
71
-
72
-
73
-
74
-
75
-
76
-
77
-
78
-
79
-
80
-
81
-
82
-
83
-
84
-
85
-
86
-
87
-
88
-
89
-
90
-
91
-
92
-
93
-
94
-
95
-
96
-
97
-
98
-
99
-
100
-
101
-
102
-
103
-
104
-
105
-
106
-
107
-
108
-
109
-
110
-
111
-
112
-
113
-
114
-
115
-
116
-
117
-
118
-
119
-
120
-
121
-
122
-
123
-
124
-
125
-
126
-
127
-
128
-
129
-
130
-
131
-
132
-
133
-
134
-
135
-
136
-
137
-
138
-
139
-
 140
140 -
 141
141 -
 142
142 -
 143
143 -
 144
144 -
 145
145 -
 146
146 -
 147
147 -
 148
148 -
 149
149 -
 150
150 -
151
-
152
-
153
-
154
-
155
-
156
-
157
-
158
-
159
-
160
-
161
-
162
-
163
-
164
-
165
-
166
-
167
-
168
-
169
-
170
-
171
-
172
-
173
-
174
-
175
-
176
-
177
-
178
-
179
-
180
-
181
-
182
-
183
-
184
-
185
-
186
-
187
-
188
-
189
-
190
 |
 |
